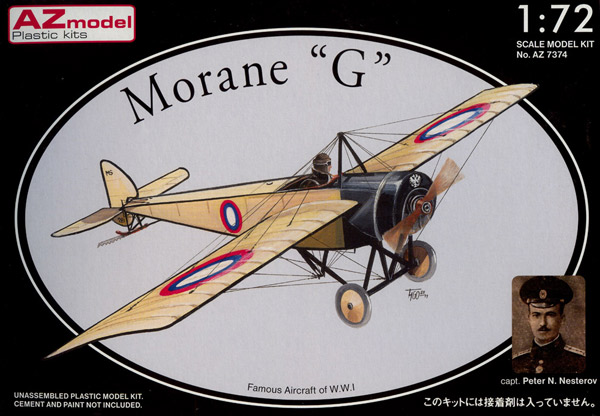
AZmodel 1/72nd Morane Saulnier Type G/H and Pfalz E.I
By Pedro Nuno Soares
When I first reviewed AZ’s 1/72nd Morane Parasol/Pfalz A.I for your favorite modeling e-zine, I mentioned that due to the general shape and size of the main parts of these early Moranes and their Teutonic cousins evidencing a lot of inbred DNA it wouldn’t surprise me to see AZ making use of the research and work done on the Parasol to later issue a Morane Type G or H.
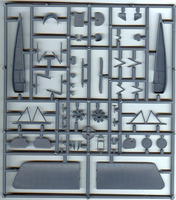
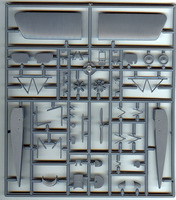
And so the day has cometh, and all in one go, making the best use of a single sprue with 57 parts, AZ has recently issued three new boxings for the same product, in the shape of a Morane G, a Morane H and a Pfalz E.I.
The Box
The first thing you can’t help noticing is the quality of the packaging for these 3 new kits. Gone are the flimsy thin cardboard boxes of yore, replaced by much improved, thicker cardboard boxes each containing a cardboard “tray” with the usual sealed plastic bag wherein sprue, instruction sheet, decals and (for the G) a tiny PE fret, await defloration by the eager modeler.
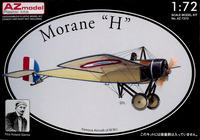
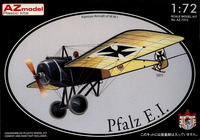
The upper face of the box features a classy “medallion” with nice artwork of the subject of the kit, while the back is used to depict the painting instructions for the options provided, a la FROG of way back when…. (sigh….)
One think I couldn’t help notice too was the “Caution” notice on the sides of the box (in English and Japanese). After reading this ever growing notices, I can’t help but feel that I (like you probably, dear reader) am a true survivor: after all I started modeling when I was 9, without parental guidance, and even though the dangers were many and very real, it seems, I managed not to get harmed by not respecting, for instance, item 3: “cut the parts off properly and throw the waste parts into the dustbox at once”, or the even more serious item 4, that tells us “not to play with the parts for any other purpose…”
Oh well…
What’s Inside
The quality of the moulding is on par with what AZ has given us before, with mostly flash free (only the 2 engines show evidence of unwanted extra plastic), well defined parts, even if, as usual, one or two of the smaller items (like the footrests, for example) probably due to the limitations of the manufacturing process used, do seem to be a bit overscale. These are very easy to replace by homemade, more true to scale, parts, so the choice is yours…
Also the trailing edge of the wings and rear control surfaces could be thinner but since this is not easy to correct given that it implies destroying part of the rib detail, it’s probably best to leave it as it is, unless you feel like replacing the rib detail too.
In terms of options, you get 2 engines – an 80 hp nine cylinder le Rhone, and an 80 hp 7 cylinder Gnome 80/Oberursel U0, plus the parts needed to make the two different types of undercarriage used by these early birds.
Mention should also be made to the fact that you do get the strange basket cum seating board seat for the original two seater G.
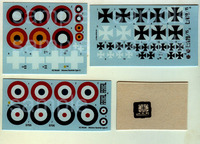
Besides the sprue, you get an instruction sheet, decals and, as mentioned above, a tiny PE fret, in the Type H kit.
Accuracy
It is not easy to judge the dimensional accuracy of these early airplanes, because different manufacturing series would often produce minor (and not so minor) differences between examples of the same type of aircraft.
A quick check of the entry for the Type G in the Davilla, Soltan Book, for instance, yields 5 variations on the main theme, with different combinations of wingspan and length and while the former should not leave much doubt has to how it is measured, given the absence of dihedral, the later is a different story altogether since not only the reference points for length to be determined might differ but also different engines might dictate longer cowlings.
In the end, for lack of better reference, I ended up using the drawings in the Davila, Soltan book to check the parts against them and here’s what I found:
Type G:
Fuselage:
Length, width and shape are fine. The only thing missing is the front end access panel. Given the fact that this seems to be a very variable feature, being sometimes nonexistent, AZ chose not to include it. Again it’s an easy feature to reproduce, either by scribing or by gluing a thin, cut to shape, panel at the front end of the fuselage.
Wings:
Chord and span are fine but the drawings show a different contour at the TE tip. This is very easy to modify too, with the help of a file and wet and dry (w&d). The location of the ribs though doesn’t totally match, this being more apparent in the outer 5 ribs.
Control surfaces:
The contour of the horizontal stabilizers doesn’t match the drawings but again 2 minutes with a bit of 400 grit w&d will do the trick. The vertical stabilizer though is best discarded and replaced by a new bigger one, cut from 10 thou plastic sheet
Type H and the Pfalz:
In general terms, the H had a shorter fuselage than the G (again lengths and spans seem to be very variable, so I’ll refer to the information and drawing provided in the Davila Soltan book). This means that the provided fuselage should be reduced in length, what again is a very simple operation, entailing reprofilling the rearmost part of the fuselage. The access panel will gain of course be nonexistent, so comments made above to the G type will naturally apply.
Wings:
A shorter span means cutting off a section of the wing chordwise, as the instructions clearly suggest you do. Still, if you do as the instructions suggest, i.e., removing the section between the first 2 ribs at the wing root, the resulting wing will not only feature the rib location mismatch that I pointed out for the G type, but will also make it very hard to correct the contour at the leading edge outer tip, that will now be too short.
The very good news is that if you leave the wing as it is, and only reshape the tip by means of file and w&d, again a level 1 operation, you will not have to extend the tip to reprofile it and the location of the ribs will be a perfect match.
Control surfaces:
As per Type G
Finishing Options
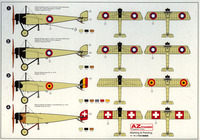
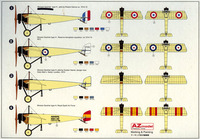
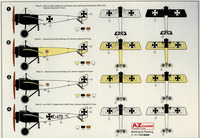
AZ isn’t shy when it comes to offer finishing suggestions, and each kit has decals for 4 options (with the honorable exception of one of the H options, a civilian machine, with no markings at all).
Beginning with the G:
- n. 316, 4th Corps Detachment, March 1915, pilot Alexander A. Kozakov – Russian Imperial Air Force
- n. 281, 11th Corps Detachment, September 1914, pilot Petr N. Nesterov Russian Imperial Air Force
even if they are similarly marked, each of these machines feature an add-on in the form of a small PE detail, that makes them unique and illustrate two of the strangest stratagems that were ever tried to inflict damage on adversary aircraft.
In fact, the story of Alexander Kasakov attempts to down enemy aircraft by hooking explosives onto them in mid flight and later by ramming them, is well known and so is that of Petr Nesterov, the first man to loop the loop, who first tried attaching a long dented knive to the tail skid to rip the fabric of the opponent’s aircraft apart, in avant la lettre James Bond fashion and would eventually die after ramming a german adversary.
AZ provides both the hook and the knife in PE, something I find very nice and well thought. Incidentally, according to my references, these 2 machines, should probably have spoked wheels.
- A Belgian G2 (double seater) ca. 1915.
- the single Type G bought by the Swiss Air Force, n. 24. Dübendorf, ca. 1914
The H:
- Roland Garros mount, ca. 1914-15
- Reserve Aeroplane Squadron, ca. 1914-15, RFC
- A machine piloted by Gustav Hamel, danger race, Daily Mail’s Derby, London 1913
- A type ha of the Royal Spanish Air Force
The Pfalz E.I:
- a machine flown by Max Holtzen, as test pilot for Pfalz, 1916, German Imperial Air Force
- an aircraft of the Bavaria air service, training unit, German Imperial Air Force
- same as above, white fuselage, a opposed to the CDL fuselage of the previous option.
- n. 479/15, Eastern front, German Imperial Air Force
What I really think:
As far as I can remember, these are the only injected Type G and H Morane-Saulnier on the market and they do have what it takes to do an excellent model, in line with the previous Parasol offering, that I too have assembled.
My only nitpick would be the thickness of the trailing edge of the wings, given the fact that it won’t be an easy correction.
Since rigging, if well planned, won’t be too difficult and since there are no inter-wing struts to assemble, this would make a very good model for the early aviation / WW1 aircraft newcomer and I do recommend it for beginner and advanced modelers alike.
Thanks to AZmodel for the review samples.
References
French Aircraft of the First World War, Dr. james J. Davilla and Arthur M. Soltan, FMP, 1997

