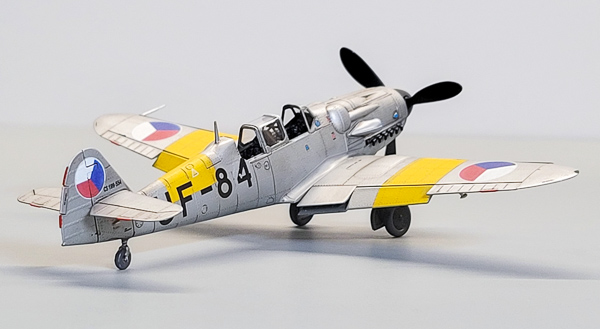
Eduard's 1/72 Avia CS-199
By Chris Banyai-Riepl
Overview
The interesting situation post-war in Czechoslovakia saw the nation needing to build up a fighter force but do so cheaply. With plenty of former Luftwaffe Bf 109G/K airframes across the country, it was a somewhat simple task to get some of those airworthy and use them as interim fighters until better types could be affordably sourced. An explosion at a factory where nearly all the DB 605 engines were stored changed those plans, and the decision to mate the plentiful Jumo 211 engines to Bf 109 airframes was undertaken.
The Jumo 211 engine was designed for bomber usage, as was the wide-bladed wooden VS-11 propeller, which did not lend itself well to being married to a fighter aircraft. The massive torque, ideal for bombers, wreaked havoc with the S-199 and its narrow-track landing gear, necessitating a dedicated trainer version to try and lower the number of S-199 crashes. The result was the CS-199, a two-seat trainer of which roughly 80 were produced. Even with these trainer aircraft, though, crashes still occurred, and the CS-199 was not immune with many of those also succumbing to those same dangers.
The Kit
The two-seat Bf 109 and CS-199 has always been a favorite of mine, but unfortunately it has not been a popular modeling subject. There have been a few kits of the Bf 109G-12 out recently, but only the KP kit dating back to the 1970s covered the CS-199. With the success of Eduard’s S-199s it is no surprised that they tooled up the two seater, though, and given the absolute joy the single seaters were, I had to tackle the two seater as well.
Unlike the single seaters, there’s not much to choose from in the way of colors for this one, as all the CS-199s were finished in silver. This means you don’t have to worry about different options in the plastic, either, other than the usual open or closed canopy and PE or decal instruments. So, without much prep to worry about, I jumped right into the cockpit. As I was building this alongside two single seat S-199s, I combined a lot of the painting steps, but unfortunately did not notice that I had the wrong cockpit color until after the model was assembled & decaled. So while my photos show the cockpit in RLM 66 (which was the color the single seat S-199s were painted), the CS-199 cockpits were actually finished in RLM 02. Lesson learned, always pay close attention to the instructions.

|

|
Aside from that faux pas, the interior went together beautifully, as expected. I finished it with Vallejo paints, and weathered it with a combination of AK Interactive, Tamiya, and Vallejo weathering materials. I went for a more well-used look as it was a trainer, but realistically not much can be seen even with an open cockpit. Granted, had I painted it the right color much of this detail might show up better. Yep, I’m still beating myself up on that. Guess I’ll just have to build another one and get it correct, right?
With the interior done, the rest of the assembly was very simple and straightforward, and given how everything just clicked together, was quite relaxing. That said, there are two areas that I wish Eduard had done a bit differently. One is the molded-in wing pitot tube. That broke off without much effort. I think they anticipated that, though, as there is a spare provided in the parts. It probably would be better to just have that molded separately and added later.

|

|
Â
The second is also something that broke off, and was a common problem I had with the single seaters, and that was the tailwheel. The kit has you sandwich this between the fuselage halves during assembly, but the connection is very petite and to scale, so it is far more fragile than you might think. It would have been nice to have this be something that could be added after doing the rest of the assembly, just to keep that intact and maintaining all the molded detail.

|

|
With all the assembly done it was time to prepare for painting, and here was a nice little side benefit to Eduard including both an open and a closed canopy option. As I wanted to have this model finished with the canopy open, I used the one-piece closed canopy as a masking block for the cockpit. I pushed some blue tack into the cockpit piece and pressed it in place, effectively sealing off the cockpit area without having to worry about masking around complex shapes. With that in place, I sprayed a base coat of white, followed by yellow for the ID bands, then masked those and painted the silver. A gloss and it was time for decals.

|

|
Decaling with Eduard’s new version of decals is surprisingly effortless. While they have a large clear film, this film disappears quickly with setting solutions and blends the decal in beautifully with the rest of the paint scheme. Once the main decals were on, the rest of the stencils were applied, and that step took significantly longer than the main markings. That’s a good thing, as all those stencils really help break up the broad swaths of silver on this model, and do a great job of improving the overall realism. With the decals on, all that was left was to do the last bits of assembly: add the landing gear, propeller & spinner, and all the other small bits, and this attractive two seat Avia is done.
Conclusion
Like Eduard’s single-seater S-199s, this model is one of the best out there for an out of the box build. Easy to assemble, detail that rivals aftermarket sets, and great decal options, this kit is a perfect distraction for those more complicated models out there. My thanks to Eduard for providing the kit.
