Tomasz Gronczewski 1/48 Photo-Etched Lewis Machine Gun
By Sanjeev Hirve
 |
Introduction
When I heard that Tomasz Gronczewski was offering his own Photo-etch version of the Lewis Machine gun, I said to myself, "Yet another offering of the Lewis gun kit! Who needs another one?" Still, by sheer coincidence, I happened to be looking for a shoulder-stock version of the Lewis for my FE2.b and Tomasz's fret had it. I ordered it and decided to wait for it. As it turns out, it was definitely worth the wait.
The Lewis Machine Gun
The Lewis machine gun was one of the most popular aerial armament of the Great War. It saw extensive service with the British, the French, Italians, the USAS, and Russia. Despite inherent problems with synchronizination, it remained quite popular with the Entente. This is attributed "...in some measure to the fact that no belt was used, and the gun [was] well balanced" [HW].
The gun started out as a light infantry weapon and evolved considerably during its adaption for aerial use by the various services. Some of the many changes included lightening the gun by stripping of the barrel sleeve and the cooling radiator. The shoulder stock was replaced by a spade grip for easy handling, though there is indication [FL] that some FE2.b squadrons may have later reverted to the shoulder stock for single-handed use.
The Kit
This photo-etch product is Tomaszís own design. It is his 'beta' version, since he plans to upgrade it with a lot more features for production.
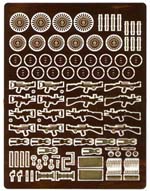
The kit consists of one fret of 0.2 mm brass. This holds enough parts to make two guns with shoulder stocks and two guns with spade grips. Additionally, it has enough parts to make about five small (No.4) magazines or four (No. 5) large magazines.
Possible variants of the Lewis include the fully stripped version with or without the radiator fins, the RFC Mk II 'light case' version, and the French Darne-built version which had a vented sheath under the gas tube. These cover almost all the aerial versions of the Lewis. Thoughtfully included are Norman vane foresights, ring backsights and tangent backsights.
Upon close examination, I was struck by the thought and skill that went into the design of this kit. The kit stands out well in several respects.
Firstly, the kit extensively uses three-level etching adding soft contours to an essentially flat medium.
Next is the use of layers to build up the various assemblies. Typically, with other kits, one expects to use styrene or resin to build the solid parts. Instead, this kit uses finely etched brass to build most of the gun body. By combining these two techniques, this kit has, in my opinion, achieved a quantum leap in quality over other kits.
A lot of attention has been paid to ease of construction. The receiver has a hole for the cocking levermaking it easier to align the four layers. A mounting tab and slots are provided for the magazine as well as its handle.Holes are provided for attaching the back-sights (though, none for the front sights).The piéce de résistance is the the radiator assembly. This consists of two rings that slip on the barrel and set of triangular fins that attach to them. Tabs on the fins fit into annular slots on the rings ñ yet another example of thoughtful design.
The Build
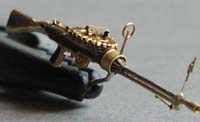
 I decided to build one shoulder-stock version gun for my Aeroclub FE2.b. Also, I chose the semi-stripped version with the exposed radiators. I chose this variant because they made for an interesting and different subject.
The first step was to assemble the receiver which consists of four layers and a two-layer feed cover. Before proceeding, I filed and sanded the shoulder-stock and coated it with thick CA for a smooth finish.
Next, I made the barrel from Minimeca 0.5 mm steel tube, and 0.015 inch brass wire for the gas tube.
To simulate the flash suppressor,  I soldered a short piece of .030 inch brass tube over the muzzle and filed and reamed it to a conical shape. The next step was the radiator assembly. To assemble the radiator, I slipped the rings onto the barrel, attached the barrel to receiver,
  and then glued the rings in place with CA. Once the CA set, I scraped off the excess with a sharp knife. The fins went on next. Again, I scraped out as much excess CA as possible from the crevices.
Finally I curled and wrapped the broad cover around the radiator. I spent about two hours assembling the radiator alone, but it was all downhill after that.
I cut the gas tube  to size and attached it (vainly trying to keep the glue from flowing between the two tubes). A piece of .002 inch brass was used to cover the gas chamber. The ring back-sight went on easily enough, but the Norman vane foresight has fallen off thrice so far.
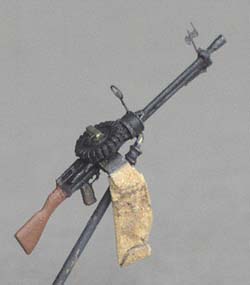
I spray painted the gun and the magazine, with a mix of black and gloss blue, and the stock with Testors 'Military brown'. The bag was painted beige with a light overspray of brown. Next, I drybrushed the highlights with Testors Steel followed by a black enamel wash. Finally I sprayed it with Testors Flat clear acryl.
I am not too good at finishing – in my opinion, my painting obscured the fine detail of this kit.
In conclusion
I have built or examined 1:48 Lewis Guns from Copper State, Fotocut, Eduard, Tom's Modelworks, and Aeroclub. Without doubt, in my opinion, this kit surpasses them in quality as well as the variations it offers.
It does lack a few features that would go toward making it perfect. The kit does not provide parts for the various mounting hardware. The front-sight attachment could be improved – Fotocut has a much better design for this. Some hardware for the ejection chute would also be nice to have.
But, as Tomasz pointed out, this was his pre-production trial. The production version from PART promises to address these and add a lot more parts and variants to the kit. I am looking forward to it eagerly!
References
-
[HW] Early Aircraft Armament – The Aeroplane and the Gun up to 1918; Harry Woodman, Arms & Armour Press, Ltd. ISBN 0-85368-990-3
-
[FL] Horses don't fly; Frederick Libby, Arcade Publishing, Inc. ISBN 1-55970-526-4
-
[MAN] Van Nostrand's Lewis Gun Manual, (copy is available on the Web atwww.fenrir.com)
