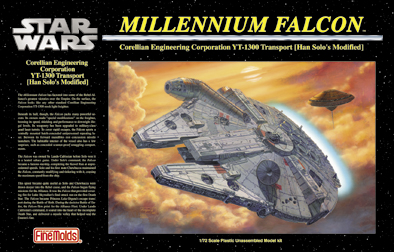
Fine Molds 1/72 Millenium Falcon
By Brad Fallen
Wow!
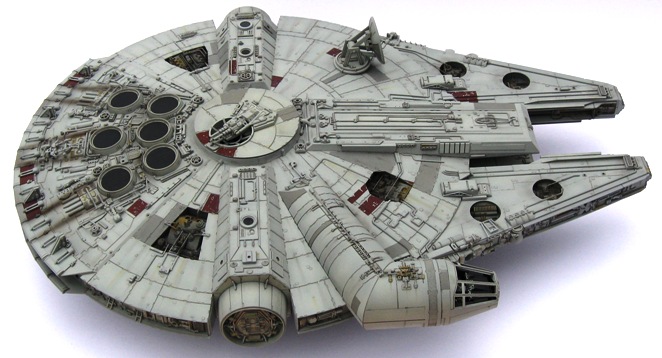 I can still remember my reaction when I saw the Millennium Falcon zooming into space from Mos Eisley in the first Star Wars movie in 1977. It was the same when she took on the Imperial fleet (with an asteroid field thrown in to boot) in The Empire Strikes Back. Fast forward to 2007, it was the same again when I spied Finemolds’ kit of the Falcon for sale at our club’s annual comp – although it did take me several months to work up the nerve to spend over $250 on a kit of an imaginary spaceship. But hey, it’s the Falcon – and once I got the box home and open, I knew I had made the right decision. Wow.
History
 What? This machine has a history? Well, if you’re a dedicated Star Wars aficionado – and by that I don’t just mean the movies, but the whole alternative universe – you’ll know that the Falcon has a very long and complicated history, which I won’t even try to explain. Go to Wookieepedia.com and have a look for yourself.
The kit
It is hard to describe how amazing, and intimidating, this kit looks on its sprues – all 14 of them, plus the integrally-moulded upper and lower hull halves, a bag of screws, some poly caps, a big decal sheet, and an A4 sized 34-step instruction booklet (most of which is in Japanese, but the pictures and numbering are very clear – you can’t go wrong, particularly if you cross off parts and assemblies as you use/complete them). Without raving any further, I’ll refer you to John Rich’s first look review of the kit here in Internet Modeler’s January 2007 edition.
 Unfortunately, as good as they are, the kit mouldings aren’t perfect. The most annoying problems in my example were extensive sink marks around the perimeter of the upper and lower hulls, and on the lower hull gear bays. The latter were an easy fix – I covered them with appropriately cut lengths of 5/32 Evergreen, which if you didn’t know weren’t supposed to be there, you wouldn’t even notice. The perimeter sink marks were harder to fix, requiring extensive filling and then careful sanding to avoid removing the beautiful raised detail on the hulls. For the same reason, it was difficult to remove a couple of prominent mould seams running the length of both hull halves. I wasn’t able to fix either problem completely, but after painting, weathering and a final flat coat, they’re not as obvious as they were on the bare plastic. Not having seen any other copies of the kit, I don’t know if this is a common problem, or was unique to my example.
Construction
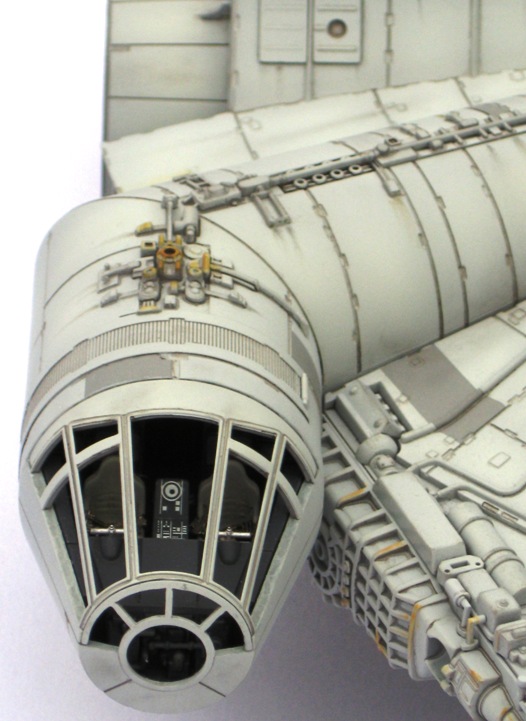 Now, I know I’m a slow builder, but I defy anyone to rush this kit and do it justice at the same time. It is a kit to be savoured. I started the build in September 2007, and finished it in February 2009, working on it almost continually over this period.
With so many steps, many of which only come together in the last stages of the build, to an extent it doesn’t matter where you start. I began at step 21, gluing on large numbers of small parts to the lower hull. This is a key element of the kit’s design – building up layers of gradually overlapping detail. My observations of the build process are as follows.
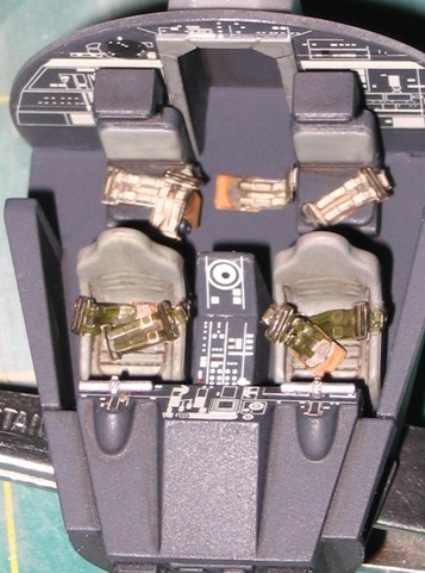 Steps 1-4: Cockpit. All parts fit together well. I used Floquil’s Grimy Black enamel as the base colour, with custom-mixed greys for the four seats – which I spruced up with Eduard 1/72 pre-painted seatbelts (US Navy WW2). Evidence for seat belts in the Falcon comes from The Empire Strikes Back when Han Solo uses one to restrain C3PO, but the style I have used is conjectural – so far as I am aware there are no aftermarket belts (or anything else) for this kit! The multiple instrument decals go on well and look excellent. Also great are the canopy choices provided by Finemolds –traditional clear styrene or studio-style glass-less framing. I chose the latter, mainly because I’m hopeless at painting clear canopies without a mask, but also because it would be easier to see the detail I’d added.
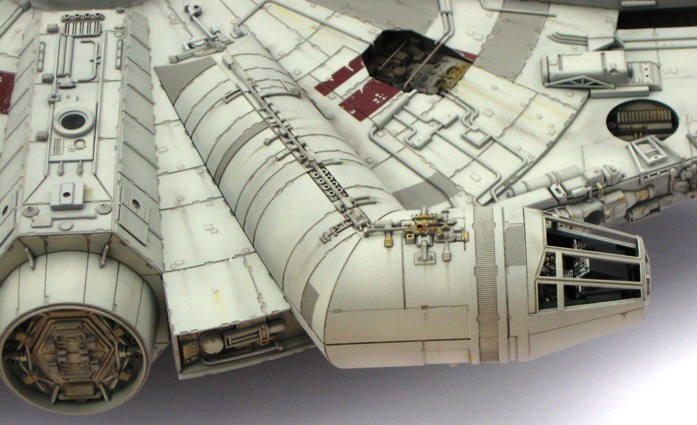 The cockpit stalk was now painted, decaled, weathered and set aside for adding in the final stages of assembly. The fit here was so good that it just clipped to the hull without glue or filler.
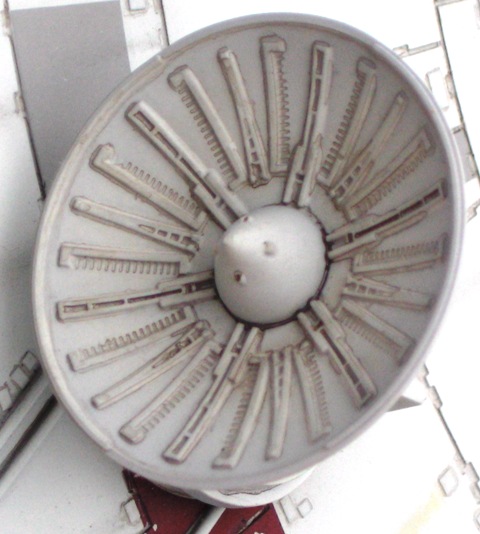 Step 5: Radar dish. This is a fiddly little assembly – the only one on the kit where I needed to reinforce joins (those holding the dish to its supports) with some wire. Again, this was set aside until final assembly, when it is a simple twist fit.
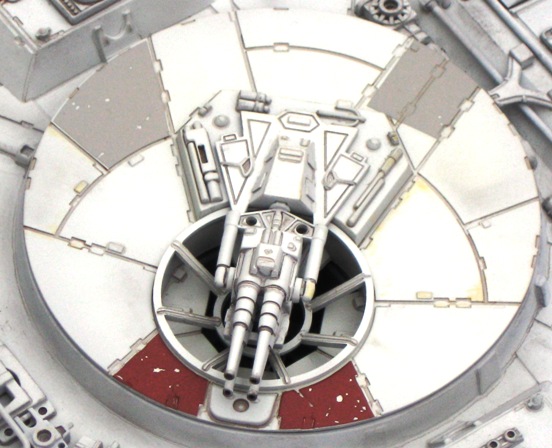 Step 6: Upper and lower turrets. These two assemblies build up identically, apart from different decal placements. Here again I added some Eduard 1/72 pre-painted belts (this time Luftwaffe WW2), but in hindsight I shouldn’t have bothered – they can’t be seen in the completed assembly. I modified the gun barrels slightly, reshaping and drilling out the ends to get a more dangerous, if slightly less film-accurate, look. While the turret parts themselves fit together nicely, the turrets’ overall fit into the upper and lower hull halves wasn’t great. I had to do a lot of fettling to get the turrets to sit acceptably flush, and while they are designed to rotate, in practice this is very hard to achieve without damaging the gun assemblies.
Step 7: Docking bays. The fine detail in these assemblies comes at a price – fragility. I broke several of the pieces here when removing them from the sprues, although I thought I was being careful. Cementing the finished bays to the assembled hulls (Step 31) is also tricky – while their overall fit is precise, the lack of positive joining surfaces and the sheer size of the model at this late stage of assembly makes it hard to see any problem areas. I ended up with a couple of tiny gaps, which fortunately aren’t too obvious.
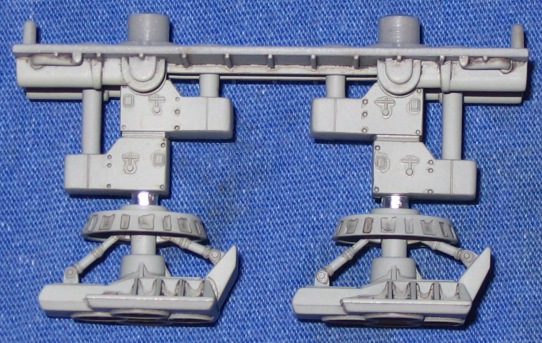 Step 8: Undercarriage. Finemolds gives you the choice of gear down or gear up (with a stand to accommodate the latter). I chose gear down, and while the finished assemblies look great, they are tedious to assemble, requiring considerable filling, sanding and patience. A point to note here is that Finemolds has chosen to represent the Falcon with the five gear-leg configuration seen in Empire and Jedi, not the initial three-leg configuration seen in Star Wars IV A New Hope; modifying the kit to this version would require considerable work.
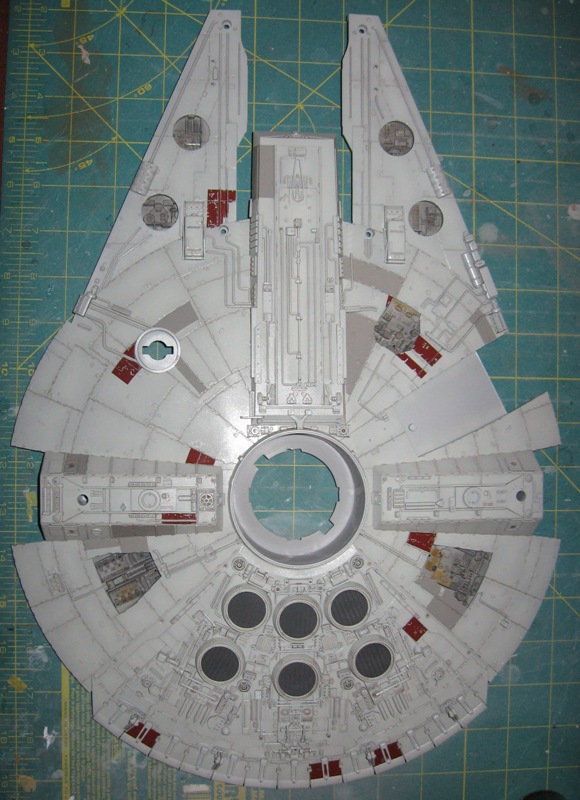 Steps 9-27: Upper and lower hull assembly. As mentioned earlier, the kit’s hull detail is built up slowly and in layers. In these steps, you will be adding literally hundreds of parts to the initially bare hull halves. As you go along, you need to use your judgement to decide which bits you can glue on now – without compromising subsequent assembly and painting – and which you need to paint separately and add later. Obvious candidates for the latter are the mandible and recessed machinery details in Steps 12 and 20, the circular engine vents in Step 13, and the crescent shaped rear engine assembly in Step 20, but it’s really up to you.
Step 28: Joining the upper and lower hulls. Before I did this, I added the undercarriage units completed in Step 8. The kit instructions would have you do this after the hulls had been joined, in Step 32, but test fits revealed that this approach would have made the units very difficult to position. Their fit is extremely tight and – like that of the turrets – required some tweaking and minor surgery (removal of locating lugs) to get right. Even then, I ended up with the rear starboard undercarriage unit only barely touching the ground, which while not obvious is nonetheless annoying.
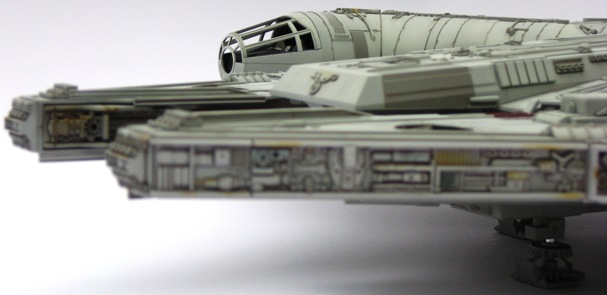 The moment of truth – joining the hull halves – was nerve racking but uneventful. While designing the halves to almost snap together, Finemolds also gives you a reassuring number of screws to make sure they join permanently. I locked the screws down with five-minute epoxy and then – another example of the kit’s excellent design – hid them from view under some hatches, exhaust ports and other details.
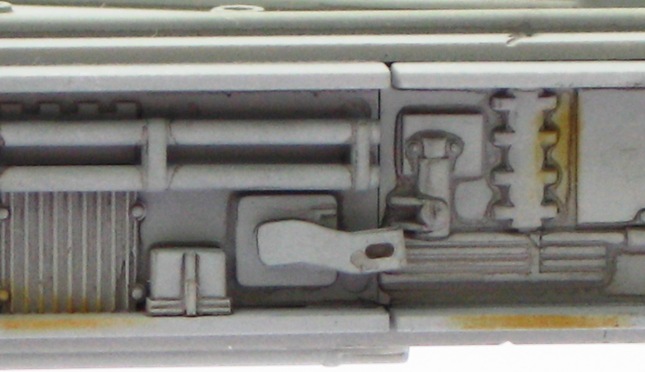 Steps 29-30: Sidewalls. These detailed multi-part assemblies are one of the highlights of the kit, particularly compared to their oversized, under-detailed counterparts in the vintage AMT (now Revell) kit. Their fit is so good that they can be completely finished (except for weathering) before being attached to the hulls.
Steps 31-33: Final assembly. This is the really satisfying bit where you get to add all the sub-assemblies completed earlier in the build. It’s not stress-free, though. Remember those wonderfully fitting sidewalls? Well, their fit was great before I screwed the hulls together – now I couldn’t get them into place at all without some serious scraping and jiggery-pokery. Nothing too difficult in the end, but after a year on this sweet-fitting kit I’d forgotten what serious modelling was like. And now the end was well and truly in sight – the cockpit stalk and radar dish were snapped into place, and the beast was finished. Phew.
Painting
You will have seen by now that I painted the kit as I went along, aiming for complete sub-assemblies where possible, and making judgement calls on which and how many detail pieces I could add to the hulls before each step of painting, decalling, and weathering.
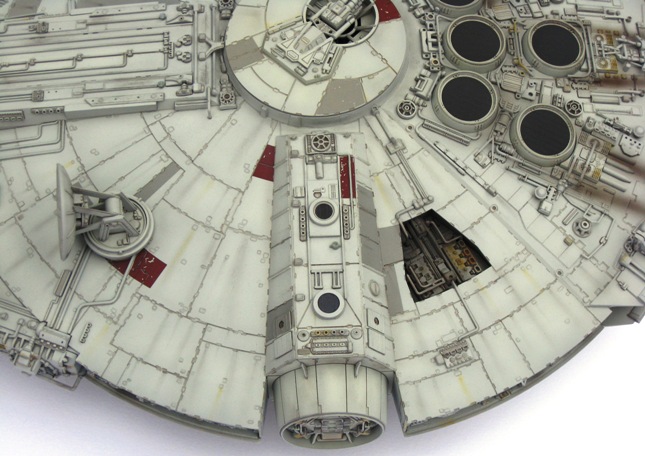 Tamiya’s Gray Surface Primer was used throughout the build, straight from the rattle can. After priming, I built up the base exterior colour with a custom mix of Gunze acrylics H-21 (off-white), H-51 (light gull gray) and H-61 (IJN gray), shot through my old (25 years plus) Badger 200 single action airbrush. Tonal variation was achieved by using darker and lighter mixes of this colour along panel lines and in panel centres.
After painting, I sprayed two coats of Future as preparation for decalling. The kit decals – and there are plenty of them – went on very well with Micro Set and Micro Sol, conforming to a variety of surface shapes with no trace of silvering. I then protected the decals with a final coat of Future before starting to grunge things up.
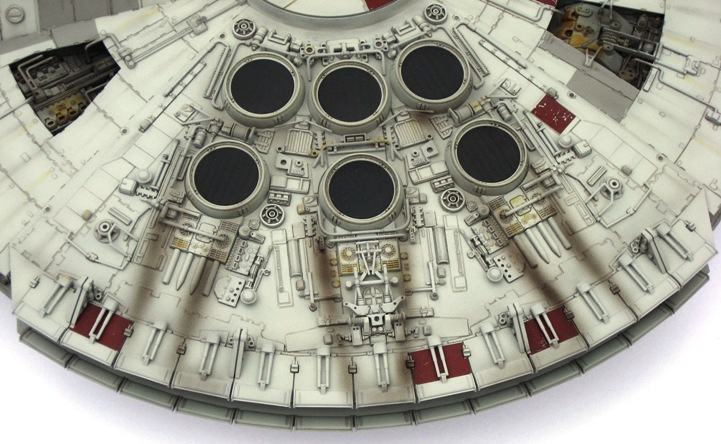 Weathering was a lot of fun. First, I washed the panel lines with a heavily thinned mix of Tamiya X-1 Black and XF-64 Red-Brown acrylics. In deeper recesses, such as gear and machinery bays, this was enhanced with a darker wash of burnt umber and Payne’s grey oil paints. The distinctive streaking, blotching and grime on the upper and lower hulls was achieved with Tamiya Weathering Master pastels (mostly Soot and Orange Rust), applied sparingly with an artist’s paper blending stick. The heavy exhaust streaks on the upper rear hull were created with multiple, very thin coats of Tamiya acrylics and enamels (the Black/Red Brown mixture and X-19 Smoke), after which I sealed everything in with three light coats of Humbrol matt varnish. Final weathering of the sidewalls and machinery bays was then achieved with Mig Pigment’s new Fantasy range – mainly Plasma Burn, Graveyard Dirt and Rocket Exhaust – with which I am very, very impressed. The pigments went on beautifully, and add some lovely, restrained grubbiness to the finished model.
Conclusion
This is one awesome kit. Any criticisms I have made in this review are really just plebeian whining in the face of true artistry. Finemolds’ attention to detail and fit is exceptional, and I’ll definitely be building more of their stuff in the future. I’ll never build another Falcon – it just took too long – but I’m really, really glad that I built this one.
History
The kit
It is hard to describe how amazing, and intimidating, this kit looks on its sprues – all 14 of them, plus the integrally-moulded upper and lower hull halves, a bag of screws, some poly caps, a big decal sheet, and an A4 sized 34-step instruction booklet (most of which is in Japanese, but the pictures and numbering are very clear – you can’t go wrong, particularly if you cross off parts and assemblies as you use/complete them). Without raving any further, I’ll refer you to John Rich’s first look review of the kit here in Internet Modeler’s January 2007 edition.
Construction
With so many steps, many of which only come together in the last stages of the build, to an extent it doesn’t matter where you start. I began at step 21, gluing on large numbers of small parts to the lower hull. This is a key element of the kit’s design – building up layers of gradually overlapping detail. My observations of the build process are as follows.
Step 7: Docking bays. The fine detail in these assemblies comes at a price – fragility. I broke several of the pieces here when removing them from the sprues, although I thought I was being careful. Cementing the finished bays to the assembled hulls (Step 31) is also tricky – while their overall fit is precise, the lack of positive joining surfaces and the sheer size of the model at this late stage of assembly makes it hard to see any problem areas. I ended up with a couple of tiny gaps, which fortunately aren’t too obvious.
Step 28: Joining the upper and lower hulls. Before I did this, I added the undercarriage units completed in Step 8. The kit instructions would have you do this after the hulls had been joined, in Step 32, but test fits revealed that this approach would have made the units very difficult to position. Their fit is extremely tight and – like that of the turrets – required some tweaking and minor surgery (removal of locating lugs) to get right. Even then, I ended up with the rear starboard undercarriage unit only barely touching the ground, which while not obvious is nonetheless annoying.
Steps 31-33: Final assembly. This is the really satisfying bit where you get to add all the sub-assemblies completed earlier in the build. It’s not stress-free, though. Remember those wonderfully fitting sidewalls? Well, their fit was great before I screwed the hulls together – now I couldn’t get them into place at all without some serious scraping and jiggery-pokery. Nothing too difficult in the end, but after a year on this sweet-fitting kit I’d forgotten what serious modelling was like. And now the end was well and truly in sight – the cockpit stalk and radar dish were snapped into place, and the beast was finished. Phew.
Painting
You will have seen by now that I painted the kit as I went along, aiming for complete sub-assemblies where possible, and making judgement calls on which and how many detail pieces I could add to the hulls before each step of painting, decalling, and weathering.
After painting, I sprayed two coats of Future as preparation for decalling. The kit decals – and there are plenty of them – went on very well with Micro Set and Micro Sol, conforming to a variety of surface shapes with no trace of silvering. I then protected the decals with a final coat of Future before starting to grunge things up.
Conclusion
This is one awesome kit. Any criticisms I have made in this review are really just plebeian whining in the face of true artistry. Finemolds’ attention to detail and fit is exceptional, and I’ll definitely be building more of their stuff in the future. I’ll never build another Falcon – it just took too long – but I’m really, really glad that I built this one.
