From Internet Modeler
White Ensign Models 1/700 Resin HMS Chester
By Dr. Kerry L. Jang
Jul 1, 2001 - 7:57:24 PM
Introduction
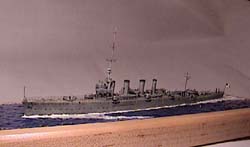
HMS Chester was the second of two ships of the Birkenhead class of light cruisers launched on December 8, 1915 by Cammell Laird at Birkenhead and completed in May 1916. The ship was at Jutland and was immortalized by the actions during this action where 16-year-old Boy 1st Class John 'Jack' Cornwell who stayed at his post on the aft gun despite the fact that the rest of the gun crew was killed and he was mortally wounded. The Imperial War Museum in London has an extensive display devoted to Cornwell, including the actual gun he stood by. When I was in London last year I saw this display and was so moved by this story that I knew I had to build a model of his ship.
White Ensign Models released a 1:700 scale resin kit of this ship a few years ago and the in-the-box reviews of this kit appearing in the model press and on other websites uniformly praised the model. I was pretty excited when the kit arrived via Warship Books who carry the kit and the rest of the White Ensign line of kits and accessories.
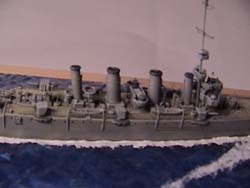
 The kit is the usual mix of resin, photo-etched brass, and plastic and brass rod typical of White Ensign Models. The main resin casting is the hull, and it is done in a white resin with a huge amount of molded-in detail, including all four funnels. The hull casting was cleanly cast and straight. A few air bubbles were found, mainly limited to the top of mushroom vents and the corners of deckhouses and other vents. These are easily filled with putty. On first glance, the hull casting looks almost perfect, no doubt due to the white resin used to cast the kit, which tends to obscure any imperfections. It was only after I had applied a coat of paint and found that the hull casting actually had quite a rough surface. The hull had a rash of resin nodules on the hull and deck. The rough texture on the hull is easily sanded off, but those on the deck required some very careful sanding so as to not obliterate the plank lines. My guess is that the moulds for this kit are starting to show a bit of wear.
The rest of the major resin parts include the bridge structure, searchlight and gun tubs and the ships guns themselves. The bridge parts and tubs have realistically modeled splinter matting cast onto their faces. In general, these parts were nicely cast but are marred with a prominent mould line that was hard to eradicate because of the splinter matting. You had to be very careful to not sand away the matting or flatten the realistic texture of folds. The ship's guns are well cast and you get a set of 10 with the guns horizontal and an additional six with the guns raised, so you can show a full broadside about to be fired. The guns have blast bags molded on them and the backs of the shields are open, showing off the gun breeches.
 In contrast to the hull casting, the quality of the small resin parts leave a lot to be desired. In this kit, the four large searchlights and two small ones were indistinct lumps of resin that were so poorly cast that they had a decided lean to them! I replaced mine with Skywave parts from the spares box. The ships boats are similarly terrible and this is a serious problem because Chester carried so many of them they are focal points of the model. The interiors show soft detail and the shapes of some of the boats are really odd. For example, the dinghies look like flat-bottomed sampans! I tried to reshape them and fix up the interiors, but no luck. I just happened to have a set of ships boats by Modelkrak and replaced the WEM versions with the closest equivalents I could find. Unfortunately none of the Modelkrak boats are a good match, but they are a lot more crisply cast and look a whole lot better so I used them anyway.
I have commented on this problem with the searchlights and ship's boats in the other White Ensign Model kit I have built (Warspite) and I must admit, I am surprised by the inconsistent production quality of some of their kit parts. We all know that WEM is capable of some stunning castings, for example just look at some of the accessories in their PRO series of replacement parts which are veritable jewels. I suppose that they do not bother to update their earlier kits as their casting and master patterns improve, and that is a pity.
 The kit has very few parts in general to put together and I had the parts ready for painting and final assembly in only a few hours. The only part that gave me a bit of problems is the base of the bridge structure, which has four cast legs that fit accurately and positively into location holes on the deck. The problem is that the legs are too short when the etch brass support lattice is added to the bottom of the bridge base. I replaced these legs with brass rod. Speaking of the etched parts, they are very delicate and very nicely detailed. They include everything you will need and want for this model and they are as close to scale as you can get them. However, WEM continues to provide parts such as large boat davits in flat etched brass. These look stupid and I replaced these with replacements made out of fine brass rod. I elected to show the ship's boats in a stowed position, as I did not think I was able to hang them from the davits realistically over the ships sides. The only other fit problem I had was with the etched boat rack that was too long to fit into the space between the forecastle break and the aft superstructure.
Painting
The model was painted using Tamiya acrylics. I began by painting the deck a 50-50 mix of Deck Tan (XF 55) and Buff (XF 57). After this had dried, I started to highlight the deck and give it some depth by spraying the exposed areas of the deck straight Deck Tan. The rest of the hull and other parts were painted Sky Grey (XF 19), which was a close enough match to Admiralty Light Grey. The metal decks were painted German Grey (XF 63).
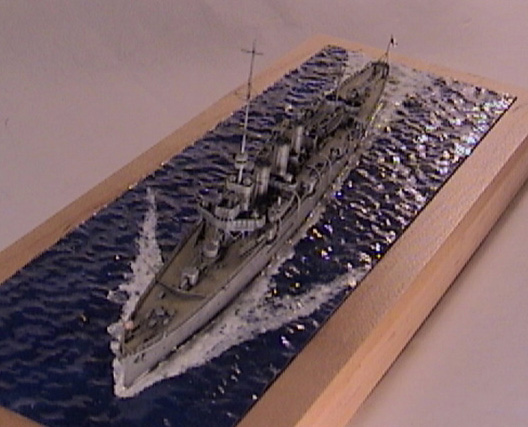
Despite the work I put into smoothing out all of the rough pebbly finish I found on the hull and the deck, this paintwork showed up more. I smoothed as much as I could with out destroying the molded detail and decided that the only way I could 'hide' the flaws is with some shading. Since the model is produced to show Chester as she looked at Jutland, heavy weathering, replicated by the shading due to being on active service would be quite all right.
 How you do the shading and the colours you choose for the washes and the highlighting makes a big difference in showing the model 'at war' or 'during peacetime'. I began with the decks. Normally, I would use a dark brownish-yellow wash mixed from artist's oils and turpentine. A dark blue-black would be used for the hull. Done in moderation, this would produce a pristine look that has some depth and character. To reproduce a war weary in-service look, I applied a wash of black over the entire model, even the yellowish deck. This gave the model a worn look and tended to hide some of the surface blemishes. I drybrushed the model with light gray again mixed from artist's oils, the deck a mix of yellow and ochre - carefully avoiding the areas with a rough texture.
One this had dried, final assembly commenced and all the remaining etched parts were added to the model. A coat of clear gloss (X 22) was sprayed over the entire model to the washes and highlights. This clear varnish tends to brighten and blend all of the colours together nicely and enhance the depth. This enhancing effect is not lost with a coat of clear matt varnish (Polly Scale Flat Finish) to yield a nice dull finish.
The final touch was the addition of a white ensign from the Gold Medal Models (1412 Fisherman Bay Road, Lopez, WA 98261, USA) international flag sheet to the ensign staff. This is the first time I have used decal flags and the ones on this sheet are beautifully printed in bright, dense colours. They are thin and delicate for that 'in scale' look. Paper flags are very easy to shape by just carefully working in folds. Decal flags are stiff and despite the fact they are printed with a windblown look, they still looked stiff. Clearly, folds need to be worked into them that somehow will hold their shape. The flags are printed in two parts and after soaking you simply sandwich the two halves together. After letting the flag dry for about 10 minutes on a sheet of wax paper (to prevent the decal adhesive sticking to the table or other surface) I carefully picked up the flag with tweezers (Careful! It is very delicate). I put a smear of thick CA glue to the jack staff and stuck the flag on. I let the CA glue harden off and I coated the decal flag with Micro-sol. After about 10 minutes, the flag was soft enough to carefully shape with a piece of plastic rod and a brush handle. Once I had the shape of the flag I wanted, I froze it with a quick spray of matt varnish. They look great!
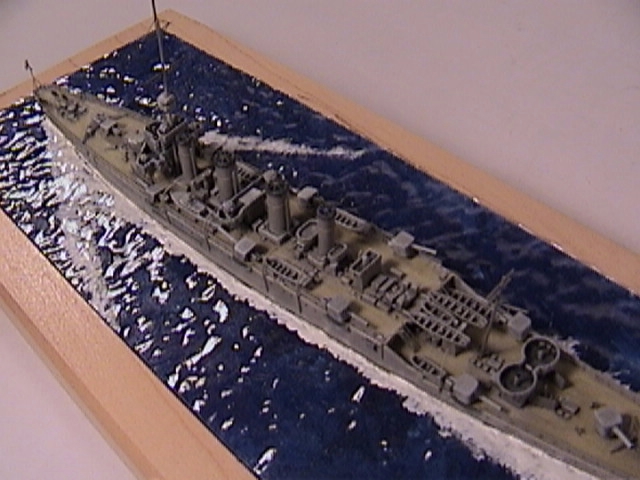
Base
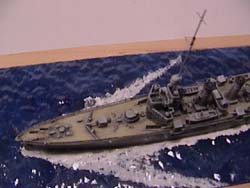
 I placed the model into a seascape made with the Faller's plastic water sheet. This was glued down to a base in which was painted various shades of blue, green and violet with Tamiya Clear. The model was glued onto the plastic sheet but before gluing the hull to the base I applied white artist acrylic paint straight out of the tube all around the hole to begin to simulate the wake. This was applied rather thickly to fill in any gaps between the hull and the 'sea'. Once this was dry, I stippled white artist acrylic straight from the tube to create the wake and any turbulence and whitecaps. The whole base was given three heavy coats of Tamiya Clear that gave the 'sea' some added depth.
Conclusions
White Ensign Models gets full marks for producing this kit and other kits of much needed subjects. I must admit I was a little disappointed in this kit due to the quality of the smaller parts. We know they are capable of making fantastic small parts and I wish they would upgrade their kits. I think WEM should try a bit harder in these areas. Despite my reservations, the kit does provide a very solid foundation for a nice model and in the hands of a more dedicated modeler than myself, can (and I am sure many have) turn out a show-stopping model.
© Copyright 2023 by Internet Modeler
 The kit is the usual mix of resin, photo-etched brass, and plastic and brass rod typical of White Ensign Models. The main resin casting is the hull, and it is done in a white resin with a huge amount of molded-in detail, including all four funnels. The hull casting was cleanly cast and straight. A few air bubbles were found, mainly limited to the top of mushroom vents and the corners of deckhouses and other vents. These are easily filled with putty. On first glance, the hull casting looks almost perfect, no doubt due to the white resin used to cast the kit, which tends to obscure any imperfections. It was only after I had applied a coat of paint and found that the hull casting actually had quite a rough surface. The hull had a rash of resin nodules on the hull and deck. The rough texture on the hull is easily sanded off, but those on the deck required some very careful sanding so as to not obliterate the plank lines. My guess is that the moulds for this kit are starting to show a bit of wear.
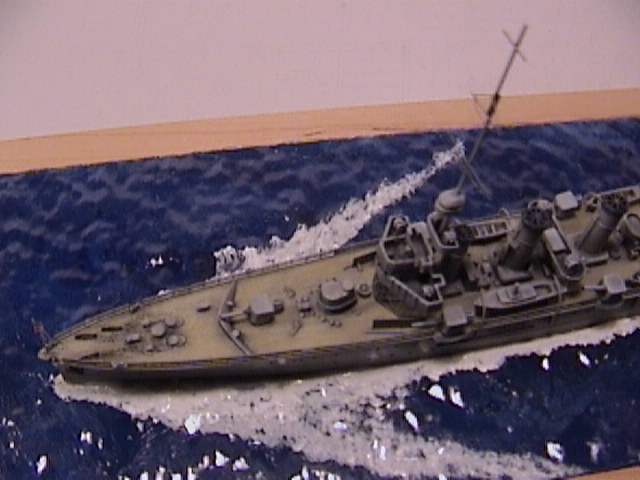 In contrast to the hull casting, the quality of the small resin parts leave a lot to be desired. In this kit, the four large searchlights and two small ones were indistinct lumps of resin that were so poorly cast that they had a decided lean to them! I replaced mine with Skywave parts from the spares box. The ships boats are similarly terrible and this is a serious problem because Chester carried so many of them they are focal points of the model. The interiors show soft detail and the shapes of some of the boats are really odd. For example, the dinghies look like flat-bottomed sampans! I tried to reshape them and fix up the interiors, but no luck. I just happened to have a set of ships boats by Modelkrak and replaced the WEM versions with the closest equivalents I could find. Unfortunately none of the Modelkrak boats are a good match, but they are a lot more crisply cast and look a whole lot better so I used them anyway.
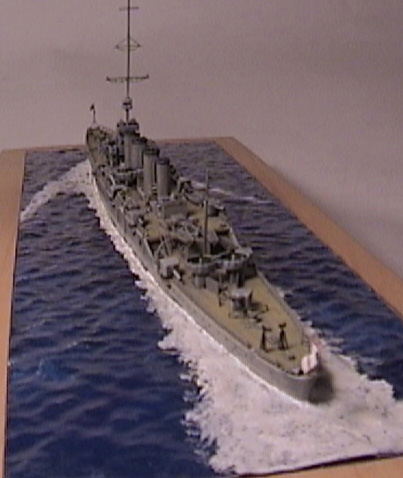 The kit has very few parts in general to put together and I had the parts ready for painting and final assembly in only a few hours. The only part that gave me a bit of problems is the base of the bridge structure, which has four cast legs that fit accurately and positively into location holes on the deck. The problem is that the legs are too short when the etch brass support lattice is added to the bottom of the bridge base. I replaced these legs with brass rod. Speaking of the etched parts, they are very delicate and very nicely detailed. They include everything you will need and want for this model and they are as close to scale as you can get them. However, WEM continues to provide parts such as large boat davits in flat etched brass. These look stupid and I replaced these with replacements made out of fine brass rod. I elected to show the ship's boats in a stowed position, as I did not think I was able to hang them from the davits realistically over the ships sides. The only other fit problem I had was with the etched boat rack that was too long to fit into the space between the forecastle break and the aft superstructure.
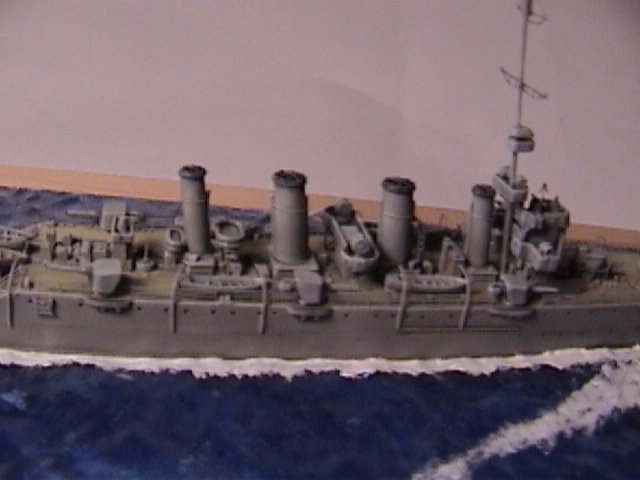 How you do the shading and the colours you choose for the washes and the highlighting makes a big difference in showing the model 'at war' or 'during peacetime'. I began with the decks. Normally, I would use a dark brownish-yellow wash mixed from artist's oils and turpentine. A dark blue-black would be used for the hull. Done in moderation, this would produce a pristine look that has some depth and character. To reproduce a war weary in-service look, I applied a wash of black over the entire model, even the yellowish deck. This gave the model a worn look and tended to hide some of the surface blemishes. I drybrushed the model with light gray again mixed from artist's oils, the deck a mix of yellow and ochre - carefully avoiding the areas with a rough texture.
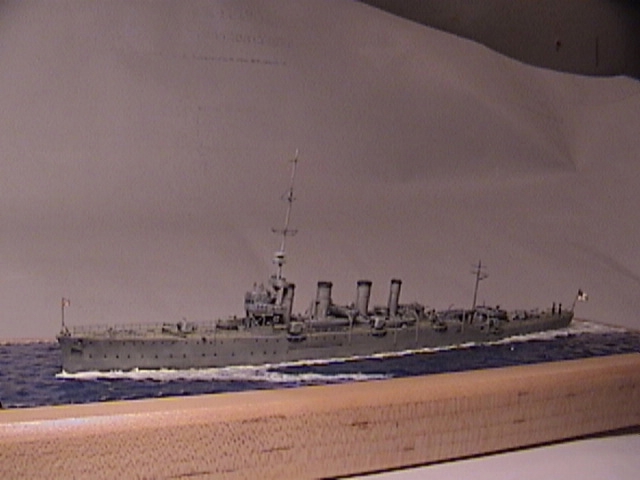 I placed the model into a seascape made with the Faller's plastic water sheet. This was glued down to a base in which was painted various shades of blue, green and violet with Tamiya Clear. The model was glued onto the plastic sheet but before gluing the hull to the base I applied white artist acrylic paint straight out of the tube all around the hole to begin to simulate the wake. This was applied rather thickly to fill in any gaps between the hull and the 'sea'. Once this was dry, I stippled white artist acrylic straight from the tube to create the wake and any turbulence and whitecaps. The whole base was given three heavy coats of Tamiya Clear that gave the 'sea' some added depth.