Mission Models Acrylic Paints
By John Miller
Testing the New Mission Models Acrylic Paints:
The Best Acrylic I've ever Used
Introduction:
I've been shooting acrylic paints a long time. From Polly Scale to Tamiya to Model Master to Vallejo to my favorite, LifeColor: I've sprayed them all. You may have come across previous articles in The Paint Booth that describe strategies for diluting, spraying, and cleaning acrylic paints. Been there, done that and still do it for all the common reasons: no nasty fumes, quick drying, easier clean up etc, etc. In addition, by using a few dilution strategies and adding a wetting agent to the mix, you can get a lot of acrylics to behave almost as well as lacquers---almost. Well that used to be an accurate statement until Mission Models released their new line of acrylic paints. When diluted for fine-line airbrushing, they perform just as good as lacquers—if not better.
Did I just write that?
Do I need professional help, maybe counseling?
All the "Best Fine-Line Paint Awards" go to enamels and lacquers.
How did this happen?
My change of heart began when the man behind Mission Models, Jon Tamkin contacted me about testing this new wunder paint. I agreed to do so and a few days later received an assortment of colors, primers, thinner, and Polyurethane Mix Additive (more on that later). As Jon warned me I shall now warn you: this is a new way to think about painting. Mission Models paints are thicker both out of the bottle and after dilution for airbrushing than other paints. But, let me cut to the chase: Mission Models Paints and Primers show very little tendency to run, sag or "spider" when sprayed. As most of you know spidering occurs when the tip of the brush comes too close to the surface and/or too much paint/pressure is used. The resulting extra wet paint runs in all directions looking akin to the arms of a spider, which has to be painted over, and/or repaired. Mission Models paint is so forgiving when it comes to runs and spidering that much of the anxiety associated with airbrushing your masterpiece is simply gone. It is so forgiving that I had to work at making it spider while spraying it!
The other peculiarity of this paint is the noticeable absence of overspray even when shooting the primers (more on that below). In addition to the spray test, I spent a few hours shooting various Mission Model colors and primers on a paint mule (an old kit) and was consistently surprised at the noticeable lack of overspray. Even in situations where overspray is considered normal (for example, an aircraft wing root fillet), there just wasn't any to be found. I don't finish an aircraft model without, in some way, dealing with rough, pebbly overspray from primer and/or paint that most often occurs along wing roots and fillets. With the new Mission Models chemistry, these problems will largely be a thing of the past.
The noticeable lack of overspray and its forgiving nature with regards to runs and spidering are both due to the increased viscosity of Mission Models paint compared to other brands. When you combine this with the abnormally high pigment density, you end up with a paint that really lends itself to fine line work. But, I'm getting ahead of myself. I always shoot a primer coat before painting and luckily Jon included a couple of samples of Mission Models primers to test, so let's start there.
Mission Models Primer:
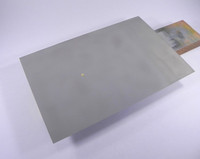
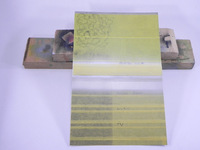
Mission Models Primers are described as a two-part system wherein the primer must be activated using only Mission Models Thinner (no Polyurethane Mix Additive should be added). The primers come in Tan, Pink, Red Oxide, Grey, White, and Black. The recommended dilution is 20-30% Thinner/80-70% Primer. This mix works great. However, after playing around with multiple dilutions, I found that I preferred a slightly thinner mix of 40% Thinner:60% Primer. As seen in the photo (MM-1), I sprayed Mission Models Tan Primer (#MMS-006) on a sheet of 0.5mm styrene that had been wiped down with Denatured alcohol, my usual degreaser. Note that in the photo a dot of Tamiya tape has been placed on the primer coat to aid in focusing the camera and that the right hand portion of the sheet was not completely painted so I had a handhold.
The primer was applied with a Harder & Steenbeck Evolution airbrush with a 0.4mm tip at ~15 psi. I was amazed at the results. This primer sprays beautifully and provides very effective coverage. The most amazing aspect of this primer is the noticeable lack of dry, pebbly overspray that is so common with most primers, whether lacquer (Alclad) or acrylic (Vallejo
). My go-to primer for the last couple of years has been Vallejo Acrylic-Polyurethane Primer (#74.600) shot straight from the bottle with Liquitex added to 1-2%. The addition of Liquitex
greatly reduces the dry dusty overspray that is common to using Vallejo primer. Mission Models Primer simply does not have this problem, period. The resulting finish dries within 15-20 minutes and is more than smooth enough for paint without any additional preparation with a mild abrasive like micromesh. Moreover, unlike Vallejo, Mission Models Primer produces a tough finish that is very resistant to scratching when dry. The fingernail test required a pound or two of force before I could scratch the primer coat once dry: this is tough stuff.
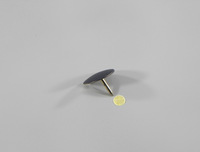
One similarity to other acrylic primers is the slightly rough or stippled finish of a recently sprayed, wet coat of Mission Models primer. Have no fears, this disappears completely as the primer dries resolving into a clean, smooth, very tough finish. How tough? Well, being an avid (read fanatical) aircraft modeler, I'm accustomed to dealing with the pomp and circumstance required to pull off a clean natural metal finish using Alclad or AK metallic lacquers. Part of the preparation is polishing out the primer coat to a near mirror finish, especially if you're aiming for polished aluminum. With this in mind, I subjected my test coat of Tan Mission Models Primer to wet sanding with a 3600 Micromesh Pad and was more than pleased with the result: a glass-smooth finish ready for the metallic paint of my choosing (MM-2). Note the reflection from the thumbtack on the recently micro-meshed primer and the dot of Tamiya tape-an effort to focus on the surface of the dried primer coat. It's also important to note that I would never put a sharp thumbtack on a coat of Vallejo primer--never. This is a quality primer. Now it was time to test the paint.
Fine-Line Pre-Shading:
In an effort to duplicate the pre-shading of the average aircraft build, pencil lines were drawn on the primer at 5mm intervals and a rather long length of ~13cm. The length of the lines is important. A good way to assess a paints tendency to dry on the tip is to measure the length of a fine line (~0.5 to 1mm) that can be continuously sprayed (uninterrupted by clearing the tip) until dried paint is evident on the needle and/or the spray pattern degrades. With Vallejo and LifeColor acrylics diluted for fine-line spraying as previously described I can count on ~20cm of sharp fine-line before I have to stop and clean the needle: maybe a little less with LifeColor. Less with both brands if I'm starting and stopping often as I spray as this leads to a quicker paint build up on the needle.
Mission Models recommends diluting their paints 20-30% with Mission Models Thinner for spraying. To increase both durability and leveling while decreasing tip dry, they recommend a few drops of Polyurethane Mix Additive be added to your paint cup prior to spraying. The Polyurethane Mix Additive (PolyMix) acts, in part, as a wetting or flow agent altering the behavior of Mission Models Paint in a similar manner, as does Liquitex when added to Vallejo and LifeColor. I sprayed multiple Mission Model colors using their recommended dilution and got awesome results. After some experimentation I opted to prepare a stock solution of Mission Models Thinner to which the PolyMix had been added to ~10% (Thinner/PolyMix). I then diluted my paint directly into Thinner/PolyMix for spraying. As described in previous articles, this is exactly the approach I've used for many years with other acrylics and it works great for Mission Models as well.
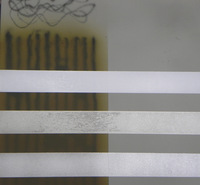
For average airbrush work I found a dilution of 60% paint:40% Thinner/PolyMix gave great results (see Khaki below). For fine-line work, I dilute Mission Models Paints 1:1 with Thinner/Poly and shoot them at ~10-12psi. When this dilution is sprayed through the 0.15mm tip of my Harder & Steenbeck Infinity airbrush, the fine line performance of Mission Models Acrylics is demonstrably superior to any other paint I've shot. As seen in photo MM-3, Mission Models Black (#MMP-047) diluted 1:1 with Thinner/PolyMix and shot as described permitted me to shoot continuous, uninterrupted fine lines of ~0.5mm-1mm almost indefinitely. Each of the black lines on the test sheet represents multiple passes. I would say there is ~70-80% less airbrush tip drying with Mission Models than with any other paint I've used, and that's good news for people who want easy, reproducible fine line performance. Just for fun and to provide an adequately dark contrast for the upcoming Coverage test (below), I sprayed some ham-handed squares on the test sheet and did so without having to stop and clean the needle even once.
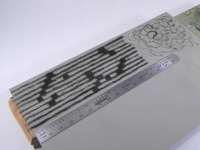
For a quick assessment of micro-fine performance, I added a few drops of Thinner/PolyMix to the 1:1 mix already in the paint cup, decreased the pressure to ~10psi, and tried some "squiggles" (right in photo). This paint is so amazing. The increased dilution/decreased pressure combination allowed me to effortlessly paint squiggles with ease on my first try with again, no tip drying. Awesome: I finally see that Ju-88 with Mediterranean Squiggle camo in my not-too-distant future.
Coverage and Modulation:
To assess how well this paint covers and how well it can be used to modulate the intensity of coverage, I diluted some Mission Models Khaki (#MMP-023) to 60% paint:40% Thinner/PolyMix and sprayed that at ~15psi through a Harder & Steenbeck Evolution airbrush with a 0.2mm tip. The subject was my tan primer test sheet complete with simulated pre-shaded lines and ham-handed squares. As seen in photo MM-4, the ability to achieve a somewhat translucent coat of the Khaki allowing the underlying pre-shading to show through was assessed by spraying a gradient of paint increasing in density from right (less) to left (more). The ability to "dial in" the degree of coverage you want is spot on with Mission Models acrylics. And, once again, the forgiving nature of this paint allows even very heavy coverage to be applied (Left portion) with no tendency to run, sag, or spider. To my eyes, the approximate middle portion of the test panel is the desired coverage for this situation. Maintaining that degree of coverage across an extended area was very easy with this paint. This ease translates into a more enjoyable experience, as you're not waiting for the inevitable run, spider, or every-30-second needle cleaning. This paint is fun to shoot.

Tape-On/Tape-Off and Compatibility:
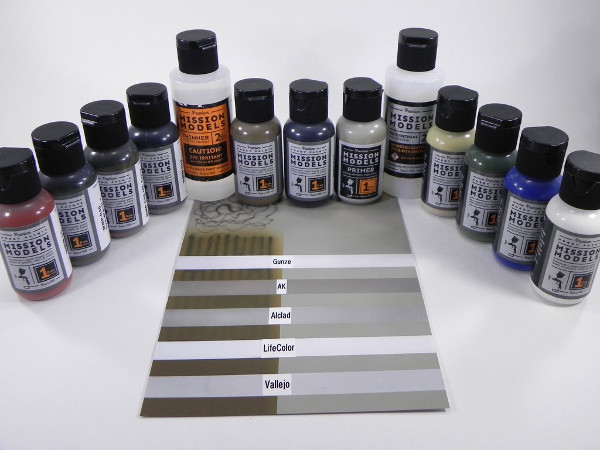
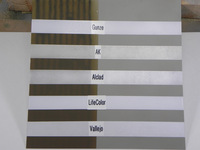
An often-heard criticism of acrylics is their somewhat fragile nature when dry. This, in general, is true. In my hands LifeColor is quite fragile requiring a clear coat for protection prior to additional painting or taping steps. The same is true but to a lesser degree with Vallejo and Model Master acrylics. It's a mark of the breed. An additional concern with some acrylics is their compatibility when sprayed over or under other types of paint such as lacquers. This is a justifiable concern as it's very common for a modeler to use multiple brands one on top of the other in the course of completing a project. In an attempt to get answers to some of these questions, we here in the secret underground MPS Paint Research Laboratory came up with a simple, little test. To assess how coats of both Mission Models Primer and Paint react to taping and over-spray, horizontal strips of Tamiya tape (taken straight from the roll: no finger oil) were placed 1cm apart on the test sheet as shown in the photo. Each of the exposed strips of Model Missions tan primer/khaki paint were then over-shot with a different type of paint. Fifteen minutes after each strip was shot, it was covered with a piece of Tamiya tape and the next strip was sprayed. As shown in photo MM-5, the paints oversprayed were from top to bottom:
1) Gunze White Lacquer (Mr. Color #1)
2) AK Interactive Burnt Metal (AK484)
3) Alclad Duraluminum (ALC102)
4) LifeColor Acrylic White (#1506)
5) Vallejo Acrylic Aluminum (#71.062)
At the end of this process all the strips of tape were removed and the sheet was closely examined. Amazingly not one bit of either the tan primer or khaki came off on the tape. Not a bit. In addition, the paints sprayed on top of the Model Missions primer and khaki coats showed excellent adhesion. To that point, a piece of fresh tape was applied across all the recently sprayed strips and removed resulting in no loss of any of the paints applied.
Of note was adhesive from the Tamiya tape that stuck to the strip sprayed with AK Interactive burnt metal (photo, left side of 2nd strip from top). AK Metalics are pretty hot lacquers and to really test the underlying Mission Models Primer I applied it as a wet coat with no protective dry coat beforehand. Not surprisingly, glue from the tape stuck. I've seen this before with AK Metalics.
A longer waiting time before taping is the easy solution. What is surprising is that I was able to remove the glue by scraping the surface of the AK burnt metal with another piece of tape without any of the metallic coming off. Note in photo MM-6 that I've scraped the adhesive off the right portion of the metallic strip. I've not seen this kind of tenacious primer coat before. After seeing these results, my next natural metal finish is going to start with some Mission Models Primer. (MM-7)
Conclusion:
Mission Models Acrylic Paints and Primers represent a sea change in the way we paint scale models. Once you familiarize yourself with the novel handling and behavior of this new paint, you'll quickly see that there are multiple upsides to this system the biggest of which is the increased enjoyment from shooting a paint that is inherently forgiving. Although I love LifeColor and will continue to occasionally use it, spraying it sometimes feels like a high-wire act on a windy day. Not so with the Mission Models system.
This paint is really is fun to shoot. As far as cleanup, I find that if you subscribe to the 3-soaks method or similar, cleaning Model Missions primer and paint out of your airbrush is a breeze. In summary Mission Models Primers give top-notch finishes and are amazingly easy to spray for the following reasons:
-Little to no tendency to dry on the needle.
-No tendency to run.
-No tendency to sag.
-No tendency to spider.
-With dilution, easily delivers fine and micro-fine lines.
-Excellent coverage and modulation.
-Primers can be wet sanded to a glass finish.
-Are compatible with other acrylics and lacquers.
I am truly amazed by this paint. Multiple Mission Models bottles now adorn my workbench and the primers have quickly become my go-to for practically all applications. Check out their website (link) for a listing of available primers and colors. In addition to their current selection I'm told by the man behind Mission Models that multiple new colors are in the works including accurate RLM and U.S. colors. That is truly good news.
Above and beyond being a quality primer and paint, all Mission Models acrylics are made in America with ingredients sourced from the U.S. It's nice to support an American company making top quality products. Do yourself a favor and try these paints. I think you'll be pleasantly surprised.
Now, go Paint Something!
--John
Check out additional build and "How-To" articles about spraying acrylic paints on Johns' website Model Paint Solutions.com
