KP 1/72 SIAI Marchetti SF-260 "Over USA"
By Chris Banyai-Riepl
Overview
In the 1960s, there was a strong interest in sport and aerobatic aircraft. The Italian aircraft designer Stelio Frati, having designed the first Italian post-war jet aircraft (the Caproni Trento F-5) and the wooden construction Falco F-8 light aircraft, combined his experience and came up with an all-metal three-place aerobatic propeller aircraft. The resultant SF-260 stood out from similar aircraft of the time in that it possessed an aerobatic performance that matched combat aircraft currently in service. As such, the SF-260 quickly caught the eyes of many military customers as both a trainer and as a light combat aircraft. The durability of the plane coupled with its impressive performance is proven by the fact that in 2005 the Italian Air Force purchased thirty SF-260EA aircraft as an advanced piston-engined trainer aircraft.
The Kit
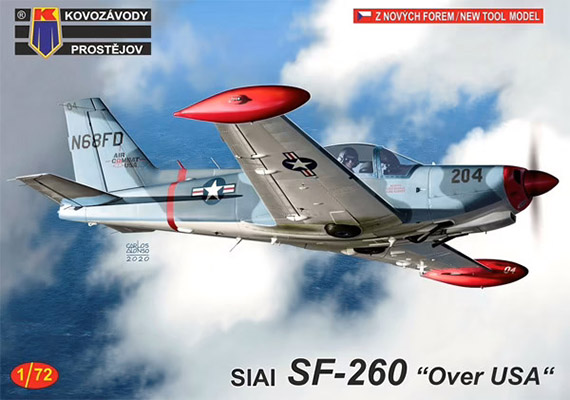
For the longest time the only option for a 1/72 SF-260 was some resin kits that were challenging to find at the best of times. Now we have two injection-molded kits from Czech companies, one from Special Hobby and one from KP. KP has gone a step further in providing both the piston-engined version and the turboprop version in different boxings. Of course, this means there are loads of marking options out there, with KP's releases having no less than six different boxes with a total of two dozen marking choices. This particular release provides markings for SF-260s used by the private air combat organizations in the United States, where for a moderate sum Joe Civilian can suit up with a friend and engage in real-life air combat.
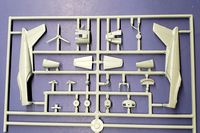
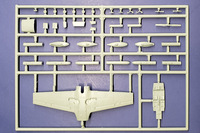
 As would be expected, this kit is a small one, with just two sprues of gray parts and a single clear sprue. There are some parts marked not for use, indicative of the multiple variants covered by KP. The kit features recessed panel lines, and these are not quite as petite as I've seen, but they're more than passable. The overall breakdown is as you'd expect, with a separate engine assembly needed to cover the piston versus turboprop options. The instructions highlight just how easy this one will be to build up, as there's only seven steps marked out.
Interestingly, the first step deviates from the usual suspect of the cockpit and instead has you assemble the engine cowling. This is made up from three main pieces, a top cowl, a lower cowl, and the front of the cowl. Into the front of the cowl goes an insert that will provide the minimal amount of engine you'd see from the front. This is good, as you'll need the rest of that cowling space for weight, and you'll want to load this one up all the way as it's definitely a tailsitter without weight. The instructions indicate 10 grams, but I'd go over a bit just to make sure. Be careful, though, as you will need to leave a gap for the nose wheel well, which is molded with the cockpit floor.
 Speaking of which, the next step is the cockpit, and this is why you want to pack that nose with weight. With the cockpit put into the fuselage, there is no space left for any additional weight. The fuselage sidewalls have molded in detail, and there is also a fair bit of molded-in detail on the cockpit floor as well. The seats have separate upright pieces that attach to the pans that are molded in the cockpit floor, and decals provide the seat belt details. There are separate rudder pedal pieces for each seat, and two control sticks. You get two options of instrument panels, too, but unfortunately the instructions don't indicate which decal option uses which panel.
Once all the interior bits are painted up and done, you can button up the fuselage, which gets the cockpit floor sandwiched in between the halves, and the nose piece slips over the nose wheel well. If everything was done right, you'll have a fuselage that's looking pretty good and very nose-heavy. With the vertical fin split in half between each side, seamwork will actually be pretty easy on this one as that fin takes care of the whole upper rear fuselage seam. There will just be the seam around the nose cowling and the underside seams to deal with, which is pretty impressive. Hopefully with some careful dryfitting beforehand all of these will end up coming together nicely to where no filler is needed.
Turning attention to the wings, this kit has the wings molded as one piece. So again the only thing you'll have to worry about here is the fitting around the wing root. The tip tanks are molded in halves, with one half mounting to the wingtip. The tailplanes are also single pieces, and should fit in easily as well. All that's left after that is the landing gear, and while this is a bit simple with a one-piece nose gear and three-piece main gear, it should capture the look and stance of the SF-260 pretty well. Given the limitations of injection molding, though, it might not be a bad idea to replace the gear doors with pieces of plastic card. These are pretty much just flat doors anyway, so that would be a very easy replacement that would add greatly to the finished look.
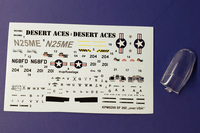
 The decal options offer up a range of interesting schemes, all with civilian registrations. There's an all-white option from Desert Aces, N910MJ, and a three-toned Russian camouflaged SF-260 registered N25ME. Rounding out the collection are two options from Air Combat USA, one in two shades of gray, N68FD, and the other in brown and green camouflage, N75IM. The decal sheet provides all the regular markings for these schemes as well as a fairly complete set of stencil markings. As these are civilian aircraft that have been seen often, finding references for any one of these schemes online will not be difficult at all.
Conclusion
If you're looking for a nice little diversion from big shelf-hogging models, this is a perfect kit to check out. The finished model is small enough that it will likely fit under the wing of some other model on the shelf, and the colorful marking options will have it stand out as well. My thanks to KP for the review sample.
