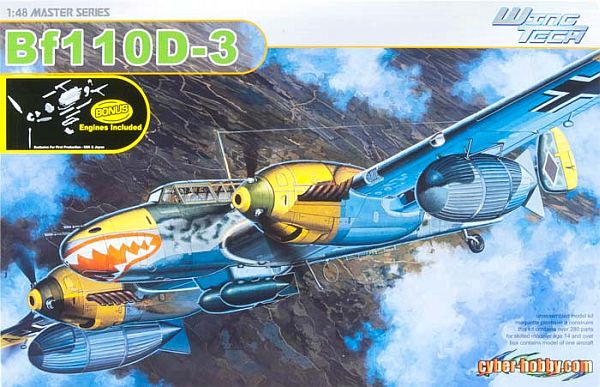
Cyber-Hobby 1/48 Bf-110D-3
By Mike Whye
I’ve been a Bf-110 fan for years and yes, I realize that many folks call them Me-110s but I’m going to stick with the Bf designation because that’s what model makers are calling them. Because I’m also a 1/48 scale fan, if I wanted to do a Bf-110 in my favorite scale, I had to use the Fujimi 1/48 Bf-110 kits. They were nice but nothing super. Using after-market resin cockpits and tires and some photo-etch definitely improved them quite a bit and, for years, this was it when it came to doing 110s in 1/48 scale.
Then along came some more 1/48 Bf-110s. Monogram and Revell did some Bf-110Gs and I thought they were good. Next, Eduard made the Bf-110 in the C, D, E and G versions in 1/48 and when I picked up one of those kits, I was impressed by the detail, causing me to believe this was the epitome of the Bf-110 kits in 1/48.
Not so, I realized when I saw the latest Bf-110 offering, this being an 1/48 Bf-110D-3 by Cyber-Hobby/Dragon/Wing Tech, an offering in the Masters Series. Holy cow, this is a great kit.
A bit of history about the Bf-110
Before diving into the Cyber-Hobby kit, a few words about the Bf-110. Developed by Bayerische Flugzeugwerke (Messerschmitt), the Bf-110 was conceived to be a long-range fighter to escort Germany’s bombers. Powered by two engines, featuring twin rudders and crewed by a pilot, radio operator and rear gunner, the Bf-110 first flew in 1936 and the third version, the Bf-110C, was the one first used in combat, that during the invasion of Poland in 1939 and then mostly in ground support roles because of the lack of any true aerial opposition. During the Battle of Britain, the Bf-110s were found to be no match for the more nimble British Spitfires and Hurricanes and often had to be protected by Me-109s. Although they did not fare well there in air-to-air combat, they saw combat again during the invasion of Russia in 1941 and, later, in the Mediterranean theater but their roles were shifted from being fighter aircraft to ground-support aircraft with the development of the Bf-110D, E and F. Variants of the F were made into night fighters, a role which they filled well through the end of the war. The Bf-110G was the last major version, used primarily as a night fighter. Some Bf-110Gs were used as day interceptors against American heavy bombers until American fighters such as the P-38, P-47 and P-51, began providing cover for the bombers and mauling the Bf-110s.
The last major version, the Bf-110G-4, had a top speed of 342 mph at an altitude near 23,000 feet and a range greater than 1,300 miles. Although armament varied between the versions with some sporting weapons as large as a 37mm cannon and others featuring 20mm cannon angled upward from the fuselage to fire into the bellies of British night bombers, the Bf-110D-3, as represented by the new Cyber-Hobby kit, had four forward-firing 7.92mm MG17 machine guns and two forward-firing 20mm cannon. The Bf-110D-3 also had a flexible 7.92mm MG15 machine gun at the rear gunner’s position. Unique to the D is the so-called boat tail which housed a life raft since the aircraft was expected to fly long distances over water.
In May 1941, the Bf-110 gained a notoriety of sorts when German Deputy Fuhrer Rudolph Hess flew one to Scotland in failed hopes of arranging a peace between Germany and Great Britain.
What’s in the box
Okay, into what’s in the box. For starters, you get 17 sprues of medium-gray and clear plastic styrene, giving you more than 380 finely crafted plastic pieces.
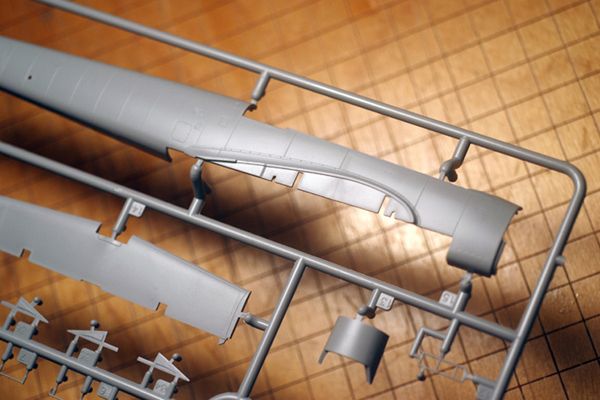
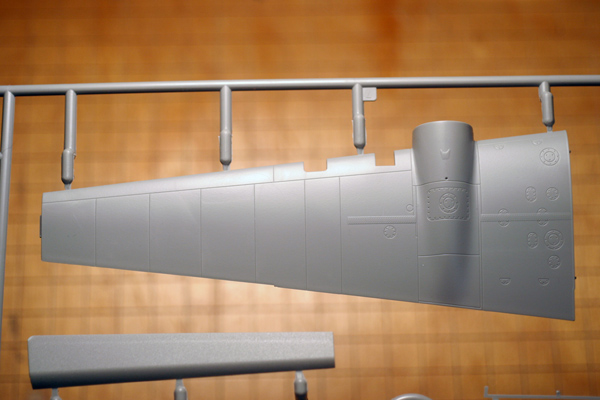 Among the sprues are two that give you two detailed Daimler-Benz DB 601A-1 engines but unlike some other kits which require you to install the engines so the propellers fit correctly, this kit gives you the option of putting them in or leaving them out, which is nice.
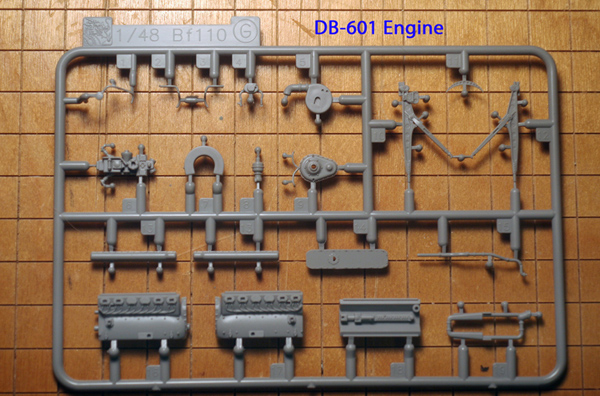 The detail in the plastic is top notch; I’m not sure anyone can improve on what’s in this kit. The inscribing is super, sink marks don’t exist and ejector pins marks are located so they will not be seen when the pieces are assembled. The plastic is so fine that I noticed one small item, a support for a drop tank, was broken but that could have been due to my handling before I noticed it. So modeler beware--handle all with care. Rivets are as fine as can be and fabric-covered surfaces controls have a subtle texture to them to duplicate the fabric; even the flaps show a clear delineation between the fabric and metal surfaces.
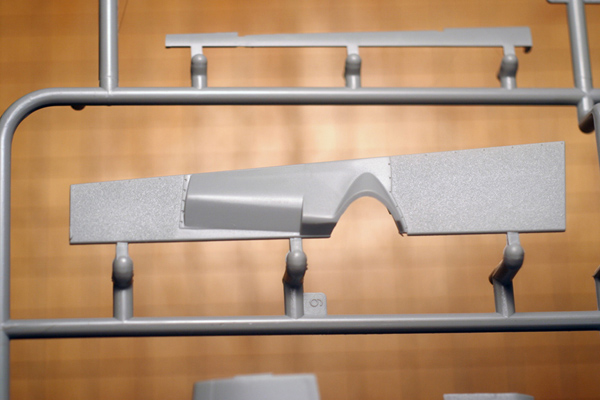
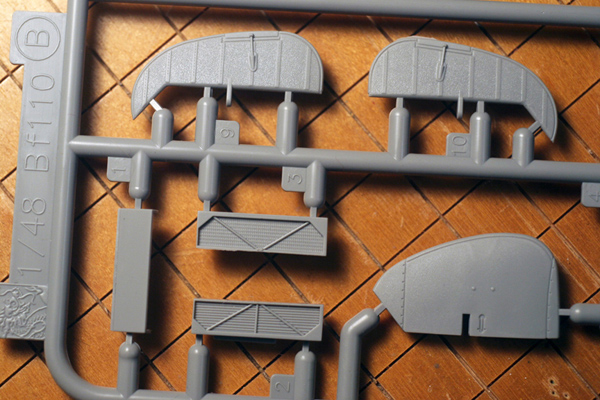
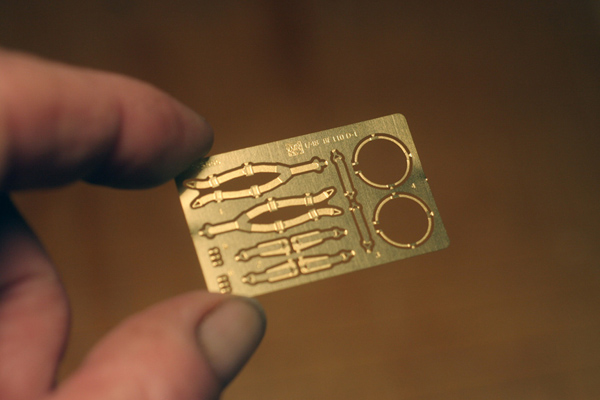
You also get a small fret of photo-etch material--basically seat belts and the radio direction-finder loop.
Decals allow you to build one of two versions, each sporting a shark mouth: a BF-110D-3 that flew with 6./ZG 76 in Greece during 1941 and another that flew with 4./ZG 76 in 1941 in Iraq although with Iraqi national markings.
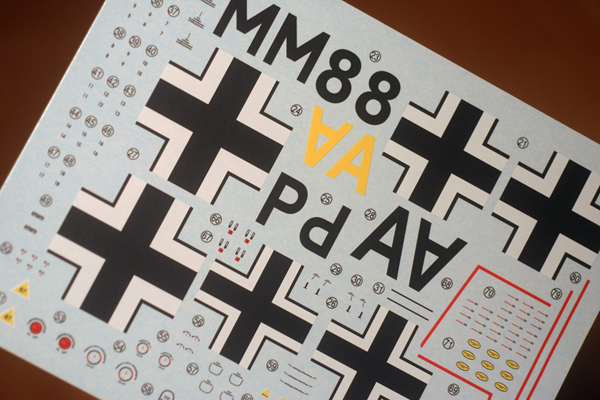
Beside the option of displaying the engines or just leaving them out of your finished model, the kit features other items that give you options in displaying the model. You can open front and rear elements of the canopy (which features a roll cage, by the way, a nice touch) or you can use the one, single, long closed canopy piece, saving you the fuss of trying to fit a number of pieces to have a closed canopy.
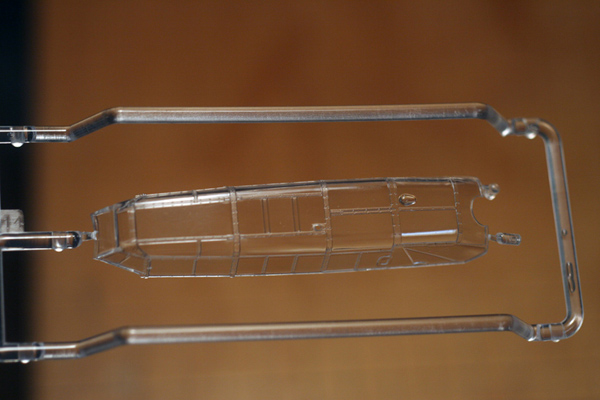 All surface controls including flaps can be positioned as you like and the kit also features slats, something I haven’t noticed on other Bf-110 kits. As you might guess by what I already wrote about the engines, you can display the cowlings open or closed; ditto with the cover over the machine guns in the nose. You’re also given two sets of drop tanks: the typically-seen 300-liter (80 U.S. gallons) drop tanks and the huge 900-liter (240 U.S. gallons) drop tanks.
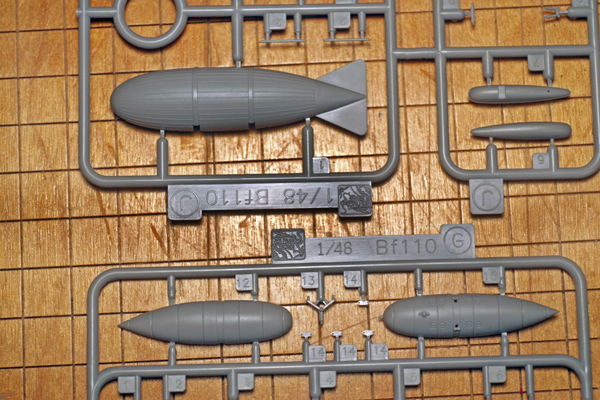 Because the D-3 was a fighter-bomber, it’s fitting that the kit also has two 500-kg. bombs that are suspended from a rack on the belly of the aircraft.
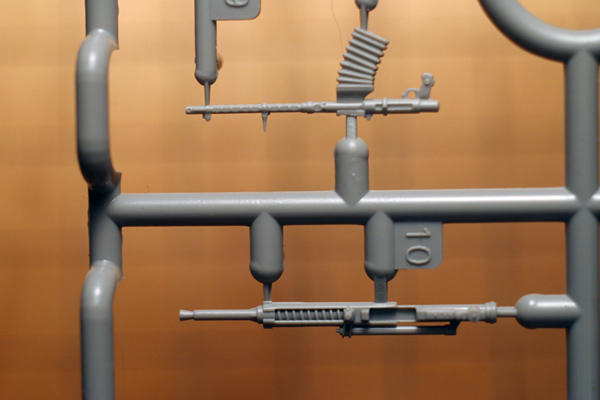
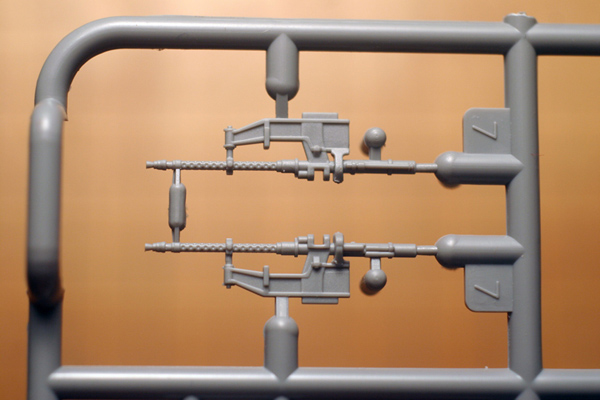
 A few more words about the detailed quality of the plastic: for me, a few simple things can show how much care a kit’s manufacturer has put into the model. In this case, I’m amazed at how fine the cannon and machine guns are made.
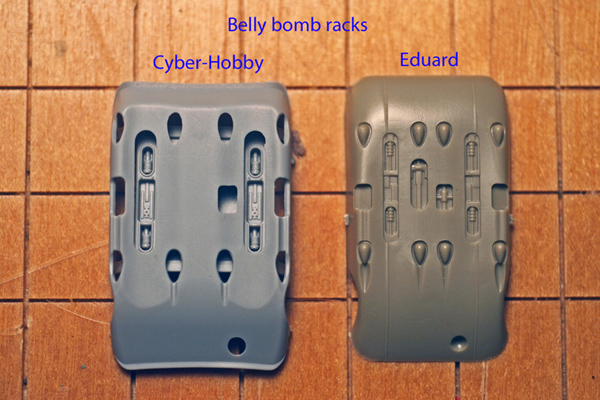
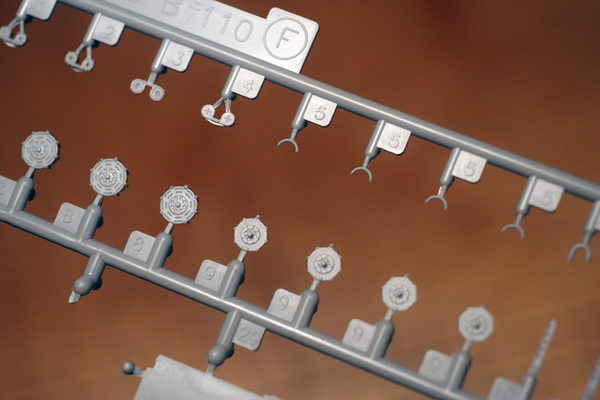 Similarly, parts F28 and F31, which make up the belly bomb rack, are way more detailed than I would have expected from any manufacturer, as are the main gear wheel wells which are exquisite in comparison to most other kits of any aircraft;
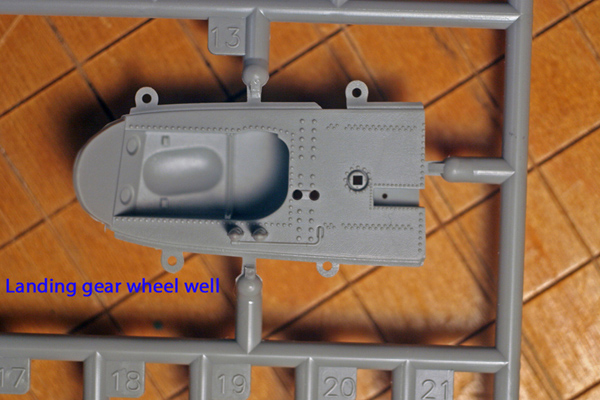 if you have ever been worried about judges inspecting the undersides of your models, you won’t have to sweat if they pick up this one.
 Cockpit detail is superb; I doubt you’ll want for anything.
Directions
The directions are straight-forward but don‘t expect any history of the BF-110s here. The colors called out in the instructions relate to the codes for Aqueous Hobby Color, Mr. Color and Model Master paints. The panels on the instruction sheet show pretty much what you need to know about constructing and painting the model.
However, they fail to show you something about the slats. In Step 8, you’re shown what to cut away from the wings’ leading edges if you want to extend the slats and then you’re shown in Step 9 how to position the slats (parts C11 and C12) in their open positions but the directions fail to show that, after cutting away the wings’ leading edges, you’re to cover the resulting holes with parts C15 and C16 which don’t appear anywhere in Steps 8 and 9. Yep, that’s quite an oversight in my book.
Similarly, I’m baffled as to the differences between parts L1 and A38, which cover the nose machine guns. I see no differences but the instructions indicate there’s a choice going on…about what, I don‘t understand since the nose caps for the machine guns appear identical.
Comparisons
Okay, I can hear the murmuring out there: how does this kit compare to the Eduard Bf-110s? Well, since I have an Eduard Bf-110C in my stash, I can make something of a comparison although keep in mind that the C and D versions of the Bf-110 differ in some ways.
Surface Detail: The detail in the outer surfaces of the Cyber-Hobby kit’s airplane are finer than Eduard yet the CH kit has fewer rivets.
Cockpit: The CH kit has lots of fine details in 45 pieces and construction is covered in the first two major steps in what would be one page of instructions. Eduard’s cockpit is loaded with lots of photo-etch material and has 139 pieces, requiring more than four pages of instructions. If you’re wanting cockpit detail, then Eduard’s the kit for you. A few examples: In the CH kit, two pieces represent the rear gunner’s eight ammo magazines very well; in the Eduard kit, 26 pieces represent ten ammo magazines (that includes ten photo-etched straps for the ammo cans).
In the CH kit, the pilot’s instrument panel has three pieces whereas the Eduard kit has a one-piece plastic instrument panel if you want that or eight pieces of plastic and photo-etched material. The CH kit has one piece, F50, that represents the throttle quadrant; the Eduard throttle quadrant has eight pieces, one being a photo-etched plate.
Canopy: The CH has one long piece if you want a closed canopy or eight pieces if you want to display it totally open or partially open. The Eduard kit has two long pieces to show a closed canopy or nine pieces to show it partially or totally open. In my opinion, the CH canopy has finer detailed framing.
Engines: The CH has two complete engines if you want them. The Eduard has none. As for exhausts, with or without each 19-piece engine, the CH kit uses four pieces to represent the 24 exhaust pipes and their “open” ends are flat.
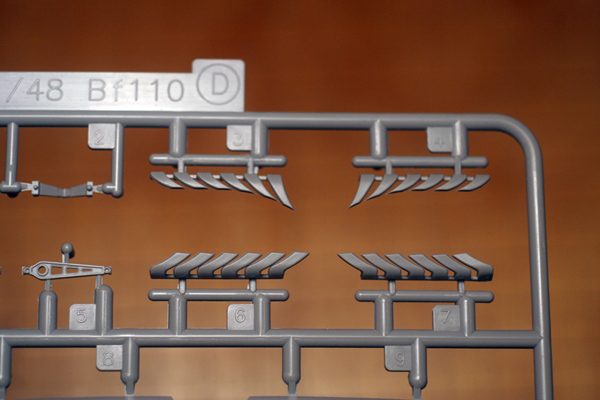 Eduard has 24 individual exhaust pipes and each has a small dimple in its end, to give it a bit of depth.
 Propellers: Each propeller in the Cyber-Hobby kit has a two-piece hub and three individual blades.
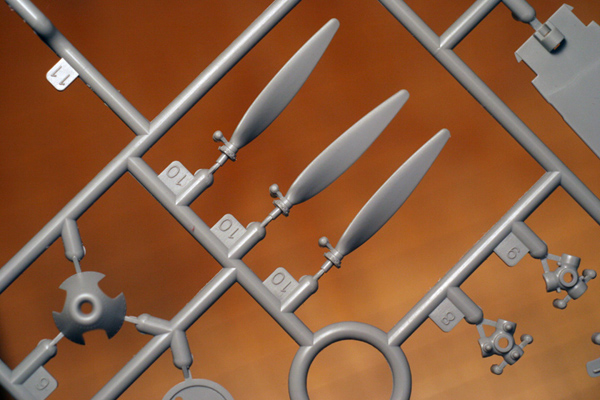 In the Eduard kit, each propeller is a single piece hub with the blades already attached to it.
 Radiator Grills: The CH kit has plastic ones while Eduard uses photo-etched material for the screens.
Main Gear: Both CH and Eduard have six pieces per landing gear leg but, as mentioned earlier, the CH kit has the best wheel wells I’ve ever seen whereas Eduard’s are rather basic. Cyber-Hobby has more detailed interiors on the gear doors. I don’t know if the wheels of the real Bf-110C differed from the Bf-110D but if they didn’t, then I have to say that Eduard’s wheels have better details.
Gun compartments: Both kits are pretty equal here with the Eduard kit having an edge by having a few more pieces but the CH kit isn’t lacking a thing. In the CH kit, the double cannon under the cockpit floor are separate piece while in the Eduard kit, they’re one.
Belly Bomb Rack: Okay, my Eduard Bf-110 is a C but the bomb rack is still on the sprues. Hold it next to the two-piece CH bomb rack and you’ll see the CH bomb rack is the winner here. A picture shows the belly bomb racks of the CH kit, in gray, and the Eduard single-piece rack, in olive drab.
Control surfaces: You can position the flaps, slats, rudders and ailerons any way you want on the CH kit. The only separate control surfaces on the Eduard kit are the ailerons.
Markings: As noted, Cyber-Hobby provides two sets of markings. Eduard has four daytime markings, all related to the Battle of France and the Battle of Britain plus one night-fighter that flew in the Mediterranean theater in 1941 (it had no radar antenna).
Photo-Etch: As I wrote, the CH kit has a small fret of photo-etch materials--seat belts and the loops for the radio direction finder; it also has a long thin wire for the aerial that fits along the left rear of the fuselage. The Eduard kit has easily more than 50 pieces of photo-etched items--seat belts, instrument panels, interior frames for the pilot’s side windows, radiator grills, rudder pedals, ammo can straps and more. Many of the Eduard PE pieces are pre-painted while none of the CH pieces are painted.
Manufacturers’ Suggested Retail Prices: Cyber-Hobby: $45.50. Eduard: $49.95
And in the end……
So which would I choose, regardless of the price? Being I have yet to build them, I cannot comment on how well they do or don’t build but for looking at what’s in the box, I’d give the edge to the Cyber-Hobby kit as I think it will build up into a more all-around pleasing kit.
