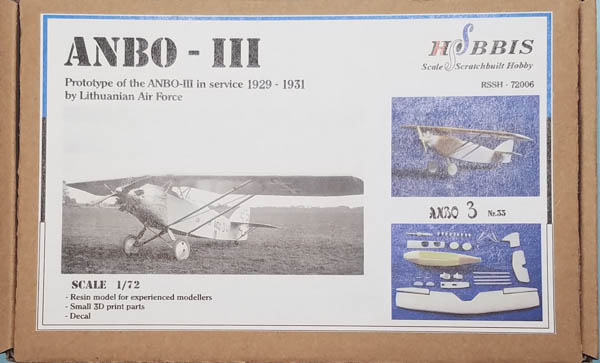
RSS-Hobbis 1/72 Gustaitis ANBO-III
By Matt Bittner
Overview
The next model to be produced by Hobbis in 1/72 is the Gustaitis ANBO-III.
The ANBO-III was another monoplane designed during the time of biplanes and appeared to fare well. Taken from the site History of Lithuanian Aviation 1919 - 1940, with translation provided by Google:
"Being a supporter of monoplanes, A. Gustaitis, already presenting a sketch project, tried to convince the superiors that a monoplane is also easy to drive and does not complicate flying training, and that there are already training planes of such a scheme - high-wing monoplanes (for example, the French "Moran" ). A. Gustaitis chose the "Parasol" scheme for his training plane, of course, also because he predicted that most of the planes of the Lithuanian Air Force would probably have the same scheme: his training and reconnaissance ANBOs."
"The construction of the ANBO-III prototype began after A. Gustaitis became the head of the Aviation fleet, and it took place in the "surrounding" of the serial production of the SVA-10 and LVG C.VI airplanes (at that time, the production of five SVA-10s was completed and the production of four LVG C.VIs began)."
For a more comprehensive history on the ANBO-III, definitely visit its page on the aforementioned History of Lithuanian Aviation 1919 - 1940 site. Note that the ANBO-III eventually entered serial production, and this model represents the prototype, active 1929-1931.
The Kit
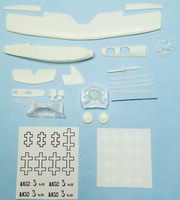
The Hobbis 1/72 ANBO-III consists of 39 pieces of cream and white resin (some 3D printed), two clear windscreens, two lengths of steel wire and a decal sheet with markings for the ANBO-III prototype, including Lithuanian crosses - black and white (the white is put down first, left to dry then the black overlayed on top of them) The molding on all Hobbis kits is first rate and some of the best I've ever seen. A new aspect with this release is the "support" surrounding the more delicate, one-piece struts. In the past Hobbis just surrounded the one-piece landing gear strut assembly, et.al. with foam, this time it's encased in what appears to be a vacuum-formed structure for protection. An excellent idea and to have all this as one piece is a huge advantage.
Since the fuselage is one-piece, the cockpit consists of a floor, two seats, two instrument panels, two engine primer pumps and two engine controls. In fact, these must be seen to be believed. They are 3D printed and too scale! Note that while the instructions don't specifically show the addition of these small parts, you can make them out in the drawings to get a sense of where they should be attached. These parts are so exquisitely printed they will need a delicate touch to glue in. While there is no color mentioned for the cockpit it appears the fuselage was linen covered with a wood coaming around the top of the cockpit. In addition, the inside cockpit tubing structure was metal, so could have been left natural, or painted black. There are no seat belts provided.

|
Once the cockpit pieces are added then the top of the fuselage is glued to the main body. The instructions show adding the windscreens, propeller and engine cylinders at the same time, but the instructions do mention "To install after painting", which is definitely good advice.
The instructions now show adding the wing and all its struts plus the separate ailerons. Note that in terms of the center section struts, while there are five "struts" per side, Hobbis has molded each side as one piece. Hence the vacuum-formed support for shipping.
The next instruction step has you add the bracing wires to the main wing struts (which are made out of the steel wire provided), the stabilizers with their delicate one-piece struts, and the rudder/fin again, using the steel wire as support. The landing gear, wheels and tail skid are the last pieces to be added.
A couple of final notes. First, Hobbis doesn't include the aileron control horns nor rigging for those, so those are best sourced elsewhere (for example, from Steelwork). Finally, all metal panels on the ANBO-III were made from turned metal. You will need to figure out how to replicate that yourself, as there are no decals provided for those areas.
Conclusion
Like the ANBO-II, the ANBO-III could take a little more time to build. That's due to its parasol design including all struts. But even still, this could build quicker than most other models as all parts are already "processed" for you (meaning you don't have to remove the parts from any type of "support structure" and clean them up) and there aren't a lot of parts. I'm looking forward to finishing this and adding it to my Lithuanian aviation collection.
If interested in obtaining any of the Hobbis models, including this ANBO-III, email them direct at rss.hobbis@gmail.com.
