

Eduard 1/144 P-51D
By Matt Bittner
Introduction
Is there anything that needs to be typed about the P-51D that most of humanity doesn't know about already? There are plenty of references out there so go Google!
The Kit
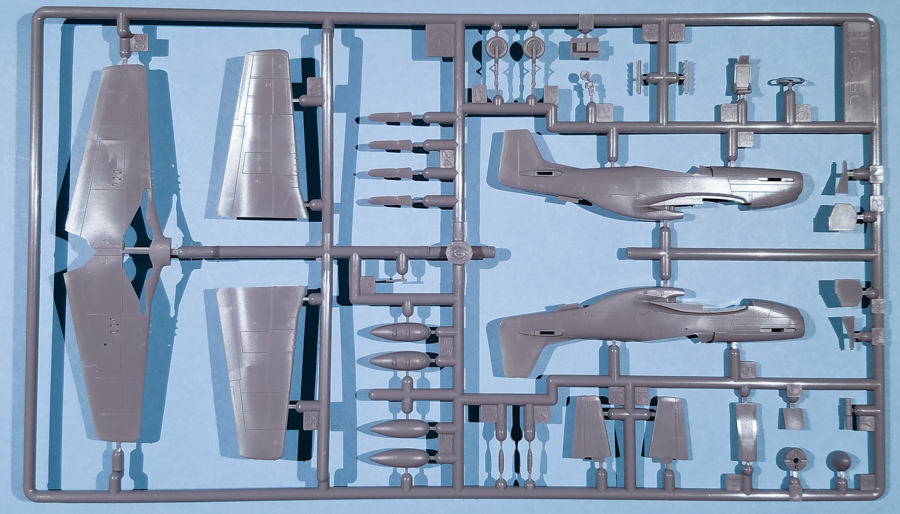
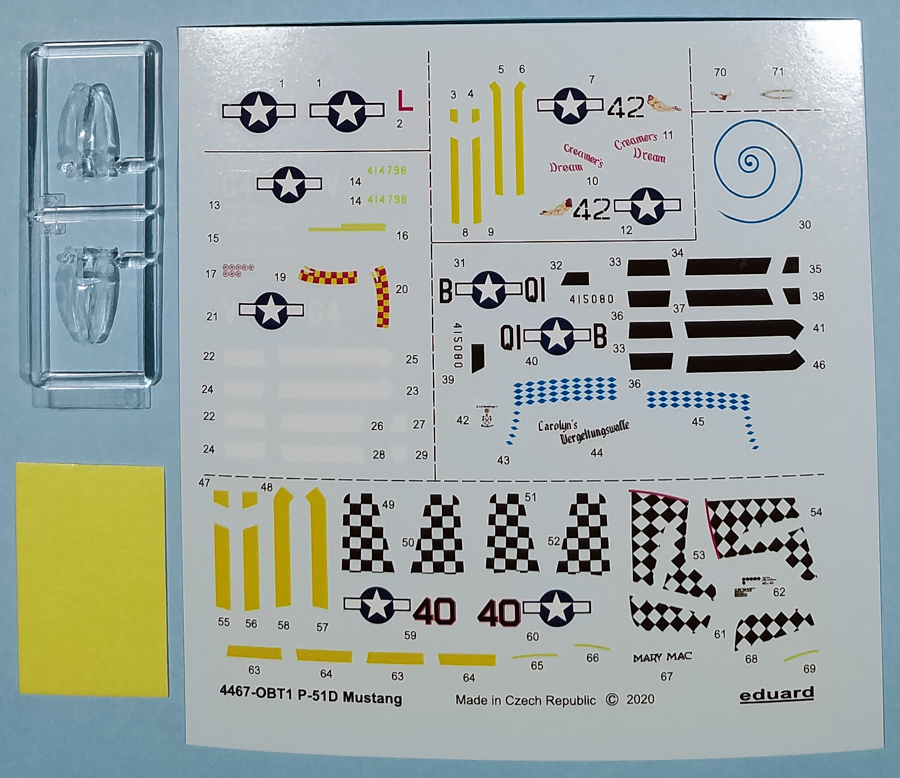
The Eduard 1/144 P-51D is actually a re-release of the Platz superlative kit with Eduard goodies thrown in for good measure. There are 36 gray, injected pieces on the main sprues and two canopies on the clear sprue. Eduard has also added a set of their masks with this release, to be used on the canopies and on the wheels. Eduard decals are for the following four aircraft:
- P-51D-10, 44-14798, flown by Maj. Joseph Broadhead, 357th FG, 8th AF, Leiston, United Kingdom, January 1945
- P-51D-10, 44-14467, flown by Lt. Gordon H. McDaniel, 318th FS, 325th FG, 15th AF, Rimini, Italy, March 1945
- P-51D-15, 44-15080, flown by Capt. Amos H. Bomberger, 361st FS, 356th FG, 8th AF, Martlesham Heath, United Kingdom, December 1944
- P-51D-15, flown by Lt. Charles White, 301st FS, 332nd FG, 15th AF, Ramitelli, Italy, January 1945
The first aircraft is finished with Olive Drab upper and Neutral Gray on the undersides, while the other three are mainly overall natural metal. The decals appear to be nicely done and in register.
|
Construction starts with adding decal seat belts to a seat you've already painted, then adding it to the already molded-in cockpit "tub", along with the separate battery shelf (all pieces naturally best painted before starting the assembly process). The propellor shaft and exhaust channel "ramp" are also added prior to gluing the fuselage halves together. Once the fuselage is complete then the stabs are glued to it.
Now the wings are glued together but before you do, be sure to drill out the holes if you want to add the external fuel tanks. The next step has you glue the wings to the fuselage along with the fuel tank pylons. The next three steps have you assemble the main landing gear and the external fuel tanks prior to adding them to the model's underside. However, they are best left off until you're finished with painting and decaling. The other additions to the underside include the separate, underside chin; the exhaust channel outlet; and the one-piece tail wheel.
The final construction step has you glue the prop blades to the spinner backing plate, followed by gluing the spinner to that assembly. Add it, the separate exhausts, the one-piece canopy (and you'll need to decide which canopy to use, based on which scheme you're finishing your model in) and finally glue the antenna on, and you now have a completed 1/144 P-51D Mustang.
|
There is one area of contention with this kit, though. The painting instructions show different external fuel tanks based on the scheme, but the kit only provides one specific type. If you need the other type of fuel tank for your build, you'll have to source them from another source. Unfortunately I do not know of a source that makes that particular set of fuel tanks in 1/144. It definitely would be nice if Eduard were to add 1/144 to their Brassin line and this is definitely one area they could start with.
Conclusion
Aside from the fuel tank mess up, this is the best P-51D in 1/144. Platz does a remarkable job with their models and this one definitely shows how nice their kits are. Add Eduard's masks and decals - along with their separate photoetch set - and you truly have a superlative Mustang in 1/144. In addition, if you want to take your kit to an even higher level, RetrokiT has a number of 1/144 P-51D details you can add.
Many thanks to Eduard for the review sample.