

Videoaviation.com 1/32 MJ1-A (Early) Loader
By Roger Sams
General
This was the first full resin kit I've ever built and I have to admit that I was a little leery in the beginning. I soon found out that there was no need to fear anything about this kit, it was a breeze to build. I found an excellent fit throughout, I encountered no major issues with construction of the kit and only some minor issues with the figure, I'll go over that later in the review. I normally don't follow the instructions to the letter, I tend to leave the smaller, fragile pieces for last and that's what I did for this build. This is a straight forward build with very few issues so I'll go over it and point out some things to be watchful for.
Construction
 STEP-1: After washing all the parts in dish soap and allowing them to dry I got started. The major issue in Step 1 is removing the large casting plug from the bottom of the kit part #2 (the rear portion of the loader). Not going to lie, this was a pain. I used a big razor saw, took my time and removed all but about a 1/8" of the plug. I then sanded the rest flat using files and sanding sticks. There'll be lots of dust so wear a mask. You'll want to keep an eye on the rear bumper as you're sanding so you don't accidently remove any of the detail. I left the control pedals off until the end of the build.
STEP-2: In this step the front half of the loader is mated to the rear half that was finished in Step 1. As in Step 1 there's a big casting plug on the bottom to be removed. Check the alignment and super glue the two large parts together. My sample's fit was perfect.
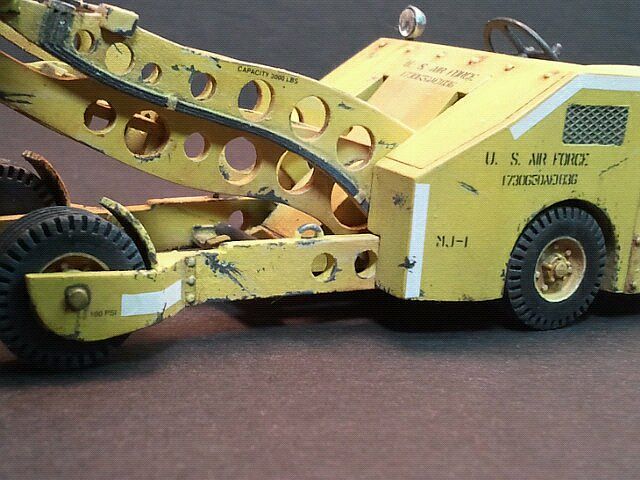
 STEP-3: In Step 3 the first two of the lifting forks is attached to the fork assembly. The forks themselves are delicate. They have a long, thin casting plug which is easy to remove with a sharp blade. Take your time and mind the instructions for the part location. I noticed only a slight amount of flash on only a few parts in the whole kit. The lightening holes on all the fork arms had a little. They clean up quick with a sharp blade, hardly worth mentioning really. The fit of the fork arms is awesome, tight and sure! I didn't glue mine in to position until the very end of the build.
STEP-4: Quick and easy construction of the cross support between the forks in this step. Just a little flash here too and again nothing a sharp blade can't handle.
STEP-5: The previous fork sub-assemblies are joined together in this step. No surprises. Check the instruction sheet for the correct alignment.
STEP-6: The outer sets of lifting forks are fitted in this step. As before take your time removing the casting plugs. The fork arms are delicate so go slow. Once again, the fit is outstanding.
STEP-7: I skipped this step until initial painting was completed. All it involves is attaching a cross support beam between the fork arms. No surprises in this step either.
STEP-8: I skipped this one until after initial painting was complete too. In this step the rear sub-assembly is mated with the lifting arm sub-assembly. The fit is great here too, really incredible.
 STEP-9: In this step the front wheel support arms, the front wheels and the outer wheel supports are constructed. The wheels have excellent tread and hub detail but on one side there's a casting plug right in the middle of the tread. This is true of all the wheels in the kit but it's not a huge deal. The portion of the tread where the casting plug was can be easily hidden behind the front fenders or, for the rear wheels, in the wheel wells. The fit of wheels is very tight, they're difficult to remove once in place so be aware. The wheel support arms clean up easy, go slow and you'll have no problems. The outer wheel supports are also easy to remove from their casting plugs and clean up fast. Same with the wheel support arms. Check the fit, mine needed a little twisting to sit squarely. I left the outer wheel supports and the wheels off until painting was complete.
STEP-10: The fenders are attached to the sub-assembly constructed in Step 9. I attached the fenders to the outer wheel supports and set them aside for painting.
Initial Painting
 With all the major sub-assemblies completed I decided to do some painting. Initially I shot a primer coat of Vallejo Air German Grey #052 down. I use this color for no particular reason other than I have a bunch of it. Since I was building the early version of the Loader I decided to go with the high visibility yellow scheme common throughout the Vietnam era. The pictures I found showed the tropical environment severely faded the finish of the vehicles so I decide to try and replicate that. First, I shot a base coat of Vallejo Deep Yellow #915 thinned with window washer fluid down in light, misted coats. With a good solid coat built up I let it dry overnight. Next I shot a misted coat of Deep Yellow and Vallejo Air White #001 and window washer fluid in a ratio of 3:1:2. I shot this only on the upper surfaces of all the parts to simulate fading. I did this by feel by just a misting light coats until I thought it looked good. Staying subtle is the key, too much of the lighten base color will be painfully obvious but fairly easy to fix at this point. The wheels were painted Vallejo Air Black Gray #055, then drybrushed a lighter shade to bring out the detail. The hubs were brush painted Deep Yellow with a drop of Flat Brown #984 added to give it a little darker hue. With the initial painting done I went back to construction.
Construction Continues
STEPS-8, 9, 11 & 12: I fitted all the sub-assemblies together without any real issues. I left the wheels, outer wheel supports and the rear wheels off until later just for ease of handling. Basically at this point construction was completed and all that was left decals, weathering and final painting.
 STEPS 13 & 14: – The smaller parts (control levers, steering wheel, headlight) are attached I left until final assembly. The steering wheel was left off until the figure was finished.
STEP-15: I painted the support bar (Part #25) Black Gray #055 and glued it into place between the forks. Next was the ordinance platform. There were no issues in its construction as only the plugs needed removed and some minor sanding. After checking my references the two part ordinance platform was painted Deep Yellow on the bottom and Game Color Chainmail Silver #053 on top. After that was dry I gave it wash with Black Gray for depth. I added the hydraulic control line per the kit direction and left the platform off because at this point I wasn't 100% sure how I was going to pose the finished loader.
Decaling
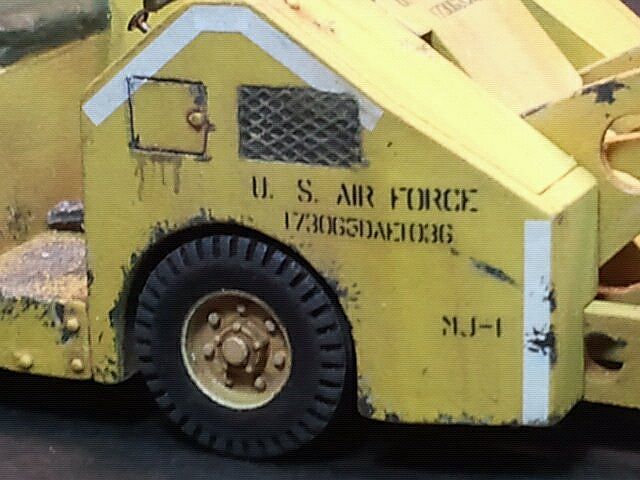
 The Fantasy Printshop decals are great! First, I shot an even coat of Vallejo Gloss Varnish #510 and let that dry. I was able to use the decals straight off the sheet with no fixing solutions. I had only one issue and I attribute it to me. The long white decal on the top of the Loader was tricky, I couldn't get it to lay down where I wanted it. Finally after too much handling it ripped in two and I gave up. Strangely enough that was the last decal I was putting on. Overall these decals are probably the best I've ever used. I shot another gloss coat on then, after drying, followed that with an even coat of Vallejo Matte Varnish #520. I didn't notice any major silvering of the decals. One note of interest – There was a decal for the control panel on the sheet but on the kit the control panel has raised detail. I decided to use the decal as the prospect of painting the cast control panel didn't sound like fun but I did like the fact that option was there. I sanded the raised detail smooth and applied the decal in place without any issues.
Final Painting and Weathering
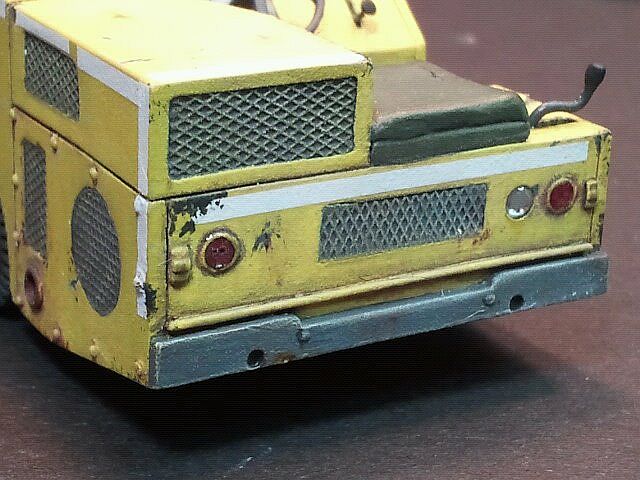
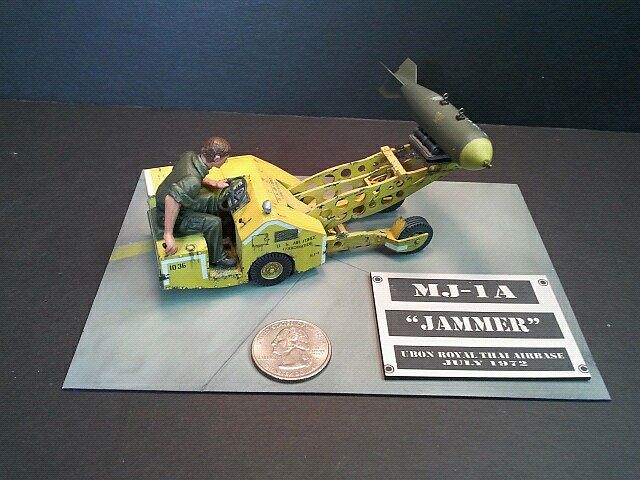
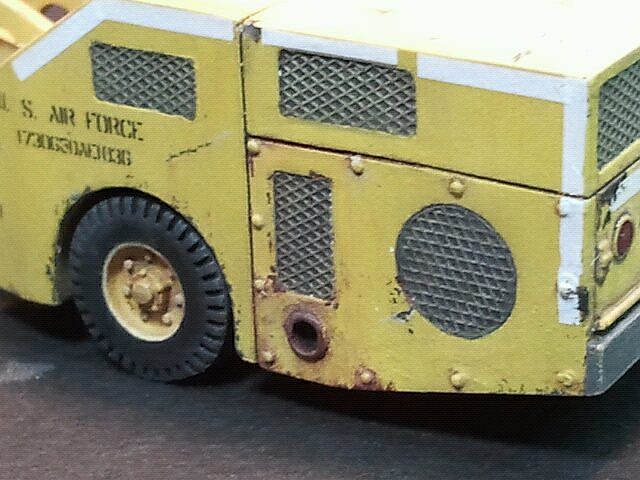 Weathering is my favorite step in completing a model. After doing some research I decided I wanted to depict a war weary Loader supporting Operation Linebacker I in July of 1972 at Ubon Royal Thai Air Base. I started by doing some detail painting of the many vents and grills. First painting them black and after allowing drying time I drybrushed the raised grill details. I think that turned out pretty good. Next I added various scratches and chips. Using a fine brush I first painted Vallejo Dark Gray Blue #054 for the chipped areas then outlined those with Game Color Dead Flesh #035. I used lightened Deep Yellow for the scratches. Chipping and scratching is harder to explain than it is to do. Try it on your next project. I used Game Color Brown Ink #092 thinned with water as a wash over the lower parts of the model to simulate dirt and grime. I used Citadel opaque Black Ink to simulate the fuel and hydraulic fluid stains. The seat cushion was painted Black Green #980 and drybrushed a light hue of the base color. I used Winsor & Newton Burnt Umber, Yellow Ochre, Red Seine to simulate rust spots and streaks. I used MIG Rust pigment for the exhaust pipe. The worn bare metal areas are drybrushed Citadel Chainmail Silver.
Final Assembly
All the remaining smaller pieces were attached at this point along with the ordinance platform. I raised the forks to give it an "In Action" pose and glued them in place. About now I noticed that the Loader was a tail sitter. To balance the thing out I begged a 1/32 bomb from a good friend then stuffed it with BBs. I finished it by adding some scratch built rollers to the platform and gluing the bomb in place. It balanced it out perfectly and I got the look I was aiming for
The Figure
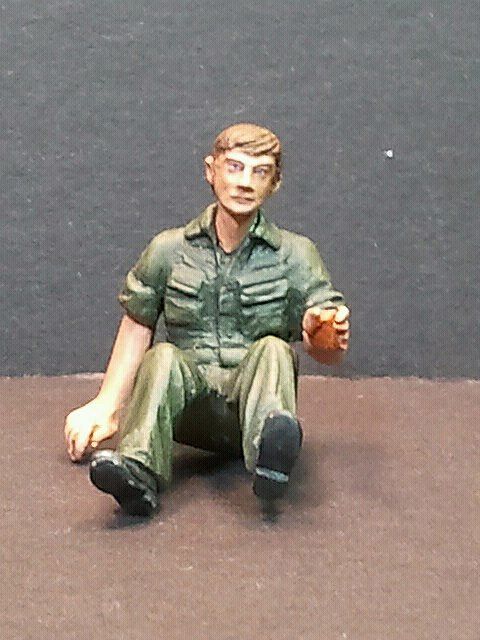 Overall the figure wasn't terrible but it is the weakest part of the kit. The fit was OK but there are some big gaps to fill around the waist and the arms. It took a little TLC but I think he turned out OK. I painted the uniform with Vallejo Model Colors Olive Drab, highlighted with khaki and the face was painted using Vallejo flesh tones.
The Base
I need a base to put my Loader in action so I decided that I'd make a section of flightline from a piece of styrene. I scuffed up the surface then scribed some lines to simulate expansion joints and etched some cracks and chips into it for affect. I then painted it to look like old worn concrete using various shades of Vallejo grays and tans. I wanted a plaque too so I contacted my friend Ryan Hoffman at Fireblade Laser Engravers, LLC. Fireblade does wonderful work; everything was cut to my specs quick and easy! They have very reasonable prices and a quick turnaround. Check out their Facebook page, if you can imagine it Ryan can cut it with his laser.
Conclusion
This was a fun kit to build! I normally build 1/35th scale armor so this was a step away from my comfort zone. It nearly falls together itself, no fit issues were encountered. Excellent decals really make it pop. As I said in the box review it aches to be super detailed and will look great next to any 1/32 scale aircraft from its era. Check out the other kits available from Videoaviation.com on their website, they're cool too. Thanks to Fireblade Laser Engravers for providing the plaque. Big thanks Matt Bittner at InternetModeler.com for publishing this review and to Videoaviation.com for the providing the kit and the opportunity build this wonderful little gem.