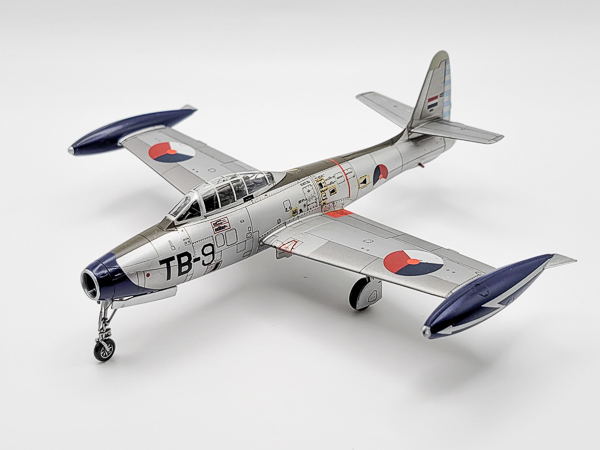
Using Vallejo’s Metal Color Line on Tamiya’s 1/72 F-84G Thunderjet
By Chris Banyai-Riepl
Overview
Easily one of the most challenging finishes for scale models is a natural metal finish. Modelers have tried just about everything under the sun to replicate this finish, some resorting to using actual aluminum foil while most just turn to one paint manufacturer or another to get this finish. For me, I’ve been wanting a good acrylic metal paint that could give me a nice range of different colored metals. I had been using the Vallejo Model Air metal paints, but those didn’t give me quite the finish I was looking for. When I saw new bottles of their Metal Color line at the local hobby shop, I thought I might as well give those a try. I had a Tamiya F-84G I had started ages ago, so with a test model in tow, let’s give these a go.
Trying the Paints
As I noted, this was a kit I had already started ages ago, so it didn’t take much time to get it ready for paint. I didn’t want to do your typical Korean War-era USAF F-84G, so I picked up a sheet of Dutch Thunderjets and picked a scheme, then turned to the paints. The Metal Color lineup has quite an extensive lineup of color choices, so I picked a handful that I thought would work well: aluminum, chrome, duralumin, pale burnt metal, and jet exhaust.

|

|
With those in hand, there was only one choice for the first color: chrome. Finding a good true reflective metal paint is challenging, so I had to give the chrome a try. I was also very curious as to its overall adhesion, so I decided to put it down over bare plastic. For the former, I was amazed at the finish. This chrome is bright, highly reflective, and perfectly smooth. To say I was impressed is an understatement, and the photos really can’t capture how bright this chrome is. I didn’t waste time before trying the different shades, and the results were simply amazing.

|

|
But (you knew there was a but) there was an issue, and that was with the adhesion. During one of the sessions of doing different panel lines, the tape pulled up the paint off the nose. While I was hoping this wouldn’t happen, I honestly wasn’t surprised, as I did spray it down over bare plastic. Before going the route of sanding it all down, though, I thought I’d give the problem area a quick spray with one of the colors to see just how much of a lip the lifted paint left. And here came the next huge surprise: one quick spray later, and the lifted section was gone. No ridge, nothing, just a smooth finish. I have never had a metal finish do that before, so in addition to the great finish overall, that has fully won me over to this line of paints.

|

|
After doing a few more different panel colors, and getting the blue nose & tanks and olive drab antiglare panel on, I hit everything with a gloss, both for decals and to see how the metal paints did under clear coats. While the gloss coat took away some of the high shine, the color differences remained strong on the metal colors. Applying the decals, a blend of Dutch Decals and kit decals, got this one close to the finishing like. The final step was a satin coat to unify everything, and with this the tones dulled a bit more, but the end result looks very much like a weathered metal finish.

|

|

|

|
Conclusion
Having tried these paints out, I can now say that my hunt for a decent acrylic metal finish is over. These Vallejo Metal Color paints go down smoothly and very thinly, and have a bright, reflective finish. I am looking forward to finishing more models with these paints.
