History
The Republic P-47N Thunderbolt was the last version to be manufactured in the P-47 family. It was a specialized long-range version built specifically for service in the Pacific Theater of Operations and was especially effective in escorting B-29 bombers on bombing raids over Japanese mainland. What made this possible was that for the first time in P-47 history, with the help of redesigned wing, the plane was able to carry fuel in two 93-gallon wing tanks. The new fuel carrying wing design also had larger ailerons and squared-off wingtips, both of which improved maneuverability. The additional weight of the fuel in wings also required strengthening the landing gear to handle the additional load and as such the gear stance was widened on the N model.
Armament consisted of eight .50 caliber machine guns and two 1000-lb or 500-lb bombs. The P-47N-5-RE and later variants could also carry ten zero-length rocket launchers added to the outer wings. What made the Pacific Thunderbolt so valuable was that with its added fuel capacity, it was able to make the very long trips from Saipan to Japan and back as well as other long over water sorties, thus providing much needed support for bomber missions.
The Markings
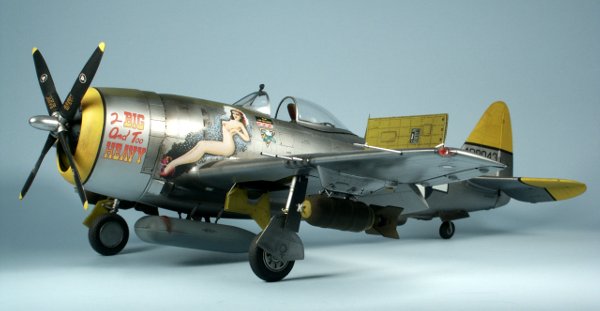
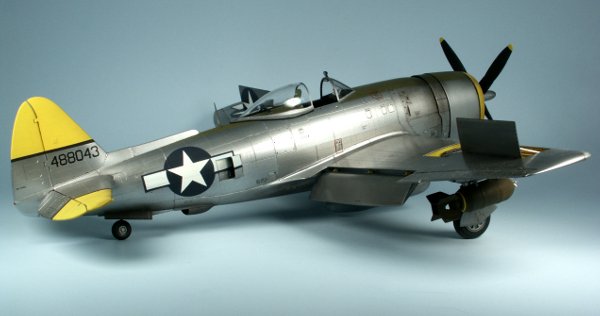
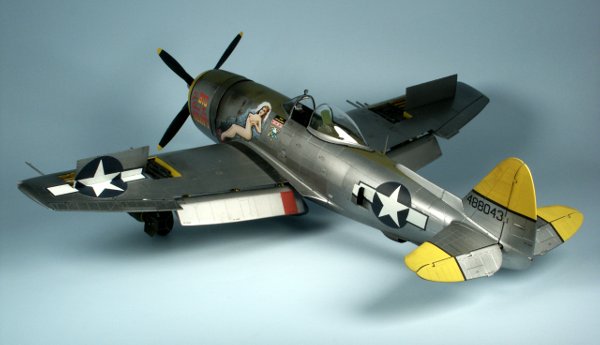
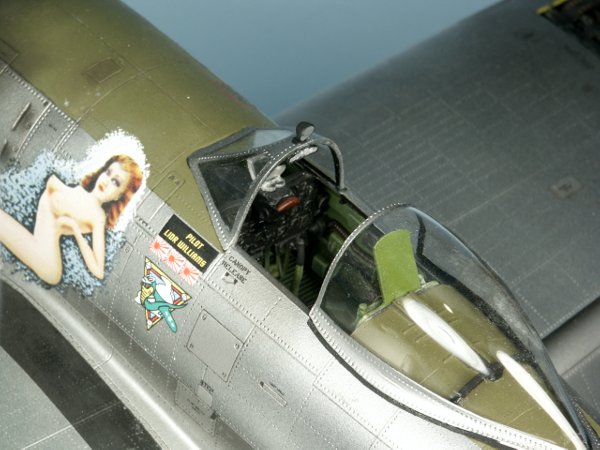
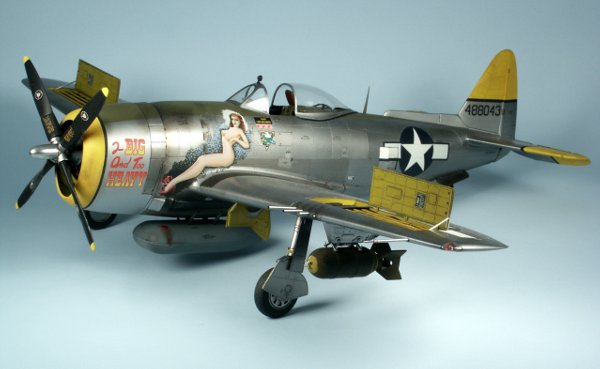
This P-47N boxing comes with two options for aircraft markings. First is the aircraft "Too Big, Too Heavy"/"Short Snorter"; and the second is Lt. Oscar Perdomo's "Lil' Meaties Meat Chopper". I chose to depict the "Too Big, Too Heavy" aircraft for my build. The aircraft was assigned to the 333rd Fighter Squadron of the 318th Fighter Group operating from Ie Shima, a small island off the northwest coast of Okinawa, Japan. The 318th was the first unit to receive the new long range P-47N's in early 1945.From research, I found that Trumpeter had also incorrectly specified the pilot for this aircraft as Durwood Williams, when in fact the aircraft had two different pilots, neither of them being "Williams". The first pilot was 1st Lt. Wayne A. Duerschmidt and the second pilot was Lt. John D.K. Bruner. Of special interest to modelers building this specific aircraft is that this aircraft did not always carry nose art on both sides. Apparently while Duerschmidt was assigned the aircraft, the plane only carried the "Too Big, Too Heavy" name/nose art and yellow half vertical/horizontal stabilizer scheme. It was not until the squadron switched to the black/yellow zebra stripe markings on the tail, that Lt. John Bruner acquired the aircraft and added the "Short Snorter" name and nose art to the right side of the engine cowl. This is especially useful information to remedy Trumpeters second (and biggest) mistake in this kit, which is the misspelling of the later nose art as "SNDRT SNDRTER" instead of "SHORT SNORTER". To avoid having to replace the kit decals with aftermarket decals, I chose to depict the early version of this plane while Duerschmidt was the pilot, and it only carried the "Too Big, Too Heavy" nose art.
Kit Contents
Trumpeter's 1/32 scale P-47N Thunderbolt consists of 13 sprues containing an impressive 400 parts in light gray plastic; 2 sprues of 21 parts and one engine cowling in clear; three vinyl tires; soft vinyl machine gun ammunition belts; one photo-etched fret; acetate film for instruments and the afore mentioned decals for two aircraft. The sprues are all free of flash with small concise attachment points. The exterior parts feature finely engraved panel lines and subtle rivet detail atypical of some previous Trumpeter releases. There is a vast array of extra parts that are sure to fatten up your spares box, such as three prop variants, 150gal/108gal/75gal drop tanks (2 of each) in addition to the "pancake" belly tank, 250lb & 500 lb bombs, triple tube M-8 rocket launchers as well as 10 zero length rockets.
Construction
Construction starts, like most kits, with the cockpit. Some "experts" will be quick to point out that the corrugated floor included in the kit is incorrect, as well as that the pilot seat is missing arm rests, however my research shows that a smooth floor was only used in P-47N-25-RE and subsequent versions and arm rests were not installed until P-47N-15 and later versions ("Too Big, Too Heavy" was a P-47N-1-RE). There are two types of gunsights supplied, so some research will be in order to ensure you use the proper one.
The only issue I had in the cockpit assembly was the sandwich style instrument panel. The instrument panel is supplied in clear with photo acetate instruments and a gray plastic rear section. Therefore you must mask the instrument faces to allow the middle of the sandwich, the acetate dial faces, to show through. I accomplished painting the clear instrument panel black, and keeping the dial faces clear, by carefully applying drops of Elmer's glue to mask the gauge glass, sprayed the panel black, then picked off the glue. This method worked great. The rear of the instrument panel has nubs on it depicting the rear of the instruments. In hind sight, I should have added wiring to them as this area is slightly visible after final assembly.

Next up are the main landing gear assemblies which are rather straight forward, however I opted to attach the gear doors during final assembly instead of at this time as the instructions direct. Another item that could use fixing is the wheel covers. The type included are the early solid wheel cover type instead of the 8-spoke wheels they should be. An aftermarket resin wheel set can easily remedy this problem if the builder is so inclined.

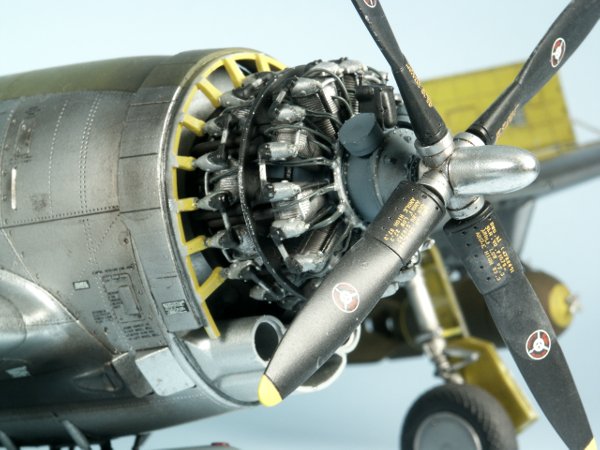
Assembly then moves to the engine which is really a model all by itself. There are almost 80 parts in the engine assembly alone! There are optional parts such as two types of crankcases and two types of rocker arm covers requiring some research into what type your particular model should have. The instructions are no help in determining which should be used in any circumstance. With the vast number of parts, many of them quite small, it is imperative to work slow, test fit, and test fit some more. For example, if you don't get the rocker arm covers lined up perfectly (all 36 of them), you will not be able to get the engine frames mounted properly as the frame attaches to tiny points on the front of each rocker arm cover. Ask me how I know! Also, the numerous exhaust pipes will need some convincing to get them in the right place since they don't line up too well with where they are supposed to go in the cylinders.
Next up is what some might see as a waste of time because 90% of it will never be seen once the fuselage is closed up. I'm talking about a complete supercharger system housed inside the fuselage. There are several pipes and ducting that will require a lot of test fitting to ensure proper fit in the fuselage. This is important because the cockpit assembly mounts on top of two of the tubes running down the fuselage and proper alignment is crucial for the supercharger waste gate to line up properly at the belly of the fuselage, as well as the intakes located on the both sides of the fuselage halfway between the cockpit and the tail. I chose to assemble the supercharger as a subassembly and install it in one half of the fuselage to aid in proper alignment. Another tricky area was assembling the motor mount which consists of 4 parts and all must line up perfectly to work as intended. A few photo etch screens are installed at this time to the front air intakes.
It's time to close up the fuselage and watch the bulk of the work done to this point disappear, so take one last good look at it and even a few pictures to show what's inside. Instructions will have you attach the assembled engine in its location before joining fuselage halves, but I did so with just a few tiny drops of glue for alignment purposes, then after getting the fuselage together I removed it to save the installation for final assembly.
All control surfaces are on this big bird are movable, and the flaps & ailerons are put together at this time. You have a choice to make as to whether you want to display your model with flaps up or down at this time and the flap hinges are different depending on your choice. I decided it would be better to attach the upper wing half to the fuselage and spars thus ensuring a strong bond with the spars (instead of sliding a assembled wing onto the spars) then attach the lower wing half to the upper wing half already in place. This also helped with the most visible wing root joint and no filler was necessary on the top. The bottom wing root area has two tabs on each side of the fuselage which must be removed or the lower wing half will never fit. Even with the removal of these tabs, the join of the lower wing to the fuselage is ugly and needs some work to make it look better.
The instructions appear to indicate you should install the assembled flaps & ailerons in their slots then glue the wing halves together. However, I found it much easier to glue the leading edge of the wing first, creating a pocket for the flap hinges to drop into at the rear, and then continue gluing the wing on the trailing edge. I chose to install the ailerons after the wing halves had been joined.
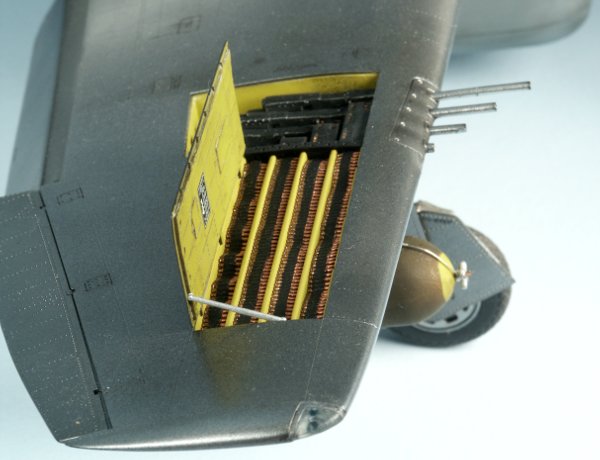
The instructions will have you install the inner gear door actuators in the wheel well, but this leaves a small rod sticking out of the wing begging to be broken. I chose to leave it out for final assembly and ultimately replaced the plastic actuator rod with a wire one for better effect. One more important note here is that you will be instructed to drill holes in the lower wing half before joining to the upper wing half to install the rocket pylons, however, early P-47Ns were not equipped with these rockets. After drilling holes and gluing in the pylons, I had to remove them and fill the holes since this aircraft was not equipped with the rockets.
Eight nicely detailed 5 piece guns are assembled and installed at this point, with a choice of gun barrels depending on your build. I chose the smooth barrels as my references indicated the perforated type were not used on this aircraft. I also left off the front gun covers (part F14) so that I could glue the gun barrels in after paint, keeping them out of harms way during the rest of construction, and making masking easier during paint stage. Ammo belts & ammo bay covers were left off until final assembly as well. I found that all three clear recognition lenses for the right wing are oversized about 15% and require some trimming to get them to fit in their holes.
Construction moves on to the tail surfaces and fuselage spine. The spine consists of two halves and runs from just aft of the cockpit all the way back to include the vertical stabilizer. The instructions recommend gluing the two halves of the spine together first, then gluing that assembly to the fuselage. However, for fear of having a step in the fuselage where the spine meets the fuselage, I opted to glue on half of the spine directly to the fuselage with extensive dry fitting and care taken during glue application and placement. Once that half was secure, I test fit and glued the other half to the fuselage. The result was a perfect seam on the fuselage.
The elevator halves are glued together by sandwiching the lower horizontal stabilizer half between them in a clamshell type hinge, then attaching the upper half. This allows the elevator to be posable provided you are careful with glue application. The rudder is attached to vertical stabilizer in the same way except both halves of the stabilizer are already glued together and the rudder is simply glued together over the hinge on the stabilizer in the same clamshell type hinge mechanism. Again, careful gluing here will yield posable control surfaces.
Nearing final assembly, you are instructed to glue the cowl flaps to the engine cowl. However, to allow the engine cowl to be removed to show off the amazing engine inside, I chose to glue the cowl flaps to the fuselage. This allows the cowling to fit snugly onto the cowl flaps, yet still be removed if wanted. There are optional open or closed cowl flaps, but I found the opened cowl flaps to be grossly misshapen and there was much less work involved in using the closed cowl flaps, which were also not without needing work and trimming to get them to fit properly. The engine cowling is molded in clear styrene which would be great to show off your work in the engine compartment, but I just could not bring myself to leave a clear cowling on this build.
Painting/Decals
With all the main assembly done and the "fiddly bits" left off, it's time to get ready for paint. I planned to spray this plane with Alclad II Aluminum, so surface preparation was crucial because every tiny flaw shows up under Alclad. I spent several hours going over the plane looking at joints, panel lines and rivets making sure everything was acceptable. Once I was pleased with it, I masked as needed and sprayed a few coats of Mr. Surfacer 1200 primer on the entire plane and rechecked my work looking for any flaws that I missed the first time then sanded all the primer with 600 & 800 grit sandpaper.
Next up was a gloss black undercoat for the Alclad topcoats. After much research, I decided to use Alclad's black gloss primer. I have read from many people who say this product is terrible and never dries, but I was told that the key is to ensure it is thoroughly mixed. I accomplished this by using a chopstick to stir the black primer. In the bottom of the bottle was a large mass of some goopy substance, and much stirring was needed to get the product completely mixed up. Once mixed, it was placed in my airbrush straight from the bottle. I had absolutely no problems with the primer. In fact, I had to hold one wing of the plane and spray all other surfaces and by the time I had sprayed everything else and was ready to spray the wing I was holding, I could hold the surfaces I just sprayed and they were completely dried (elapsed time maybe 5 minutes!).
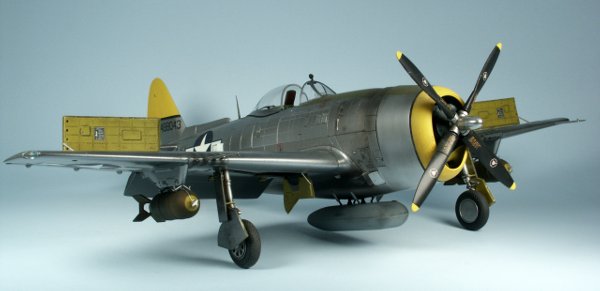
Now it was time to spray the finish coats. I chose Alclad II Aluminum for the entire plane and followed that with masking and spraying select panels with various other shades of Alclad to break up the monotony. Next I masked and sprayed the yellow surfaces on the tail & cowling, anti-glare panels, and added the black stripe at the edge of the yellow to Alclad line. Then I spent quite a bit of time cutting my own masks for the national insignia. The goal was to not use any Future on this plane as I did not want to alter the appearance of the Alclad. This is why I chose to paint all national insignia and also purchased a Hobby Decal dry transfer stencil set. The only decals used are the two nose art decals, the squadron insignia and pilot data plate. After placing these decals, I freehand sprayed Future over the nose art, squadron insignia and pilot data plate, then masked off at the panel lines to spray Future on the nose art text on the cowling. Weathering was done with chalk pastels, and some spraying of very thinned paint in some areas. Finally all the "fiddly bits" were added and the build was completed.
Conclusion
Trumpeter's 1/32 P-47N was great fun to build. There are only a few complaints I have with the kit, the first being the critical error in misspelling the nose art text. Fortunately this can be averted provided you build the early version of "Too Big, Too Heavy" or buy the available Zotz aftermarket decal sheet for this same plane. The only option to fix the pilot's name decal error is to hand paint it, as the Zotz decals also have the incorrect name (Joe Heffernen).
There are few fit issues with the build, the worst probably being the fit of the lower wing half to the wing root area, followed closely by the supercharger assembly and the fuselage spine to fuselage joint. However, the latter can be avoided with plenty of dry fitting and careful construction. There's tons of detail in this plane and unfortunately alot of it is lost once the fuselage is closed up. Perhaps it would have been better for Trumpeter to release another version of this kit with a clear fuselage (or at least one half) to show off the supercharger assembly, oil tank, and engine, then release the non-clear version excluding the bulk of the parts that won't be seen in a solid body for a lower price.
This kit builds up nicely and is probably best suited for those with at least intermediate modeling skills. I highly recommend this kit to anyone who is a fan of P-47s, WWII aircraft, or 1/32 scale aficionados. I'd like to thank Trumpeter, Internet Modeler, and Chris Banyai-Riepl for the opportunity to review this kit.
