
Tamiya's 1/48 Skyray As a Drone Controller
By Drewe Manton
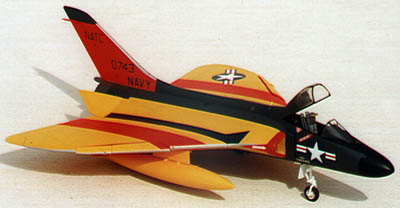 |
A while ago I was part of a thread on RMS discussing the Cutting Edge stencil decal sheet for Tamiya's lovely new 1/48th Douglas Skyray. While expressing my concerns over this sheet's value for the money, I happened to mention that my chosen 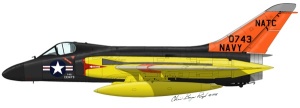 subject was the drone controller aircraft featured on sheet 48-091. I subsequently received several e-mails from people expressing an interest in seeing the finished model. One, from Tom Cleaver at Internet Modeler, suggested that I might like to say a few words about the model and submit some photo's to them for publication. Here are those few words (bear in mind the model was assembled and painted already so there are no "in progress" shots as such.
Assembly
The model as seen is basically SFTB, the only additions I added were some etched metal seat belts, otherwise what you see is what you get! All interiors aft of the cockpit were sprayed with Halfords white primer prior to assembly to speed up this part of painting (the cockpit area was sprayed Halfords matt black and detail painting was carried out with Humbrol paints). As an experiment, I first painted the radarscope silver and then overcoated with Tamiya clear green to see how it looked. Whilst the result is perhaps a little bright and not completely accurate, it certainly looks good and catches the eye. The model basically slipped together in the customary Tamiya way. The only filler I used was a bead of Tippex along the upper forward/rear fuselage join. The slots for the belly Sidewinder pylons were filled with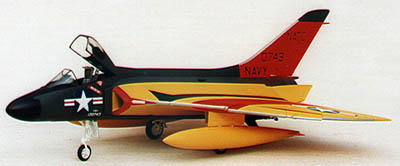 successive coats of gap filling cyano (ZAP-A-GAP) and sanded and polished smooth prior to rescribing the surface detail in this area. The windscreen was glued in place with Tenax and masked. The main canopy was also masked and this just popped into place for spraying. Time to start waving the airbrush at the model!
Painting
This is where it gets interesting. Two of the three main colours in this a/c are notoriously translucent and difficult to spray. At the time I commenced spraying, I had yet to receive my tin of Extracolor Insignia Yellow and so was forced to use the (matt) Humbrol equivalent, not perfect but it would have to do! The light grey plastic of the kit had led me to think I could get away with no primer coat of white prior to applying the yellow. Big mistake! In the end the wings required some 6-7 coats of yellow to achieve an acceptably opaque yellow. The tail, although being red/orange was also sprayed yellow to ensure uniformity with the wing stripes when sprayed. Take this as a warning...always undercoat with white prior to spraying yellow (or red), it saves a lot of heartache (to give you an idea the white undercoated drop tanks required two very thin coats of yellow to achieve a beautifully smooth finish).
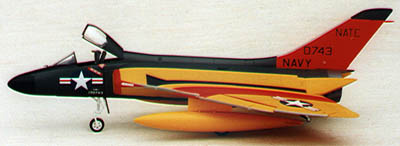 With the yellow rubbed smooth with a piece of Scotchbrite, I masked for the application of the red/orange tail and wing stripes. This colour is stated as being FS18913 and was obtained from Extracolour (X161), it turned out to be a fluorescent blaze orange, I always assumed that this colour was far redder but in the end I bowed to greater minds than mine and on it went! Luckily when applied over the yellow (the reason for having sprayed the tail as well) it went a bit redder and darker and looked very good to me. Over the yellow it only needed a couple of thin coats to cover well. The masking was removed and more rubbing down with Scotchbrite was done to smooth the finish. Finally the last major masking operation was carried out for the application of the engine grey to the fuselage and tail tip. Again Humbrol was used (number 32) for this and when dry, I rubbed down before I removed the masking.
The final bit of spraying with the airbrush was to the inside of the slats - these were painted with Insignia Red. With this done the model received several coats of Halfords clear lacquer to give a smooth hard finish. Having got the main colours on the a/c the next step was to mask and spray the minor details (nose cone/leading edges) prior to decal application. All of my masking is done using Tamiya tape. Whilst the nose cone and anti-glare panel were sprayed with Tamiya Gloss Black, I chose to hand paint the leading edges with Humbrol Chrome Silver. 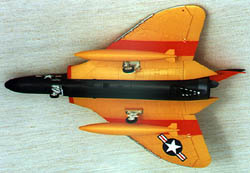 The result was not as perfect as I would have liked but the masking of these areas is a nightmare believe me! Tom Cleaver assures me that it is entirely possible to work silver decal film around the leading edge fences so I may be tempted to take this route on my next Skyray.
The very last job before decals was to mask and spray the tailcone. I had masked the tailcone off prior to spraying the rest of the model in order to keep the plastic "virgin" for the metal paint. This masking was now removed and the area around the tailcone masked. The colour I used for the tailcone was Humbrol Metalcote "polished steel". The area was given a good coat of this and allowed to dry for a half-hour or so before buffing up with a duster. The effect this paint gives is superb but be warned it is fragile so handle with care.
Decals
The decals for this kit were from Cutting Edge sheets 48-091 & 48-092. I ordered sheet 48-091 specifically for the drone controller but had I known just how few decals this involved I would have been tempted to make the scheme up from my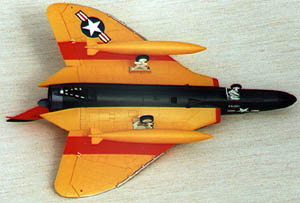 spares box! Aside from the Bureau Numbers in white, all the decals for this scheme are basic black numbers and letters. Stencils and national insignia came from 48-092 and all bedded down beautifully with Super Set and Super Sol. The intake warning decals are an awful fit and needed cutting and copious amounts of Super Sol to go down well, even then I basically painted over most of the decal when dry with Humbrol No19, which is fortunately almost an exact match once dry. The black walkway decals also needed a little touching up once dry in order to make them reach far enough forward (matching the black was not a problem!). All other decals went on fine but be aware that the NATC logos go over the rudder hinge line and will need cutting along this line and an extra application of Micro Sol to bed them down well. There really is very little else to add to this as the scheme (at least decals wise)is so basic.
Finishing
With the decals dry, the model was washed with warm soapy water to remove setting solutions and decal glue and allowed to dry. The decals were then 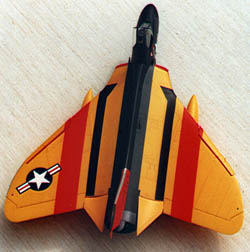 sealed with a coat of Johnson’s Klear applied with a wide flat brush. Time to weather. I had decided that this model would be fairly clean and represent a used but not shabby aircraft. To this end I ran some burnt umber oil paint around the panel lines and wiped the excess off after around 15 minutes with a tissue moistened in white spirit (the multiple lacquer coats and Klear protect the paint finish). The panel lines on the grey fuselage were done bit they are a little too dark to show any effect really. This aside the only weathering would be a little airbrushing around vents and the like after varnishing. For the varnish I used a 50-50 mix of Aeromaster acrylic flat and satin varnish. This gives a slightly shiny but not quite semi-gloss finish that I like very much and looks the part to me.
Final Assembly
With the varnish in place and dry final assembly and detail painting could take place. The canopy was popped off and all masking removed prior to inserting the ejector seat and internal canopy structure. My canopy is currently not 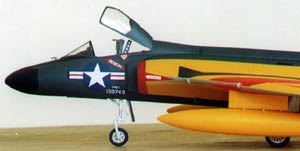 glued but just sits in the open position. If I find details of the raising mechanism, I may add detail later. Tail bumper and arrestor hook were white glued in place and then the undercarriage and doors were glued in place with Zap-a-Gap. With this done the model is more or less done, the only other things were a little touching up some areas and to add the navigation lights (for this I painted the areas with silver and when dry overcoated with clear green and red). That’s it. Done!
Conclusion
This is overall a great model of a fascinating aircraft - easy to assemble and with some great colour scheme possibilities. The drone controller has become at one fell swoop the brightest model in my collection! Were I to do the model again there are a couple of things I would do differently:
-
I would attempt to add some intake trunking -this is more obtrusive than I expected on the finished model and was a bit of a disappointment to me.I would definitely give the model a white undercoat before commencing painting of the yellow. This was a major pain to paint with out the undercoat! I would wait for the Extracolours to turn up and not use matt colours for a scheme like this in future. Although the fluorescent red/orange was a match for the colour in my FS595A book I still think it doesn’t look quite red enough. I would perhaps add a drop of red to my next drone controller (I’m thinking Crusader!) and I would also possibly lighten the engine grey just a little.
-
And finally I think I would attempt to use silver decal for those B**%$!!£y leading edges! Just goes to show that you always learn something with every model!