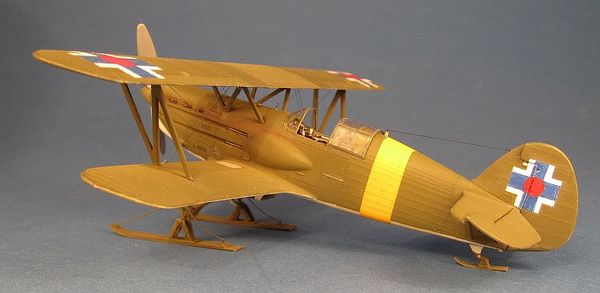
RS Models 1/72 Avia B-534 IV. version/5. Series
By Curtis Knight
Introduction
 So long ago that I'm too ashamed to share the date noted on my build journal, I received this, (and another), RS model for a review/build. As is typical with me, I tore into the end opening box, enjoying that familiar "buzz" that accompanies the first glimpse of a new kit. For me, the sensation was heightened by the subject matter. I'm an absolute sucker for almost anything with two wings. But further than that, if the possibility exists for pontoons or skis to be hung from the bottom side, I'm hooked hard. Such is the case with the Avia B-534, and I was excited to get started!
 I didn't happen to have much in the way of reference material on the shelf so after giving the kit contents a cursory look, I went immediately to "the google". There I found some fabulous material in the way of scale three-views as well as some really convincing cockpit artwork composed for flight simulation games. These along with various build reviews of the beautiful Eduard 1/48 scale Avia B-534 became the basis upon which I devised the direction I'd take my latest favorite project.
The kit instructions provide a short history of the development and operational history of the aircraft as well as the engineering numbers. A helpful list of references is also included. The "exploded" view style of directions are clear and concise and provide a good understanding of parts placement. A frontal view of the rigging arrangement supplements a low quarter rendering so the basics are mostly provided for wing rigging positions. More thoughts on this later.
 Decals are thin, in perfect register, and opaque. Five aircraft are provided for including aircraft operated by; Czechoslovakia, Slovakia, Bulgaria, the Czech Police, and The Luftwaffe. Decal placement along with the corresponding painting arrangements for each aircraft are pictured on the backside of the box. No color numbers or manufacturer's names are provided; however, a color table is given with general color names.
The kit sprues come enclosed in a resealable plastic bag; a thoughtful touch when dealing with the typically flimsy end opening box. I found the plastic to be reminiscent of the older Heller kits in both color and density. The plastic used was similar to all the short run kits that I've built being somewhat soft and yet holding nice clear detail. There are no alignment pins as are found on mainstream models so some extra care is necessary during the assembly.The clear windscreen, sliding hood, and quarter windows are cast as one piece and are a bit thick in this scale, but seem comparable to most of the canopies I've seen provided in other manufacturers kits.
Upon initial review, the RS kit compares favorably to to the venerable old KP kit.
Construction
 I begin the construction phase of all model projects with a bath. Not for me, that'll wait till Saturday. The kit plastic needs to be washed down however, to remove any mold release agent. I like to use a cake pan filled with warm (NOT HOT) water and just a couple small drops of liquid dish washing detergent. An older soft toothbrush ensures that all the nooks and crannies get their fair share of cleaning. A few things that I've learned in the years of doing this are; that kit parts don't disappear down the drain as easily if washed in a cake pan, that I'm a lousy plumber, and that my wife is far more tolerant of my hobby when it doesn't include plumbing disasters or dirty cake pans. I generally use a hair dryer set to blow cool air to speed the drying process.
 Due to the limited run nature of the kit, (I suppose), the sprue gates are marginally larger than many mainstream kits. This required a little extra care be taken when removing the parts from the sprue trees. I've found the JLC saw to be indispensable for this. At this point, all that is usually needed to give a perfect part are a few careful clean-up strokes with a sharp #11 blade and a final swipe with a sanding stick. Note, care must be taken during the removal of the fuselage half that has the small antenna mount molded to it as it is located very close to the sprue gate. While on the topic of the fuselage, I want to mention that RS has done a wonderful job of getting the look of the fabric over stringer effect of the rear fuselage just right.
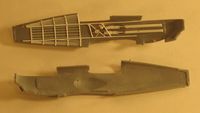
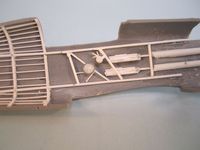
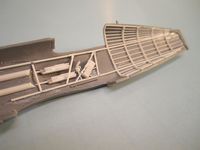
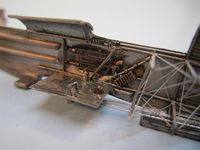
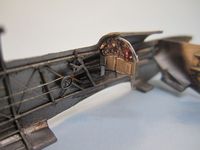
 With the fuselage sections removed, I began to "scratch" the A.M.S. "itch" that seems to always appear at just about this point in every project. After having seen some really wonderful renditions of the B-534 done using the larger scaled Eduard kit while looking on-line for reference, I had developed the notion that this little bird needed a fully outfitted interior. I'm sure that there is a personality disorder associated with this sort of irrational behavior, or perhaps as Freud would put it, I may be, "compensating", but either way, out came various shapes of blades and the scrapping of the interior of the fuselage sections commenced. Particular attention was given to thinning the bulge that houses the side mounted machine guns as these are such a predominant feature of the interior. When the appropriate amount of plastic had been removed, the surface was smoothed by sanding, and sanding, and even more sanding. Following this most tedious of all modeling endeavors, strips of Evergreen plastic were applied to replicate the stringer and structural detail of the fuselage interior. A control panel and ammo boxes were constructed from sheet plastic, as was a new seat. Belts were made from craft paper tape and small bits of very fine wire. And finally, the horizontal "cross members" and wire bracing were added with much test fitting of the halves together. Although Brengun has produced what appears to be a very nice photoetch set for this kit that would have provided many of these elements, I chose to go the scratchbuilt route because I felt that I could manage to get a more accurate scale rendition while enjoying the thrill of actually creating rather than merely assembling. And since this is the aspect of a model build that I enjoy the most, I chose to indulge myself.
Painting of the interior was done at different stages in order to try to avoid damaging parts.
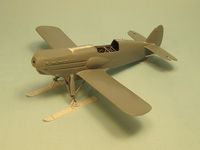
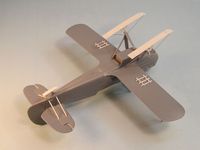
 When at long last it came time to button up the fuselage halves, I was glad for having test fitted the parts prior to all the scratchbuilding effort. My example had needed a small amount of sanding to the port fuselage half in order to achieve a positive join (particularly in the front portion of the fuselage). The pictures of the unpainted fuselage show a small amount of filler and primer that was needed to even up the join on the top side of the fuselage prior to the cockpit opening. I have to confess that this may not have been necessary had I not chosen to do all the work to the interior. I suspect that the control panel may have been just a bit too wide to allow for a positive join. There was also a need for just a small amount of filler where the vertical stabilizer meets the fuselage.
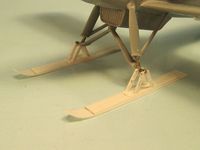
 As I alluded to previously, I find aircraft equipped with skis or pontoons to be far more visually interesting than their wheeled counterparts. And, as luck would have it, (my good fortune if not theirs), the Slovak Air Force operated at least some of their B-534's on the Eastern Front with skis. So out came the sheet plastic and skis were created to match the line drawings found online. The conversion was really fairly straight- forward. All that was necessary was the removal of the bottom portion of the landing gear support as it turns out to meet the wheel spat. With that portion of plastic gone, a small hole was drilled vertically into the now squared off support strut and a previously bent brass rod was epoxied in to provide the attachment point for the skis. The rear ski was attached directly to the tail wheel support after having removed the wheel.
At about this point in the project I decided to replicate the small bomb rails using Evergreen strip. In the end, I realized that I should have used a round section of plastic for the length of the bomb rails, but instead used a rectangular stock. My bad, as the saying goes. The bomb hanging cleats were just a very narrow section of the thin sheet plastic given a slight curve by wrapping around a paint brush handle. In the final analysis, I think that the kit parts would have probably looked nearly as convincing.
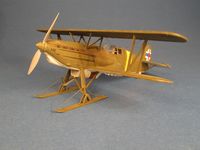 Something else that I feel adds to the visual interest of a model in a display case or on a contest table, is to remove and pose the flying surfaces in a more spontaneous position. This was easily accomplished by scribing repeatedly at about a 45 degree angle into the seam where the elevator, trim tabs, or ailerons meet the wings from both sides. Often it isn't necessary to completely remove the piece to be repositioned but enough plastic must be removed to allow for the angle of the control surface to be altered relative to the wing. It is usually best to align the flying surfaces to the position of the control stick or yoke. I learned this the fun way from a very friendly fellow modeler who just so happened to be a airline pilot. He informed me that a model I had entered in a local show had the surfaces posed opposite of the controls!
The interwing struts and cabane struts were now attached to the lower wing and top side of the cowling. Careful cross checking with the drawings and several test fits with the upper wing were done as the glue was drying and adjustments were made to the angles. It quickly became abundantly apparent that the cabane struts were not nearly long enough to reach their intended attachment points on the bottom side of the upper wing. This dilemma was one of my own making. In an attempt to add a bit more realism to the finished model, I had opened the strut attachment points at the top side of the cowl. Careful observation of many biplanes will reveal that in the case of the real aircraft, the struts run through a hole in the sheet metal and attach to the internal framework. It was this feature that I was attempting to replicate by deepening and widening the holes, but I had failed to consider the consequential shortening to the length of the cabane strut. Stupid.
This minor annoyance in combination with some work-related pressures conspired to convince me to take a break from the Avia. As things go, it ended up being a very long break.
When I finally got back to the Avia, I made the decision to simply add some plastic to the cabane struts to make up for the shortfall. After everything was blended in, the fit of the upper wing to the struts was tested and found to fit so it was on to the painting!
 The painting process began with a wipe down of the parts with 50% Isopropyl Alcohol applied with a coffee filter. This will remove any body oils from handling and acts as a tack rack as well. The coffee filter is used as a rag because it won't deposit additional lint. While the parts air dried, a thin mix of Alclad White primer was mixed. This coat of primer allows for better adhesion of the paint while highlighting any need for further filling or blending in the various seams. I've switched to using white primer (rather than gray) because it gives a better base for building light layers of paint over, giving me the opportunity to play with the opacity/density of the paint. I like to layer thin coats of paint, often mixed with a clear lacquer which gives a semi transparent coverage, to achieve the appearance of depth, dimension, and wear.
I generally do not pre-shade because I feel that I can achieve a more subtle, (and to my eye, more realistic) appearance by layering up the tone and density of the color along the panel lines.
With the base colors applied, I shot another coat of clear with just a bit of an off white added to it overall, but with extra coverage given to the broad areas that needed to be high-lighted. This coat protects the fragile paint against the further handling to come, and provides a smooth overall surface as a base for the decals. An added benefit is that the clear tends to tone down and blend any overdone elements of the previous painting. At this point in the project, I was trying to get the model finished to enter in a show and was pushing things harder than I really like to. That at least is the excuse I've chosen to use for the ensuing disaster... which is how I have to describe my attempts at using decals on this or any model.
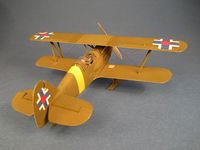 Let me try to be as clear as possible about this; the kit supplied decals are wonderful. The problem rests entirely with my hurried and ham fisted approach to the process, and to my dismay, I was left with no choice but to paint the national markings on the tail. My first attempt resulted in disaster and any thoughts of having this little bird on the contest table had to be shelved along with the unfinished model. This latest banishment to the Tupperware Bin of Shame ended up being another rather lengthy stretch. Frankly, the fun was done, and I was discouraged and needed a break.
Months passed and I puttered with this kit and that kit, pushing each project forward but never really getting as close to finishing anything as I had been with the Avia. My own club's annual show was looming on the horizon and I was forced by the shortness of time to go with the one kit that I had a reasonable expectation of finishing. So out came the Avia. The offending national marking was doctored up and the upper wing was fixed in place and the rigging process was begun.
Previously I mentioned that I'd have more thoughts concerning the rigging diagrams provided in the kit, and here they are. Although they are nice, I found that I needed to download and print a page of the rigging instructions from Eduards website intended for its 1/48 scale Avia B-534. There are details that are simply not provided for by the RS kits instructions.
 Armed with the Eduard instructions, I began the rigging process. The way I prefer to rig a bi-plane is to measure the distance from point A to point B with a simple compass. Cheap and effective. All the attachment points had been provided for prior to the attachment of the upper wing. Essentially all I do is drill a very small divot into the plastic using the tip of a sharp #11 blade much like you would drill out a gun barrel or exhaust pipe. With the upper wing in place, I use the compass to measure the distance for the length of the rigging and over-cut that amount of fly tying tippet by about 1/8". A very small amount of CA glue is transferred to one hole using the smallest wire I can find. The end of the cut piece of tippet is dipped into CA accelerator and then inserted into the glue filled hole. I then use a broad tipped tweezer to pull the other end of the tippet to the corresponding hole where the gluing process is repeated. The slightly loose rigging line is then carefully "bounced" using the heat from a snuffed out match and if successful, the line is stretched taut.
This process gets repeated only 12 times for the B-534 and I had completed 9 runs when I dropped the model.
What happened next is not fit for publication. Suffice it to say that I was embarrassed that my family had to experience it.
After taking a few very deep breaths, I risked looking down at the scattered pieces of what had been a reasonably nice model and knew that it probably was never going to be the little beauty that I'd worked so hard to produce. Upon closer inspection, I determined that although the Avia would bear scars, all was not lost and began the unhappy task of trying to patch things up as best as possible.
Eventually everything was put as right as could be and the final weathering and touch ups were administered. To my delight it really didn't look like it had endured as much abuse as I'd given it. The final coat of Testers Dull Coat Lacquer was shot and it was time to figure out an alternative to the kit supplied canopy.
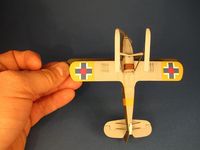 After all the effort I'd put into the interior, I was determined that it needed to be visible which required that all the canopy sections be thin and clear and most of all, separated and posed in an open position. This was accomplished by making numerous thermo formed copies of the kit canopy. My method for doing this is simple if tedious. The kit piece is attached to a length of dowell which is then secured in a vise. A small amount of clear acetate is heated over a small candle flame and the heat softened plastic is pulled over the kit piece. I re-use plastic that has been previously vacuformed and used as bubble packaging for this. It usually works great. I like to remove any molded on canopy framing from the kit piece prior to using it for a mold master because I don't like the soft edges that result from thermo forming such raised detail. The framing detail is reinstated with painted sign grade vinyl that is cut into narrow strips and then applied to the new canopy sections. The finished canopy sections were then mounted to the model using white glue.
The radio lead was applied in the same manner as the rigging and the little Avia was finally finished!
Conclusion
I wholeheartedly recommend this kit to all that would like to add a beautiful example of aviation history to their collection. It will require a bit more from you than a mainstream kit but it is not beyond the abilities of an average modeler, and you will be rewarded with a sense of accomplishment that doesn't accompany the typical low wing monoplane. With bi-planes it is twice the modeling fun for your money!
Many thanks to RS Models and Internet Modeler for the opportunity to build this little beauty!
