Kitbashed 1/72 North American Yale
By Simon Wolff
History
This brief history of the North American Yale is taken from an excellent article inIPMS Canada's magazine 'RT' volume 17 Number 2, which has a thoroughly informative article by Dave Fletcher along with some very useful drawings and colour scheme illustrations.
The RCAF received 119 North American NA-64s (designated Yale Mk 1s) from an interrupted French contract, for 230 NA-64s, brought about by the fall of France in 1940. The NA 64 was a predecessor to the more famous Texan/Harvard, the most obvious difference being fixed undercarriage, other differences (besides smaller cowling and different engines) are the canopy framing and straight trailing wing edge.
The RCAF used the Yale as an intermediate trainer, till 1943-44 when all surviving Yales were converted to wireless trainers.
Kit(s)
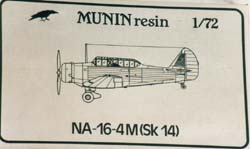 In 1991 a mate and I had the pleasure to return to the old homeland (UK) for two months. While in England we visited the annual IPMS Avon Show in Bath, amongst the many traders was a business selling an expensive 1/72 scale resin kit of the Sk 14 (NA 67/BT-9 type) by a Swedish company called Munin. I recall that we ended up posting back to Australia some dozen or so boxes of books and kits, not counting what we took back on the flight, from the overall trip.
The original intention was to build it as the sole NA-16 (also identified by some as a NA 32) brought to Australia in 1937, obtained along with a NA 33. Oh my, how great plan(e)s go astray! For the next eleven years the kit sat (crushed maybe), with many others, awaiting the chance of daylight. Daylight came when the local club (Australian Plastic Modellers Association) picked as a Display-Day subject for April 2002 the theme of 'Texans/Harvards/Yales and Wirraways'. This brought about an opportunity to do a RCAF Yale, having by now switched passions to RCAF types!!
How simple things look in the beginning, talk about seeing things through rose coloured glasses! Well I dug out the kit, everything looked okay (bar a slightly yellowed vacform canopy) and all the parts were complete, so to battle.
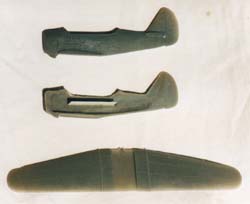 The Munin kit is of the Swedish Sk-14, a NA-16 license built in Sweden, which largely resembled the NA-57. Now I have NO idea if this Munin kit is still around however the Azur kit of the NA-57 is now available and most likely (without having seen the Azur kit) a lot of what follows applies to that kit to.
The Munin kit consists of approximately thirty parts, twenty-nine resin and one vacform canopy. The detail and quality of the resin was very good, although the smaller parts suffered from too much flash. Fairly conservative construction sequence with a choice of ski (ski for Sweden) or wheeled versions. Also a choice of Swedish or French markings. Some flash which required time cleaning up but nothing out of the ordinary. Surface detail is quite clean however the cockpit interior is very basic, consisting of couple of seats, roll bar etc.
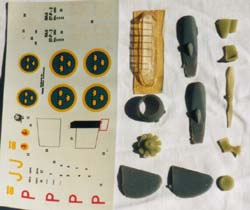 As with most cottage industry kits there were few or no locating pins, which necessitated great care in positioning cockpit parts, not to mention exterior parts. First job was to make a cockpit floor, this was made from plastic card, a sort of trial and error job. Fortunately in the case of the fuselage interior the manufacturer chose to indicate where the floor should go. Fitting interior parts needed a lot of preliminary work, as with any moulding technology they left crude surface detail making for difficulty fitting instrument panel and such. Seats were fairly easy, as only so much space was available (also having the canopy frame as a guide). The tricky part was the roll bar, as this had to match a certain frame on the canopy.
But if you use deduction, that is dry fitting where the other parts go first, then you are left with the bleeding obvious with where to stick this. Of course in the end not much interior detail shows up, ah ha - it is now I realise that I neglected to insert a control column, however it is doubtful if one would be seen anyway. The difference between this kit and the Academy Texan is quite marked, which I was building at the same time, for the Academy kit's level of interior detail is a couple of centuries ahead of the interior of the Munin kit.
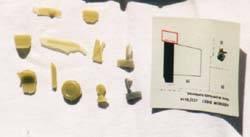 The Munin wing was a one part piece, this wedged up to the fuselage and did so remarkably well with only minor shaving off of the soon to be joined parts.
Next the resin engine (allegedly a Wright Whirlwind), now I do not presume to know if this was the right type for the Yale or not, because basically – in it went. Attachment was to the inside of the resin cowling, again a bit of shaving so she would squeeze in nice and tight. As with most resin kits, the interior/inner areas were quite rough and needed some tidying up using mostly sandpaper (wear a mask, use wet and dry etc).
I find that the real challenge with these sort of kits is that of making sure important parts line up, because once they are glued, well that's it. Even if you do get problematic parts separated again then there is dried glue to remove and labour over. So you learn quickly to take care and time over these babies, it also helps to develop a really "good eye".
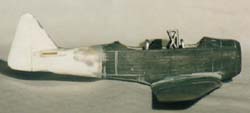 It was here or rather at this momentous stage that major surgery was required. Basically the Sk 14/NA 57 had a different shape rudder plus a shorter fuselage than the NA 64/Yale, thus the options were chop the Munin fuselage in two and insert a small plug to extend the fuselage then hack off the rudder and scratch-build a replacement. Or modify the existing rudder with plastic surgery! Now it struck me that what would be easier would be to obtain a Heller Texan (which has the correct style rudder for a Yale) and hack off the rear fuselage. Fortuitously the opportunity was presented to pick up a cheap Heller Texan kit at the Model Expo 'Swap and Sell' in Melbourne last March.
The incision was made just behind the canopy, as photos of the joined parts show, then after tidying up I blocked off the resin end of the remaining Munin fuselage area with plastic card. How I did this was to choose a common vertical panel line to work from, extend that line around the fuselage with a pencil (using a flexible ruler) and cut using a saw with a small blade (not very difficult). Importantly it is better to do this 'operation' after the fuselage is joined together – less alignment to worry about cleaning up.
 I chose to seal off the resin kit with plastic card plug as I felt the Heller rear fuselage would bond better and be more adaptable and flexible when gluing, than if it was super glued directly to the resin parts. The idea of trying to prise apart these parts if this went 'pear-shaped' did not appeal!!!
Not unsurprisingly the two fuselage parts did not match each other, the Heller end being a dimension larger than the Munin part. To protect against sanding too much of the Heller plastic part off I built up the interior end with plastic card. Once the new (what should it be called now.. Meller or Hunin??) fuselage got some sandpaper on it the different fuselage dimensions disappeared into one.
Obviously great care is needed in making sure the damned parts are aligned up accurately, taking care to check from both above and the side to be sure of the alignment. Once these two parts had bonded I used Milliput grey to seal the join, once this was dry and sanded down the join area was covered with Gunze Sangyo Mr Surfacer 1000 (which is a liquid style putty ideal for this application and small gaps/scratches).
 For the tail-wheel and tailplanes I used the Heller parts, slight modification was needed to the rear fuselage as the Heller parts had raised panel lines while the Munin kit had recessed panels. It was easy using the existing Heller raised panel lines as a guide to score new recessed lines.
As the undercarriage consisted of two fixed wheels this made life much easier. Even though the location area was a little less than precise, the kit instructions helped out. The fixed u/c was made up of three parts each, the two halves for the spats and a wheel.
Detail was rough round the edges but they all fitted well enough, again as there are no locating marks so care was taken lining these up. Of course making sure these were lined up well was paramount.
Other less major alterations was the need to shave off a number of 'lumps' around the lower cowling along with where these continued on the under fuselage area. One area I changed slightly was to insert clear parts, made from clear sprue parts, in to the leading edges of the wings as landing lights. This necessitated sanding back and cleaning up but looked better than painting the lights in. The Sk 14 had square wing tips so had to round of these off, but this was easy using the RT drawings as a guide.
 Last thing to be added was the exhaust hanging out the right side of the cowling, this basically looks like a piece of guttering buried in the side of the cowl. This necessitated drilling a hole through the cowl, altering the exhaust to bend through the cowl and hook up with the engine. Okay, so the exhaust wasn't last, I had to attach the canopy last, this was vacform and had yellowed over the years but using a bit of Tamiya Rubbing Compound (to clean up the worn surface) helped. Attaching this to the fuselage proved problematic and time consuming, ultimately the match was poor and required copious amounts of putty to clean up the fitting to the fuselage. "Wait there's more"! - had to add a brass pitot tube to the starboard wing.
PAINTING
The interior of RCAF Yales is silver, for this I used Humbrol Chrome Silver. The exterior colour was yellow, with black anti glare panel forward of the canopy and wing walk areas on either side of the canopy.
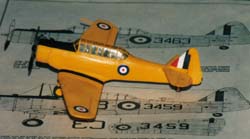 For me painting became the biggest conundrum of all. The first round of painting involved using an unopened old tin of Airfix Yellow that was picked up for fifty cents. The paint turned out to be a rather thick pigmentation, when it came out of the airbrush it was like spraying powder (didn't help that I failed to thin it down enough). The finish was a disaster, despite various efforts at rescue such as light sanding down with fine grain "wet and dry" the end result was dreadful. Once the club Display Day was over, I paint stripped the offending paint using Mr Muscle oven cleaner. Unfortunately the intention to strip the exterior didn't work, as the canopy mask came off and then so did the canopy during stripping (followed by the roll cage failing it's accidental impact test). This also meant repainting the canopy frame, time consuming in that it was masked off in sequence, vertical frames first then the remainder last and brush painting them when masked off. Taking the time and effort made it worth while though.
Second time round I used Humbrol Trainer Yellow, undercoated the model with Humbrol white; repainted the interior; scratchbuilt a more to scale (using the old thick resin parts as a master) parts roll frame. I also filled in the rudder trim tab as a photo of a flying example on Aircraft Resource Centre showed this did not exist, however there is one appearing 'hanging off' the rudder (see the finished model photo). The fin flash was brush painted on, cute huh?
Decals, the first lot came from HASEGAWA RAAF roundels set. The second lots were a combination of 'Aussie Decals' RAN Sea Fury wing markings and for the fuselage Hobbycraft 'Golden Hawks' Sabre and small Hasegawa RAAF roundels. The size was based loosely on the RT illustrations, as RCAF decals don't grow on trees in Australia. Unfortunately I was unable to find a supply of numbers appropriate to the style for this plane, so left the aircraft without numbers.
Conclusion
An obscure kit which required an inordinate amount of work, and quite a lot of filler to get a decent finish on the joins, but the surface detail was quite well done. I also learned that when painting yellow make sure you have an undercoat. Now have to find a supplier of decent RCAF decals.
Lastly what to do with the rear end of a resin Sk 14 and the front end of a Heller Texan? Plus there are also some nice Swedish and French markings left over.
References
-
IPMS Canada RT Volume 17 number 2
-
Squadron/Signal Number 94 T-6 Texan
-
Aircraft Resource Centre (web site) Yale Walkround photos
-
Authors photos of Yale at Canadian Warplanes Heritage Museum (Hamilton Ontario)
