
Building Hasegawa's 1/48 EA-18G Growler
By Greg Goheen
The Kit
 Shortly following Chris Banyai-Riepl’s inbox review of this kit I was asked to work up an on-line build, the star being Hasegawa’s kit (#07252). The quality of the moldings throughout are typical Hasegawa with very finely engraved panel lines and a relatively straight-forward instruction guide. After reviewing the 300+ parts I decided a little bit of aftermarket was in order, namely for the cockpit assembly which seemed sparse and decided to add MMD Squadron Products cockpit (#BLC48008) as well as some rather colorful decals from Afterburner (#48-061) dubbed SuperBug Shockers.
Construction and Painting
 Construction of this kit, for me, actually began with the intakes rather than the cockpit, as I was anxious to try a new technique I’d read about recently. Usually modelers either stick with the kit parts, which require some intricate filling and sanding to remove the seam lines or to opt for expensive aftermarket resin that are molded in one piece to eliminate the seam. The technique used to resolve the seam issue within the intakes was both simple and cheap, two of my favorite words to hear when it comes to modeling.
 The halves of the intakes were simply painted while on the sprue Model Master Insignia White enamel and allowed to dry before gluing them together. I then trimmed some .010 (.3mm) Plastruct sheet to fit the opening of these intakes and glued them into place, using CA and generic binder clips from the office to hold them in place. As the plasticard is quite thin it was easy to cut to shape with scissors and the process to do both intakes, top and bottom took a walloping 10 minutes. I knew there was a reason I liked simple and cheap and urge fellow modelers dealing with these issues to try this technique and the result was fantastic.
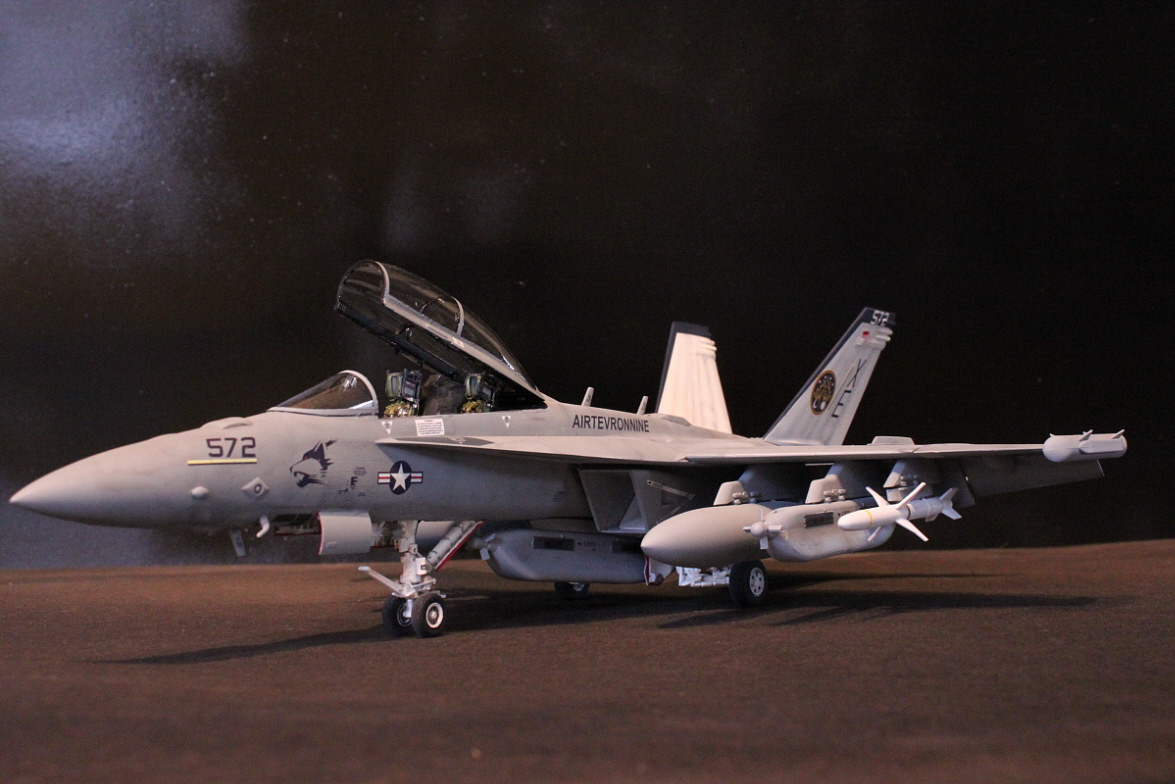
 Moving along to the actual aircraft office I blended some of the kit parts with that of MMD Squadron Products Avionix cockpit, namely keeping the kit instrument panels in favor of the resin parts since I planned on detailing them myself. Upon painting the entire tub and affixing the instrument panels in place I offered a light wash of Burnt Umber artist oils to depict some steady use of this aircraft.
As Chris had mentioned in his review of this kit, it was a bit tricky to position the tub in place and then close up the various pieces making up the nose and fuselage section of assembly but dry-fitting truly pays off and very little filler was needed by taking my time and not hurrying the process.
Then it was onto various sub-assemblies I wanted to work on, including the wing sections, nose and landing gear assemblies as well as the wide array of under-stores included in this kit, each of which was a delightful build in itself given the detailing Hasegawa has done with each of these.
 With the landing gear assemblies completed I again airbrushed Model Master Insignia White enamel onto these components, following with a wash of Burnt Umber artist oils again.
The various doors for the landing gear were fastened to a simple paper plate and numbered accordingly before the interior sides were airbrushed and washed. As the sub-assemblies were fitted into place I was quite delighted that very little filler was needed to attain the now completed aircraft waiting to be painted.
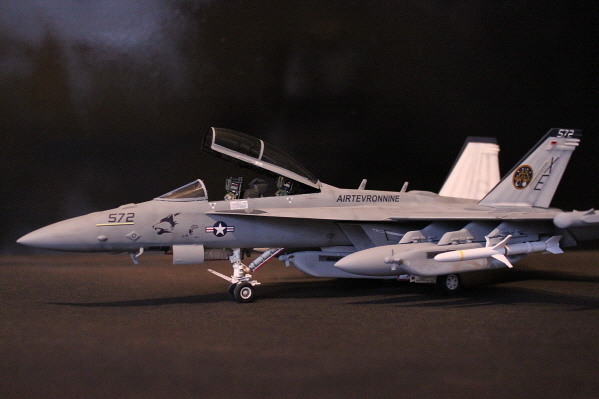
 Having eyed my choices of Afterburner decals I finally opted for the white finned variant from VX-9 and was quite glad I had not affixed the vertical fins in place for the intricacies of painting involved.
This entailed first painting each with a thin coat of Model Master Flat White before highlighting the panel lines and rivet detailing with a custom blend of Gunze aqueous paint I use for post shading which is really nothing more than flat black and mahogany that essentially is a dirty looking Burnt Umber.
 This was airbrushed using my Iwata CM-B, as I like using this particular airbrush for softer, detail work like this. Any overspray that I was not happy with was corrected with Model Master flat white again to tighten up the appearance of wear and tear. I noticed that the color of the emblem on the fins was a very dark blue, which in turn was painted across the very top of each and then extended down the leading edge of each and I halfway thought I might have to blend my own color to attain the desired matching finish. Yet upon testing Model Master Insignia Blue enamel I realized I had a match and the pattern was masked off with Tamiya tape and airbrushed in place.
 Looking at various reference photographs it was easy to see that the elements quite often took their toll on the finish of these aircraft. I commenced by painted the undersides Model Master Light Ghost Gray and the topsides Dark Ghost Gray. Again, photographs of many of these aircraft revealed that any demarcation line between these already low contrasting colors was often nonexistent so now was time for the real fun to begin. I again turned to my Iwata CM-B and used the custom blend of Gunze aqueous paint to essentially post shade the various panel lines throughout the aircraft.
 Once completed, I switched back to my Iwata HP-CS and started on the undersides by loading the cup with Light Ghost Gray again and adding a drop or two of Flat White to it. The paint was thinned heavily, approximately 80% thinner to 20% paint and then applied to knock down the high contrast of Gunze I’d applied to the panel lines. This was repeated on the topside of the aircraft more dramatically, as this is where the fading and wear and tear was evident on the actual aircraft. I’d start in the middle of a panel and essentially “dot” it with this lightened blend of Dark Ghost Gray and then add another drop or two of white to the mix to attain a bit more fade.

 At this point I was about ready to affix decals to the ALQ-99s when I noticed that there was two areas on each side that needed to be steel instead of Light Ghost Gray. Luckily enough, this coincided with my readying the afterburner cans/nozzles for Alclad so it was really nothing more than just masking each and airbrushing with Alclad Stainless Steel. Likewise, for the afterburner cans/nozzles, I’d noticed that these were quite different than seen on many A thru F SuperBugs in that they were not a dirty/worn white inside each as much as very dark and highlighted by numerous white squares. Afterburner Decals includes these squares on their sheet, so in order to have the nozzles look accurate I decided it might be wise to cut a portion of the assembly in place so I could more easily apply the decals. This was done with a modeling saw after marking a match-line onto each assembly so I could glue them correctly back into place when completed with painting and decals.
 The interior of each can was painted Alclad Burnt Iron, while the actual afterburner plate was painted white aluminum. The exterior of the nozles were then painted Alclad Duraluminum followed by a light misting of Burnt Iron to knock down the shine a bit. And to further depict a sense of depth to the nozzles I painstakingly masked the feathers with tiny pieces of Tamiya tape and airbrushed the groove between each with Alclad Burnt Iron tinted with Flat Black. The result was spectacular and well worth the effort, while there was absolutely no lifting of the Alclad I’d previously applied to each nozzle. (yes, this is one of the many reasons I switched to Alclad lacquers many years ago and am truly grateful for doing so). And if masking the feathers of the nozzle seem like tedious work, I can assure you applying the white squares from Afterburner’s sheet is just as challenging.
Despite these being attached to one another, rather than individual squares, it will take time to apply these in vertical rows of three (3) and centering each internally within each feather. Still, the effort pays handsomely when completed and you’ll thank yourself for the hour it takes to do each nozzle.
Conclusion
 This is yet another stunning release from Hasegawa that any modeler will surely enjoy. The engineering of the kit makes it a joy to build, despite the large number of plastic pieces associated with this kit. Can one make an accurate and realistic EA-18G by building this completely out of the box? I’d say yes, although it would necessitate a few elements such as seatbelts and some super detailing of the cockpit. Although I am not a fan of the “it has to have tons of aftermarket resin to look good” club, I am glad that I opted for the stunning cockpit assembly from MMD Squadron Products, as it does make for noticeable improvements.
Likewise, the Afterburner Decal sheet is worth it’s weight in gold given the large array of stenciling included on these sheets that one will not find simply out of the box. (I call it a good thing now but assure you it was actually more involved than the build of the model to set all those decals in place). This build was a very welcomed change from the prop’s I usually opt to build for myself and others and I cannot urge you enough to try this kit and a few of the techniques listed herein yourself.