From Internet Modeler
Converting the Airfix 1/72 DH4 into a DH4A racer
By Neil Crawford
Dec 1, 2002 - 10:51:00 AM
Introduction
A DH4 racer? Yes that is what the DH4A really was. In fact it won the Kings Cup Air Race in 1922. That it won was probably due to the judges not realising how fast a DH4 actually was when they handicapped it. In fact the airliner version (DH4A) was probably even faster than the military version, it would have been lighter and the enclosed rear cockpit must have reduced drag. The DH4 was something of the First World War's Mosquito - a fast bomber that could outrun and outclimb the fighters. Looking at it I find it difficult to understand why it was so fast, there's so much rigging, but I think that might be part of it. A well rigged biplane will be comparatively light, which means you can have thin wings and a fast wing profile and still get plenty of lift, a large wing-gap will reduce interference drag. However the major factor was probably the Rolls-Royce Eagle engine, you can't beat plenty of horsepower. That's my theory, I would like to hear any other opinions.
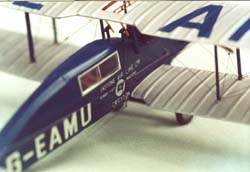
After the war, many DH4s were rebuilt as DH4As by replacing the rear gunner's place with a two-seat compartment which was cloth covered with sliding windows. To compensate for the change to the centre of gravity, the top wing was moved back to give a 90 degree wing angle - ie no stagger.
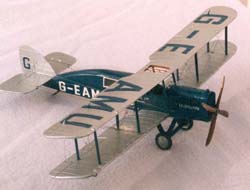
Instone Airlines was one of the first airlines, flying between London and Paris with DH4A's until larger planes went into service, Instone was originally a shipping line, later their airline merged with Handley-Page and some other small airlines to become Imperial Airlines. One of their DH4A's G-EAMU was prepared for the Kings Cup Air Race in 1922, and won it.
This was the first running of the race that was originally introduced as "The Circuit of Britain", but since the prize was a cup donated by the King, it was soon known as the King's Cup Race. It was held on September 14-15, with start and finish in Croydon. On the first day, a Friday, the course was Croydon - Birmingham - Newcastle - Glasgow. On the second day the planes flew back to Croydon via Manchester and Bristol. The total distance was 810 miles (1300 km) and at each of the stops there was a mandatory 90 minute break. The race was open for British subjects only, and the entrants had to be individuals, not companies. 22 planes of all types were entered. The hottest was the brand new Armstrong-Whitworth "Siskin" fighter, still so secret that it wasn't allowed to be depicted in the program – Can you imagine a Eurofighter prototype with a civil registration being entered in a handicap race by an individual! The others ranged between light planes, civilianised WW1 fighters! and a ten-seat passenger plane. The winner of the race was Frank. L. Barnard, "Commander of the Instone fleet", in G-EAMU, which was entered by Mr S. Instone, the owner of Instone Air Line Ltd. His average speed was 123.5 mph (198.7 km/h). Second place was taken by Alan Butler in a de Havilland DH37 and third by Rollo de Haga Haig in a Bristol Type 77. After the race the king announced that he would donate a prize for the next years race too, making it an annual event.
The Model
My model is converted from the Airfix DH4, which is a good model, basically correct, except for the undercarriage which is too short, and the wing surfaces that I don't like. I left the wing surfaces as they were due to laziness - which I regret a little, as I think they lack finesse, but that's life!
I started by cutting out two side panels for the rear fuselage. I was lucky enough to have a photo exactly from the side and to 1/72 scale. I started by trying to get the windows right, then I cut out the shape approximately. The roof was made of a flat piece bent to shape. I used thick plasticard for this because I planned on a lot of sanding. I stuck the two side panels on each cut-down rear fuselage and then concentrated on the interior
 I over-detailed the cockpit in my usual fashion. I then built up a rear cockpit interior using marquetry wood, it's really just two holes with armchairs in, I faked it up as well as I could. Then I could glue the fuselage sides together, the roof onto the rear compartment, and also a small panel on the compartment front where it blends into the rear of the pilots cockpit. I used tube cement so as to get a good joint that wuldn't fall apart when sanding, which was the next step, once it was thoroughly dry.
 The whole mess was sanded into a nice rounded off shape. This was easy because of the thick plastic. I couldn't think of a better way of simulating the cloth covering than to simply sand grooves in it with rolled-up sandpaper, covering with thin scored plastic won't work because of the convex curvature.
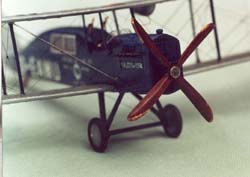
I made a new undercarriage as the original one is too low. I also replaced all the struts with Strutz brass, filed to the correct shape and length. I didn't use the Strutz idea of sticking them right through the wing, which meant I didn't get that time-saving benefit, and they are a pain to work with. I only use them because they are stronger than plastic, and on the whole I prefer wood.
There is nothing much wrong with the kit otherwise, just an immense amount of detailing that needs to be added. Things like radiator shutters, generators, the cut-out in the top wing, and the exhaust pipes. This kind of thing varies between individual aircraft, another thing that seems to vary is the engine (and propellor) direction of turning, I've seen pictures of both, so I carved a new propellor with what I thought was the correct twist, then of course I found a new picture of G-EAMU with the propellor in the other direction. My theory is that there were surplus RR Eagle engines available from late model FE2's and airships which had pusher airscrews.
 I made the exhaust pipes from brass rod which I bought at the local hobby shop, I think they are used for model ships. I buy thin strips of wood for struts, propellors and other oddments at the same place. The propellor is made by laminating thin wood, I use cyanoacrylate super glue for glueing the laminations, then just carve and sand till I think they are thin enough . . . and then a bit more.
I used Revell paint for the Instone Blue, I made as good a guess as possible for the shade. I think I based it on a Tony Woolett model, who can say I'm wrong and if I am, then I am not alone! I used the last of my Liquaplate for the wings, it must be 20 years old, nowadays I think Testors Metallizer is the same, without polishing I think it gives a good impression of silver dope.
 Decals were the most difficult part of the model, The large registration letters on the top wing were from Aeroclub, who have a good range of civil registration letters in various sizes and colours. The fairly small white text "Instone Airlines" and "City of York" were from Modeldecals and Almarks Royal Navy serial letters in white. Black letters are always easier to find but small white letters are rare. I finally found the letters for the "Kings Cup machine" text on Revell's 1/32 Dornier Do 27. The stencils on the decals for the Swedish version were perfect, it's really a case of having a big stock of old decals (and in my case good friends) and usually something will always turn up.
I always cut all the letters out individually to get rid of decal film, so then it was just a matter of arranging them in straight lines. The Instone emblem was made by cutting up solid decal in various circles and shapes and overlayering (is this a real word or did I just make it up?). A little inkwork and a coat of varnish to finish off. The G on the tail was cobbled together from Aeroclub letters that were nearly right, I combined a G and a C to make a tall G. As I have said before it's amazing what you can do with decals and a good pair of scissors!
Assembly was easy because the wing stagger was changed to nil. I made up the wing packages separately, and so could build them straight on the table without jigs, just keeping both the leading edges parallel. After the model was painted and decaled I assembled the wings to the body, and touched up the joints a little.
 I've just remembered what the most difficult job really was -of course it was the rigging. If you think a DH2 is bad, then a DH4 is actually worse, remember it's two-bay and has external control wires. I use stainless steel wire that I heat treat in a candle to remove the springiness. It's important to have a good glue, my old white glue was finished, and the one I used on the DH4 was no good. I have had a problem with rigging falling off because of that. You only know if you have good glue until some time has passed. The glue I have now is Casco universal, it is much better and I recommend it if you can find it.
The actual rigging is done by cutting off straight lengths of wire with the correct length, and glueing them on with small dots of white glue. I measure the length using dividers. Starting in the middle and working outward. It's not difficult, just time consuming. It could be simplified a lot by not bothering with all the double wires, as there is still plenty left, and the work involved would be more than halved. I had to use heat stretched sprue on the control wires for the elevators, they are so long that the steel wires sag in the middle from their own weight. I was amused to see that John Alcorn did the same on his magnificent 1/24 scale DH9.
Was it worth it? I suppose so, someone's got to build a DH4, now it's somebody elses turn!
------
This is an article originally written for "Bent Throttles", the magazine of the IPMS-racing and record breaking SIG. Thanks to Anders Brun for use of the drawings.
© Copyright 2023 by Internet Modeler