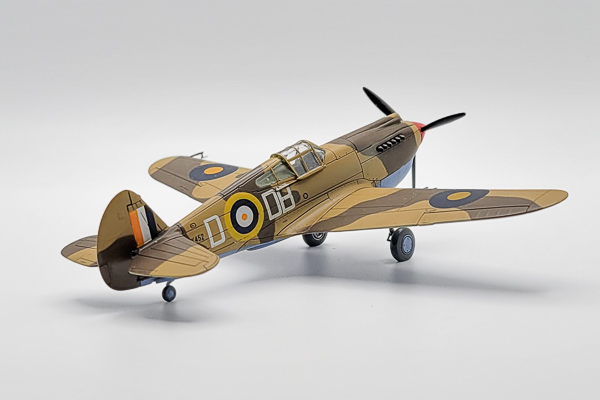
Airfix 1/72 Curtiss Tomahawk Mk I with Tally Ho Decals
By Chris Banyai-Riepl
Overview
Inspiration for your next build can come from so many different directions. It could be a new kit being released, or maybe a subject in the news or the subject of a new movie or book. Other times, it’s much more subtle, and that was the case with this build. I was going through my decal stash looking for some replacement roundels and came across an old Tally Ho decal sheet for P-40s with one option for a South African Tomahawk I. With the Airfix kit in the stash somewhere, I pulled that out and tossed it on the bench for a quick build.
The Build
The Airfix Tomahawk is one of their classic newer kits, with simple construction and adequate detailing. I was more interested in the markings than making a superdetailed model, so I did this one pretty much out of the box. The only addition I made was to add some seat belts from an Eduard set, but otherwise it was just detail painting & kit decals for the interior. The engineering of this kit has the main cockpit attached to the lower wing, so you can glue the fuselage together before putting the cockpit in. With a separate top forward fuselage section, I took some care on gluing the fuselage together to reduce the chances of filler needed on that part.

|

|
With everything assembled (and the propeller painted and ready to go), I put down the azure blue undersides and middlestone on the upper surfaces. To mask the upper surface for the dark earth I worked up some Blutack and laid down the pattern. This worked really well, with no real touchup needed, so a gloss coat went down and it was time to turn to the decals.

|

|

|

|
As mentioned earlier, the inspiration for this build was that old sheet of Tally Ho decals. I don’t remember how long ago I got this decal sheet, but it has definitely been well over a decade. Given the age, my immediate concern was whether they were still good to use or if they suffered from cracking. To test this, I decided to put on the fuselage roundels first, as they had separate center dots. If these failed I could then source other RAF roundels and either fix the Tally Ho decals or paint the center dots. Luckily these went on just fine, a bit thin and needing some care to position, but nothing too challenging. However, they did reveal a much bigger problem: pronounced translucency. The yellow was very apparent going across the two-tone camouflage, so much so that I had to deal with it. Luckily, some careful brush painting of both the yellow and white fixed that, and for most of the other decals they were either fully on the middlestone or fully on the dark earth, so the translucency wasn’t an issue.

|

|
With the decals on it was time to finish this one up. A flat coat and some light weathering, it was time to throw on all the small bits. On went the exhaust stacks and landing gear, along with the wing pitot tube, and the masks removed, and I called this one done.

|

|

|

|
Conclusion
This was a fun quick build that let me use one of those old decal sheets that we all have in our stash. And now that I know Tally Ho decals have translucency issues, I’ll take that into consideration with the other sheets I have in my stash. So next time you’re going through your old decals and think, I want to do that scheme, just go for it and have some fun.
