Now for something completely different.
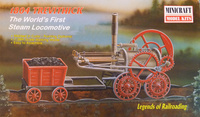
Every now and then it’s good to break out of our usual routine and try something new. When my good friend Scott Kruize presented me with this Minicraft kit last September, I knew it would be something very different! His clever plan was that I would build this kit and he would build a model of the more famous Stephenson 1829 Rocket and we'd enter them together in the railroad category at the IPMS Vancouver show in October. It seemed like a good idea at the time. I figured I had a good month before that show, and this kit seemed fairly simple. It has a grand total of 74 parts and it seemed it would be a fairly quick build. But as is often the case with my best-laid plans…
First, a little history:
Richard Trevithick is not exactly a household name; at least I had never heard of him but this relatively obscure English engineer was responsible for designing the world’s first locomotive. I had always thought it was Stephenson’s Rocket. No it was Trevithick – 25 years earlier!
In 1775 when he was only 25 years old, Trevithick was building working models of high-pressure steam engines. One of his early engines powered carts used in 1800 by Welsh and Cornish coal miners and in 1804 he unveiled his first steam locomotive.
The most revolutionary feature of Trevithick’s 1804 locomotive was the fact that it had smooth wheels operating on smooth metal rails. Until Trevithick’s breakthrough, engineers had said it was impossible to achieve sufficient traction without using gear-like wheels on a slotted track. Trevithick also devised a method for drafting the firebox, via a smokestack, which has been used on steam locomotives ever since.
While its maiden journey on a small circular track and London, the 1804 Trevithick hauled 70 men, 20 tons of iron and five wagons over 9 ½ miles of track at the breakneck speed of 5 mph.
The Minicraft kit has a couple of interesting features right off the bat. First, it’s an “authentic 1/38th scale working model kit.” It's an unusual scale, and a "working" model? I will touch more on that feature later. The kit comprises 74 parts on five sprues with a base and rails, and 9 metal parts. The sprues are molded in black and wood brown (the parts for the coal car). The metal parts are axles for the coal car and the engine and two control rods for the boiler and two guide rods for the single piston. There are 17 steps in the construction process and the diagrams are fairly clear although as I was putting it together I was having a hard time trying to imagine how the whole thing worked (to skip ahead for just a moment, in my haste to get this done for the show, I had assembled most of the working mechanism before I took the time to do some research on how it worked. Turns out I had it all backwards.
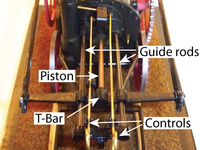 I was thinking the guide rods were the piston rods. It’s actually the center rod that drives the single piston as you can see in this 3-D animation:
https://www.f-lohmueller.de/pov_anim/ani_6023d.htm
or this Youtube video of a replica:
https://www.youtube.com/watch?v=pLJaboxC3Do
Had I realized that, I could have bored out the T-bar and the piston hole so the rods and bar would slide and freely move the gears and wheels. Oh well…
Back to our story…
On close examination of the parts I quickly realized that this was not going to be a quick build after all. Virtually every part had sink marks, ejector pin marks, ample flash and mold seams. So I spent a good part of the build cleaning up parts. The kit dates from 1997 or at least the copyright on the instructions indicate that, so I wasn’t expecting the kit to have so much cleanup. It seems like a kit of a much older vintage (which it may be). The most difficult part of the cleanup was the wheels: every single spoke of which had to be scraped and cleaned out.
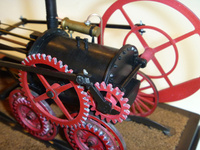
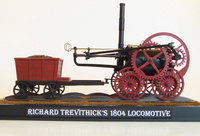
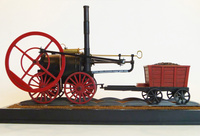
But with all that done I finally got around to gluing some parts together. I assembled steps 1 through 5: the smokestack and the major boiler parts before hand painting them with a mixture of flat black and gloss black Model Master acrylics. This gave the parts a satin finish that I felt most closely resembled the images I had seen online. With the boiler section complete, I skipped to building the coal car simply because it gave me something I could quickly construct in a short period of time (which I was finding was all the time I had to work with as life was getting in the way as usual). Next I assembled the parts for what I would later discover was the return flue (nothing is actually identified in the instructions). The two halves of the cylinder were not even approximately round, so much sanding and filling was required to fix that misalignment. I painted it and other non-black parts with Testors enamel brass, copper and silver which I find are finer for metal shades than grainy acrylics. The wheels and gears I painted red, dry brushing the gear teeth with silver and polishing the road surfaces with graphite dust. I painted the coal car red over a coat of Model Master wood and tan, weathering with burnt umber oils and dry brushing with Model Master wood to simulate wear. I was tempted to leave the coal unpainted plastic since it had a convincing sheen, but I flooded it with thinned burnt umber to deepen the shadows and finished, at the suggestion of my modeling guru Jim Schubert, by touching the highlights with a black Sharpie. Very clever - and it turned out very convincing.
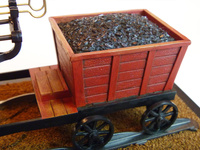
The kit comes with a simple plastic base that includes a part to align the tracks and two braces that can be glued to it to hold the axle of the steam locomotive to the base. I opted not to include these supports and just let the engine sit on the tracks. The tracks themselves I painted with Alclad steel. I considered weathering them with some rust and dirt but realize that since this was a representation of the first locomotive that the rails would probably be in pretty pristine shape. After gluing the rails in place, I masked off the edges of the base and sprayed on a layer of Woodland Scenics cement. I poured a coating of their Fine Brown Ballast to represent the rail bed. When that was dry I flooded the surface with another coat of the cement. I still find that some of the ballast falls off if I handle it. Perhaps another coat of the cement would be a good idea. I suppose I should admit at this point that I took a bunch of coffee stir sticks, cut them to size, weathered them with burnt umber intending to use them as railroad ties only to realize on closer inspection that this particular railroad track did not use ties. The tracks were anchored in place by a series of round disk supports which look like they were metal but I couldn’t confirm that with anything I found. Nonetheless this out-of-the-box base I thought, turned out to be just fine for this model.
In Conclusion
Although I would not recommend this kit for its quality or fit, it is a kit of a unique subject. If you really wanted to go all AMS (Advanced Modelers Syndrome) on it, I’m sure you could build a wonderful museum quality model and if you wanted to build a working version, you can certainly do that as well though it would be a good idea to fully understand how it works before attempting that. It would also be a good idea to find more track for it so that you can actually move it more than an inch or two. Also, expect to spend some time on it. I don’t time my builds (for sanity’s sake), but it certainly took much longer than expected. And no, I did not get it done in time for the show. Instead of 4 weeks, it was more like 4 months! But I am a slow, often interrupted modeler. Yet, I have to admit that for all of its trials and tribulations it turned out to be an interesting build and I certainly learned a great deal about a subject of which I had no previous knowledge, which is always fun. The final result looks interesting and it’s a great conversation starter, so get off the beaten path, try something new, try something completely different.
