Trumpeter 1/35 BMP-3 MICV Early Version
By Brian Medina
Background
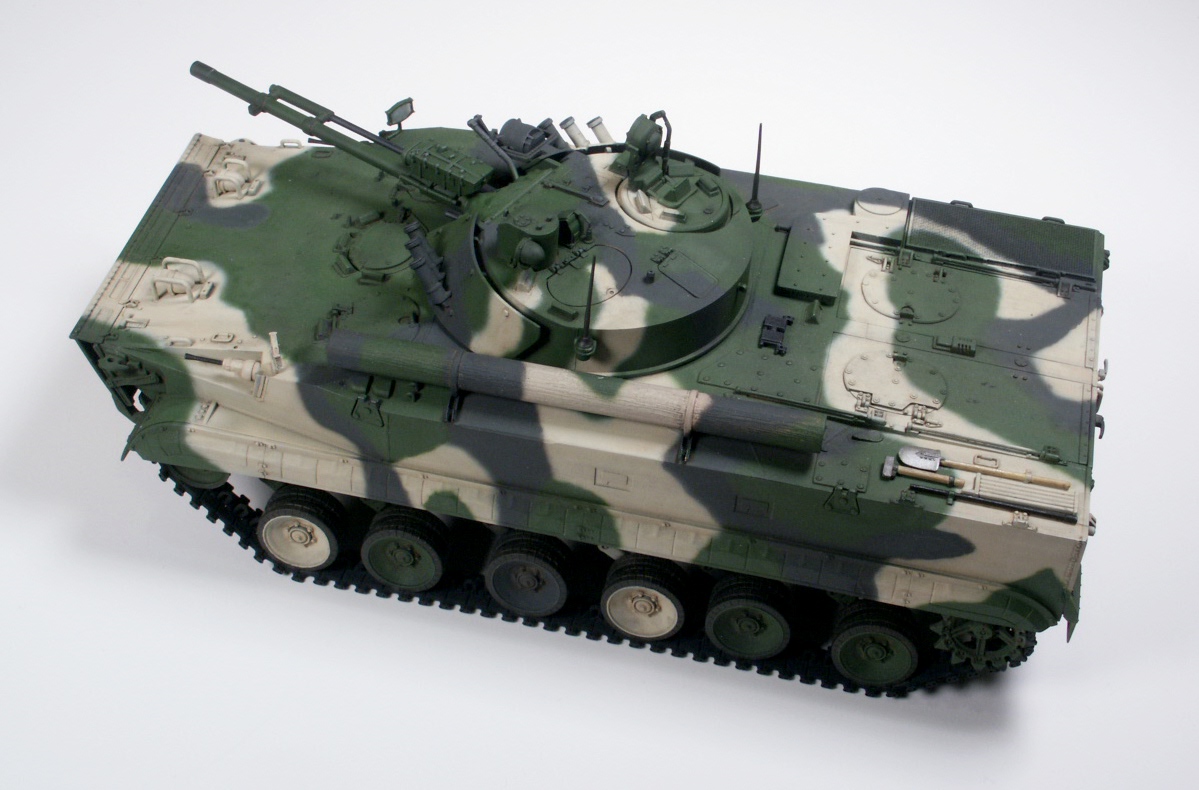
The BMP-3 is a Soviet amphibious infantry fighting vehicle that first entered service with the Soviet Army in 1987. This latest version of the BMP or Boyevaya Mashina Pekhoty, which translates to "Infantry Combat Vehicle", utilizes the best design features of it predecessors, along with new upgrades and additions including a larger caliber main gun (coupled with a coaxial 30mm cannon) and laser-guided anti-tank missiles. It can accommodate 7 combat-ready troops, complete with roof hatches. Two doors at the extreme rear of the hull allow horizontal access for dismounting troops.
You can find more information about the background of this vehicle as well as box contents and pictures of all the sprues in my In-box review HERE.
Construction
I’m going to start this review with a disclaimer. I’m primarily a 1/48 aircraft modeler, but really all scales are fair game to me. This build is my first experience ever at building an armor model, and will serve to provide a “newbie’s” point of view to building armor. Because of that, there may be steps, or techniques, which I’ve done incorrectly, and parts I’ve named incorrectly, which I completely blame on my inexperience. Now, on with the build.
To someone who is used to a parts count of anywhere from 50 to 150, I must admit, the idea of 768 parts was a bit dissuading. However, it was quickly evident that the bulk of this parts count was contained within the track assembly, which is where I started construction to get the “fun” part out of the way, earlier rather than later.
I spent about 6 hours just cleaning up sprue attachment points and mold lines on all of the individual track links and guide pins (Part T1). There are nearly 200 of each. After cleaning up all the track parts, they were then bagged and stored until the road wheels were attached to the hull.
Lower Hull
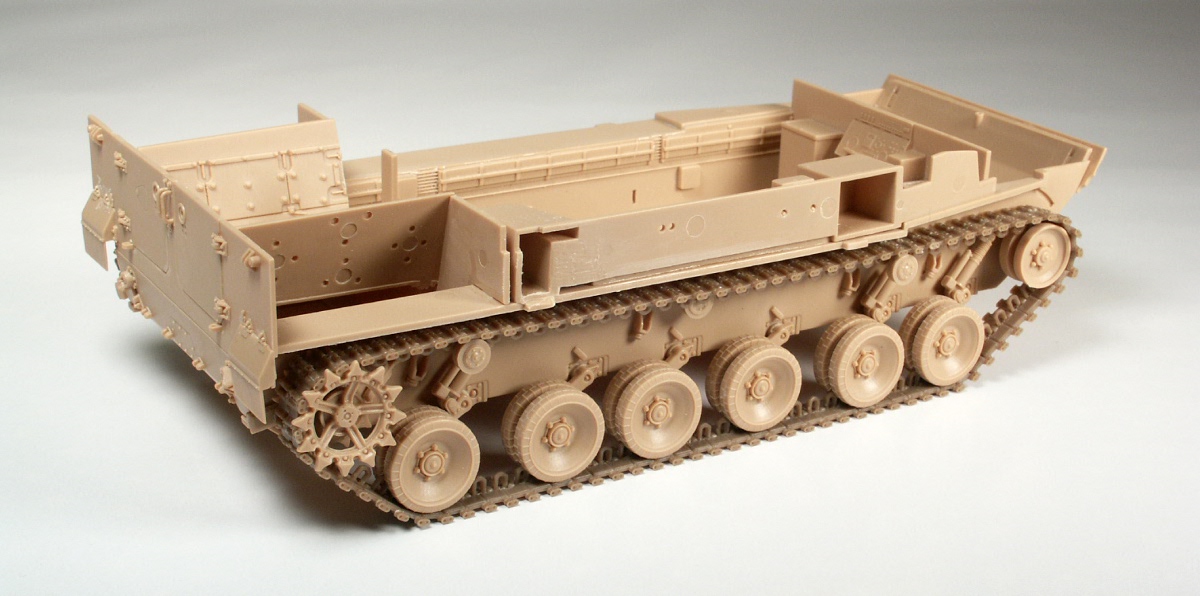
Next, I attached the axle/shock assemblies to the hull, taking care to get them all in a straight line and the same height so that all the wheels would line up properly. The idler wheels (Parts A13 & A14) attachment point is basically just the end of a rather small diameter tube, butt jointed to the hull. Because of this I decided to leave them off until much later in the build. I also left off the two drive sprockets and main idler wheels to make getting the tracks in place easier when the time comes.
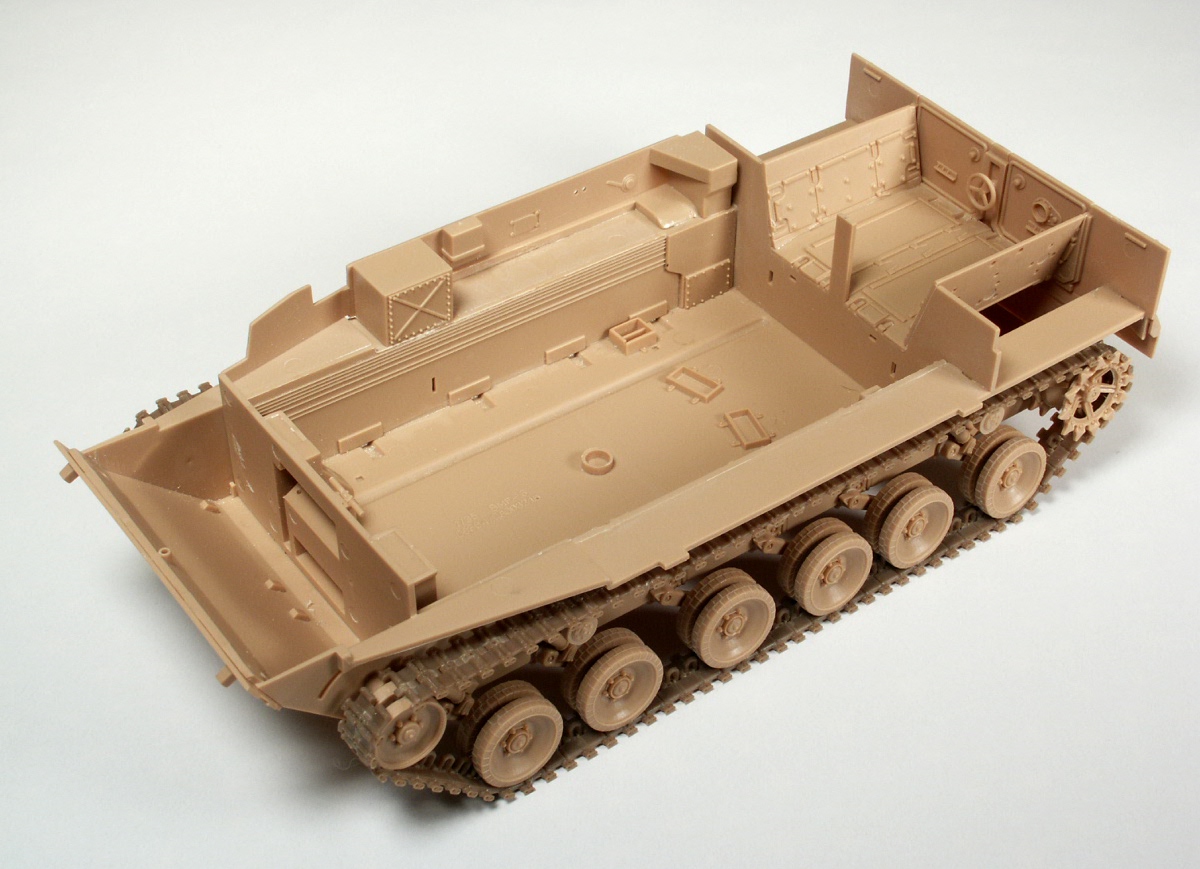 I decided to skip the next step the instructions call for which was track assembly, and instead started construction of the interior parts. At the outset of this build, I envisioned building this tank with all the interior parts included, as there seemed to be quite a few, and take advantage of the many hatches (some quite large) to show off the interior work. However, after speaking with a few veteran tank builders, it was suggested that because this was my first armor build that I just build the tank with all the hatches closed up. This suggestion however, came after I had already put most of the interior into the kit.
The interior of the lower hull is adorned with several oxygen bottles, fire extinguishers, seats for the crew and infantrymen, ammunition trays and other mysterious (to me) small parts. It really seems to be a fairly detailed interior out of the box, but could certainly benefit from some scratch building and/or aftermarket add-ons, should you want to display your tank with open hatches or doors. The lower hull interior shell is made up of a front driver bulkhead/panel, two side panels, and a rear bulkhead that a row of 5 seats attaches to and separates the crew compartment from the rear engine area. Fit of these parts was excellent and little cleanup was needed to get them glued into their proper places.
 Next, the rear panel of the tank exterior is assembled by attaching the doors, handles, steps and mud flaps to the main rear panel, then gluing that to the rear of the lower hull. Then the engine compartment area is up next, and this was where I found one of the few issues with this kit. As you can see in the pictures, the engine cover (Part C4) is to be attached to the rear interior bulkhead at the front, and sits on top of a post at the rear, then the engine compartment sides are attached at an angle to the engine cover and bulkheads. The problem, however, is that the post C4 is meant to attach to is too tall and makes it impossible to get the angled side panels in place where they are supposed to go.
 Once I discovered this issue, the fix was simple, just remove about 3/16” from the top of the post to get C4 to sit level like it should. Once this was done, installation of the side panels was perfect. The angled engine compartment side panels also needed a bit of sanding and filing to get them to fit where they were supposed to go properly.
Upper Hull
Next up was the upper hull. Mostly several exterior monitoring screens and a left & right side panels wrap up the interior portion before moving to the exterior parts which are numerous.
 Lots of hatches, track tools, tubes, lights & light guards are installed at this time, all of which fit without trouble. I did leave off some items (machine guns, rearview mirrors, a couple lights) I felt would be at risk of breakage if they were installed now.
There is a large, two part log that is strapped to the port side of the upper hull that is attached with some photoetch brackets. There is a vent tube (A23) at the front of the log that if installed, will not allow the log to be seated in the mounting brackets properly. There are actually 3 vent tubes in this area, but only the one closest to the turret gets in the way. So the tube was omitted and hole filled. I bent and attached the PE brackets at this time, but left the log off to make painting easier. To finish off the upper hull assembly sequence, I installed the nicely done photoetch engine screen. Before gluing it in place though, I painted the plastic underneath flat black, since it would be difficult to get any color under the PE screen once installed, and the Trumpeter tan plastic would show through.
 Finally the upper hull is mated with the lower hull, and the fit was perfect. For a couple of large pieces of plastic, as they were, I was pleasantly surprised with how well they fit together. The only area I found that would show any “seams” was the very rear corners. I dealt with these by using Tamiya Extra Thin to attach a small, thin piece of sprue to the corner. I let it get soft and start to set up some, then using a small file I shaped the sprue to look like the weld marks that are on other areas of the tank. For my first time replicating a weld line, I was happy with the outcome.
Tracks and Wheels
Before moving on the next step in the instructions, I wanted to get the tracks built and installed. The first step was to get the 12 road wheels attached. Since there are 12 pairs of tires, each with a gap between them, what I did was to test fit first, and once satisfied, I quickly put glue on all six axles of one side, placed the wheels, then used a thin ruler that fit between the pair of wheels. This ensured all the wheels were in line with each other. I only had to worry about getting the angle right, since the height was established when I installed the axle arms in the first part of the build. These steps were repeated for the other side and the end result was all twelve wheels in line ready for some track.
To assemble the tracks, I used a glazed 4”x6” ceramic tile and clamped a straight edge to one side. Then I dry fit a long run of tracks, butted up against the straight edge. Doing it this way ensured I had the track straight and flat, making assembly of the tracks (at least the straight parts) a breeze. Once satisfied with the length of track dry fitted, I used Tamiya Extra Thin to glue a long run for the bottom sections and another long run was glued together for the top. The top run was temporarily placed in position when the glue was almost set to introduce a little bit of sag between the wheels.
Before creating the sections of track that wrap around the drive sprockets and idler wheels, I had to decide where I wanted to have the breaks in the track for final assembly.
 The upper part of the track sits almost completely hidden behind a guard that runs the length of the vehicle, so I decided to make two sections of track per side. One would break at the top just before leaving the idler wheel, and the other would break at the opposite corner, underneath the rearmost road wheel. Knowing where I wanted to make my breaks allowed me to create the curved sections of track and attach them to the straight runs before they were fully set to get the curve to straight transition correct.
To create the rounded sections, I simply placed sections of track on the idler wheel and around the drive sprocket until they reached the point where they would start going straight, and applied Tamiya Extra Thin, removing them carefully and quickly so they wouldn’t stick to the wheels. Once dry I attached them to the straight runs of track.
Turret
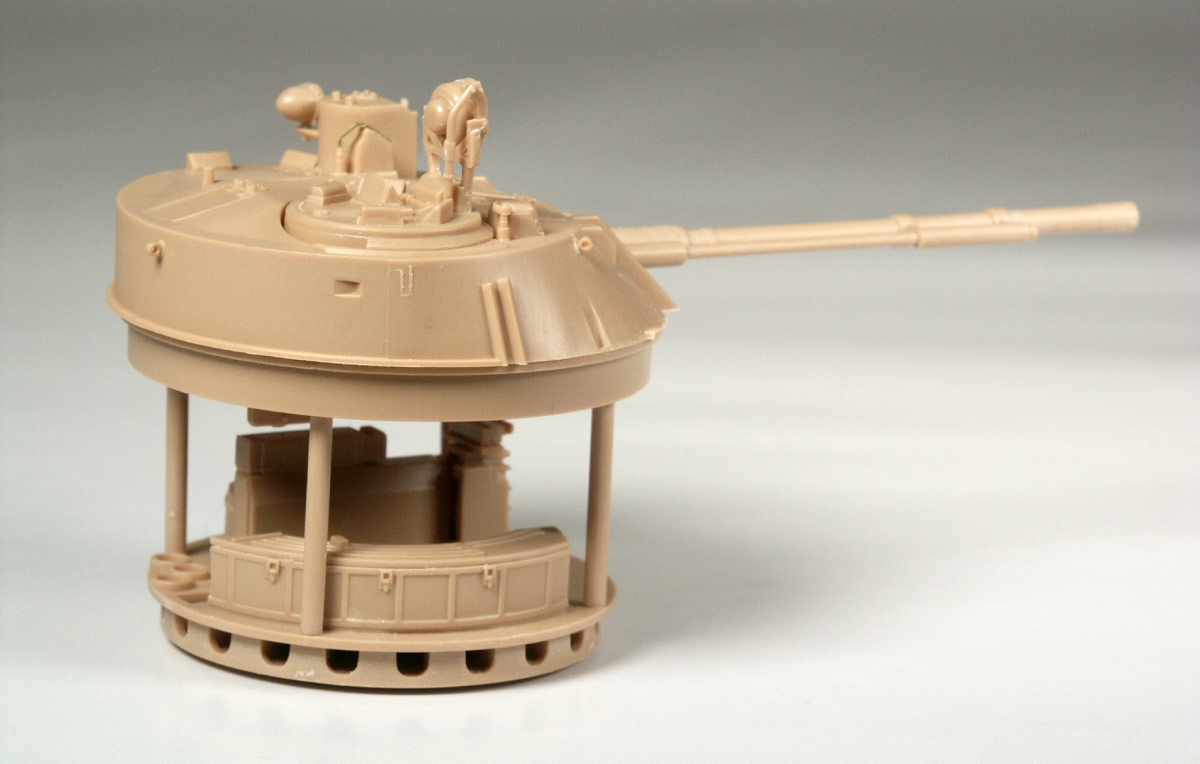 The interior turret assembly is comprised of many detail parts. Its basic shape is formed with a two-disc sandwich that plugs into a locating tab in the hull, and an upper ring that has a cradle for the main gun assembly to attach to. Being my first armor model ever, I’m unfamiliar with the bulk of the parts that go into this assembly, but most seem to be fire control systems. There are also three ammunition rounds included that stand vertically on the turret floor.
Earlier in the build I had decided not to have any hatches open showing interior detail, but had still planned to paint and detail the turret assembly and surrounding area since the turret would be removable. However, it was during this step that I decided to forgo painting any of the interior at all, as I had no intention of ever displaying the model with the turret removed. I did still install a majority of the parts though, just in case they were needed for the basic structure.
 With the interior section of the turret completed, I turned my attention to the exterior. This is where I found another problem. Part E16 (arrow in photo), a sensor of some kind, is a small square box that has an angled notch molded in the front of it to which a photoetch panel is supposed to fit into. The area where the photoetch goes is much to narrow. I decided to widen the plastic enough for the PE to fit as opposed to shaving down the sides of the PE.
Part E18, an optic sensor of some kind, has a small side hinged door that the instructions indicate gluing in the closed position, and then install a small clear rectangular piece of “glass” inside this sensor. Since nobody will ever see this detail, I decided to omit this the glass insert. If you wanted to, it would be easy enough to attach the door (D24) in the open position to allow the interior “glass” to be seen.
 Next I assembled the two part main gun barrel. Fit and detail was good here. I opened up the end of the barrel to give it a more realistic look. I also did this on the coaxial gun barrel. Armor plating for the turret sides is then attached and is equipped with smoke grenade launchers that have photoetch tops to them [a nice touch].
With the turret complete, it was time for final assembly. At this time, I attached the track sections to each side. I was surprised to find one side was nearly a perfect fit without the need to trim down or add in a section at the final joint, while the other side had a rather large gap, requiring almost a another half of a track link to be installed, even though both sides were constructed with the same number of pieces. Fortunately, the joins were in hidden areas. Once the track was installed, the track guards that run the length of the vehicle were installed, as well as the bow plates that are attached to the front and their associated linkage. And now, ready for paint.
Painting and Finishing
 One of the first things I noticed about building armor vs. aircraft, is that you can assemble 90% to 100% of the entire vehicle before putting any paint on, which I found to be a nice change. So with nearly the entire vehicle assembled, it was time to fire up the airbrush and put some color on it.
I wanted to do a finish that had a bit more going on than a single color green camo, so I decided to loosely follow Scheme B included with the kit. The markings diagram is a bit misleading though because the actual paint colors are quite a bit different than what the box scheme shows.
 Not having any armor references at all, I turned to the internet to get some ideas on finishing the exterior of my vehicle. In doing this, I came upon a very nice set of walk-around pictures at SVSM that just so happened to be in the 3 color camouflage paint job I wanted to do.
I used the following paints for this 3 color camouflage paint job:
* Base color green – Model Master 1713 “Medium Green” 34102
* Tan color – Model Master 1706 “Sand” FS33531
* Gray color – Humbrol 32
I started the paint process like I always do, with a coat of Mr. Surfacer 1200 as a primer coat. Three or four thin coats were sufficient to provide a nice fresh surface for the topcoats to stick to.
 I let that dry overnight before applying a few coats of flat black to use for color modulation of the topcoats. A base coat of the green was then applied on the bulk of the model, though I did not spray in areas that would clearly be one of the other camo colors. Next, using the SVSM walk-around photos as my guide for the camo pattern, I began to freehand spray the tan color followed shortly after by the gray. Once the camo patterns were sprayed out, it was necessary to go back and touch up the overspray where the demarcation line was not sharp enough.
Next, I sprayed all the road wheels, using all three camo colors, before tackling the rubber part of each one. To paint the rubber sections of each wheel, I used Model Master 4723 “US Army Helo Drab”. This color was brushed on all 24 road wheels.
 Next I painted the tracks. The tracks on the BMP-3 appear to be a rubber backed steel piece, with the rubber side in direct contact with the road wheels. For this side I used a mix of darkened version of the Helo Drab used on the road wheels. For the metal portion of the tracks, I painted them in a steel color, followed by a red-brown, and a black wash.
Weathering
 There were no decals to apply on the scheme I was doing, so there was no need for a coat of Future. I kept weathering to a minimum because, as I understand it, these tanks are usually kept rather clean, and the pictures I was using for reference proved that (at least on this particular vehicle).
 First step in the weathering was to apply a filter over the whole of the tank. I applied probably 4 to 5 coats of a super thin Raw Umber filter to get rid of the factory fresh paint job it had on it. The second and last step in my weathering was to apply a pin wash of Payne’s gray to panel lines and hatches.
Final Assembly
With the paint and weathering done, it was time to add on the handful of small parts I chose to leave off. This included the antennae mounted on the side of the turret, lights mounted on the front of the upper hull, rearview mirrors, and the forward machine guns mounted on the side of the tank, just in front of the turret.
 Prior to installing the lights and the mirrors, I wanted to spruce them up a bit. For the mirrors, I laid in a polished piece of bare metal foil where the mirror would be, burnished it down nice and flat and cut the excess. Then I filled the glass area with Envirotex Pour On, a two-part epoxy (the kind usually used to make water in dioramas). I think the result is a rather convincing mirror. The lights got nearly the same treatment, only no bare metal foil. I did paint the inside of the clear lights silver before filling with the Envirotex, and for the one dark tinted [almost black] light I added in a bit of Tamiya Smoke to the epoxy before filling up that glass. The Envirotex treatment was used in lieu of the kit’s clear parts.
Conclusion
As luck would have it, my first venture into the Armor world was met with an offering from Trumpeter that was not only a near perfect kit in terms of fit and assembly, but also a subject that was a much anticipated and improved kit over what was previously available.
With exception of the two or three fit issues noted above, the kit went together without incident and the detail is great, providing the builder with a great addition of modern Soviet armor to their display case. The only non-fit related drawback I can see, is the daunting task of cleaning up the nearly 400 individual track pieces and trying to keep the raised detail on the 24 road wheels intact.
This was a great venture into the armor modeling world, and opened my eyes to a whole new genre of model building and techniques. Had this kit been a nightmare to assemble, it very likely would have been my first and last armor kit. I’m happy to report that was not the case, and I can foresee more armor kits making their way into my stash
MANY THANKS to Internet Modeler and Stevens International for the opportunity to build and review this kit. I highly recommend this kit for anyone who would like to add a piece of modern Russian armor to their display case, especially for armor "newbies" like myself