Building a 1963 Pontiac Catalina – A Conversion
Story
|
 |
Quest for Inclusion
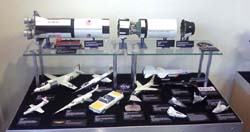
The Northwest Scale Modelers are a club which meet monthly at the Museum
of Flight in Seattle, Washington. One of group’s activities includes
filling two permanent display cases at the Museum on a quarterly basis.
These cases are populated with models supporting the activities of the
Museum (see photos). Currently, the Museum is currently showcasing the
50th anniversary of NASA (the National Aeronautics and Space Administration),
and so the club got together to build rockets, satellites, and NASA aircraft
for display. Since I classify myself primarily as a car modeler (or at
least, primarily not an aircraft modeler), I felt a little excluded from
the action.
Then, one fateful day in June, Tim Nelson, a fellow club member who
specializes in space related models, approached me with an idea and a
book. He told me that in 1963, NASA was experimenting with vehicles called
“lifting bodies” – aircraft which generated lift using
the entire airframe body rather than wings alone. These airframes were
used as experiments and proving grounds for ideas that eventually became
the Space Shuttle. However, at the beginning in early 1963, they needed
a way to get these unpowered airframes down the runway to test their flight
characteristics.
 |
In order to do this, the book says, NASA bought a stock 1963 Pontiac
Catalina convertible, sent it to Straub in California for a “hot
rod makeover”, and brought it back to Edwards AFB where it was equipped
with a tow package, high visibility yellow hood and trunk lids (more on
why later), and some NASA markings. They then proceeded to tow the first
lifting body (designated M2F1) down the runway behind the Catalina at
a cool 110mph (!). By October 1963, a C-43 had replaced the Catalina as
the tow vehicle, but the car had done its part and taken a step into the
history books. With this inspiration, I undertook to build this early
60’s “muscle car” for the NASA display.
Defining the Problem
My first problem was simple, but posed the biggest hurdle: there are
no kits of a 1963 Catalina available, at least none that I could find.
The early Catalina kits from 1960 and 1962 I did find had radically different
bodies, and I didn’t want to scratch-build an entire car body. I
thought about using die-casts, but had problems finding acceptable subjects
there. Armed with some Internet pictures and a video from the NASA archives
of the Catalina in action, I went looking for a suitable substitute. Knowing
I had an eight week deadline, and would lose some of that due to personal
travel plans, I was looking for something that matched the basic body
shape of the Catalina, and wouldn’t require a lot of hacking and
slashing to make it fit.
What I found was the 1965 GTO kit by AMT. The basic body outline matches
well, but to be sure, there are some significant differences between the
GTO and the earlier Catalina.
1. The windshield on the Catalina wraps around, while the GTO windshield
is flat.
2. The taillights on the Catalina are mounted vertically behind the
fenders, while the GTO lights are mounted in a panel under the trunk,
which spans the width of the rear end.
3. The trunk on the GTO is flat and opens on top, while the Catalina
trunk bends over the rear “character line” and the trunk
lid is also narrower.
4. The headlights are subtly different
5. There are some badging, chrome, and character line differences as
well.
Oh, and there’s one other small minor difference between the two
cars: the GTO is (supposedly) a lot shorter than the Catalina.
My second problem was simple after this: In order to perform the conversion,
I had to figure out how to handle each of the problems listed above. In
doing so, I considered the audience – most visitors to the Museum
of Flight would not be able to tell a Camaro from a Firebird at a distance.
I therefore opted to take on the easiest fixes – the tail section
and trunk lid, character lines and chrome trim, and GTO badges. I decided
to leave the windshield alone (I don’t have the capability to vac-form
new glass), and the front end changes were simply too difficult to undertake
without major surgery. I also decided about halfway through to make this
a curbside model – no one would see the engine, so why bother building
and detailing it?
However, and this may be the most surprising of all, I didn’t
bother with lengthening the GTO chassis. According to my sources, the
documented wheelbase length difference is only 5 inches (.2 scale inches)
and the LOA (Length Overall) difference is only 4 inches (.16 scale inches).
I didn’t think the change was worth the work, given the audience.
My third problem? This was by far both the easiest and most difficult
problem of all: I’ve never done anything remotely like this before.
The best I’d ever done to a car was to remove existing badges –
no chopping, no channeling, no pancaking, no nothing. I hadn’t even
lowered a car by turning the king-pins over. This was brand new territory
for me. Let’s see how I did…
Execution
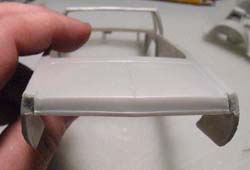
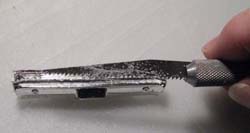
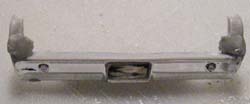
My first task was to resculpt the rear of the body. I cut off the rear
fender pillars just above the GTO chrome rear bumper, and then used the
pieces to build the rear bumper to look more like the Catalina (see photos).
A lot of epoxy putty and CA glue later, and I had a reasonable facsimile
of the Catalina rear bumper. I sanded down the top portion where the taillights
were encased with some chrome and added strip styrene to form the housing.
I also built down the trunk lid and scribed a new trunk line to fit with
the new rear bumper shape.
My first attempt at rechroming the rear bumper with Alclad Chrome was
a dismal failure – I used the incorrect base coat, and the results
looked like bad aluminum paint. My second attempt was to use BMF (Bare
Metal Foil) as chrome – after a few attempts, I had something that
looked OK but not great. I had issues with seams and getting the BMF around
the compound curves, but was running out of time, so I left it as is.
With weathering and proper positioning, the rear bumper would be less
visible, but I plan to fix it once the model is returned from the Museum.
I removed all the GTO badges from the car and sanded down the character
lines on the body to look more like the Catalina. I added a chrome strip,
which was eventually covered with BMF when the paint was complete. I also
lengthened the rear wheel wells on the body to look more like the Catalina,
and therefore had to modify the chassis wheel wells as well, sawing them
off and replacing them with sheet styrene backed with some epoxy putty
for firmness. This wasn’t the first problem the chassis would give
me, though.
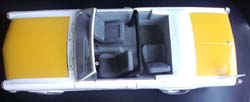
Since this was a convertible, the interior would be highly visible and
very important to get right. The interior of the modified NASA vehicle
was described in the references my friend handed me – the driver’s
bucket seat faced forward, the passenger’s bucket faced rearwards
(?!), and the rear bench had been removed and replaced with a third bucket
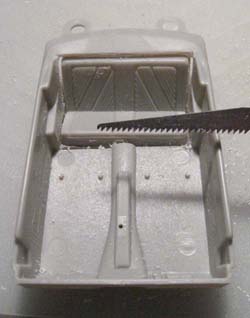
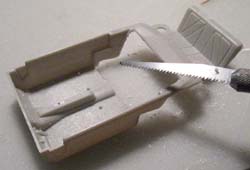
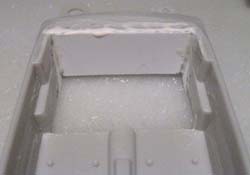
behind the driver, facing to the right. I cut the rear bench out of the
interior and built the floor and rear of the interior pan back up, making
sure to carry the drive shaft tunnel through to the back (see photos).
This was covered eventually with flocking, so I didn’t do much to
restore lost detail here. The third bucket seat was provided by an older
Mustang kit. No interior colors were mentioned, so I went with a neutral
grey all over. The interior was completed with the addition of a simple
roll bar behind the driver and passenger seats and spanning the width
of the interior (see photo)
All this work, however, caused my first fit issue with the chassis –
the new squared off interior interfered with the tops of wheel wells on
the chassis. I cut out wedges in the tops of the wheel wells to accept
the new interior corners so the interior pan would fit, reasoning that
folks would be looking down into the model rather than up into the wheel
wells when it was on display. However, to help disguise the openings,
everything underneath was painted flat black.
The wheels on the real car were five bolt steel rims and unnamed black
walls – I used flat black paint and some detail painting to convert
the kit’s chrome five-bolt rims, and a knife and files to remove
the Goodyear logos from one set of tires. Some CA glue was used to overcome
rim-to-tire fit issues, but since the wheels had to be wedged into the
wheel well openings, I didn’t try to glue them to the interior rims.
Some weathering with light grey acrylic paint to represent the dirt and
dust from repeated high speed runs down an active runway covered up the
CA fogging and hit other sins on the tires.
The last major hurdle was the hood. The Catalina’s hood is flat,
but the GTO has a prominent hood scoop. I back filled the hood scoop with
epoxy putty and started grinding down the profile. Once I had a good flat
hood to work with, I applied primer and the first few color coats. It
was then that I noticed the scoop outline and some epoxy putty irregularities
ghosting through the paint. I wound up starting over on the hood, this
time using automotive sealer to block the body work from ghosting up through
the paint.
Paint and Decals
The original car was white, with the exception of the hood and trunk
lids, which were painted high visibility yellow on the real car. The reasons
here were two-fold: First, the car would be racing down active runways
at Edwards AFB, and needed to be seen from the air as a safety measure.
The second reason was more interesting, though: the bright yellow marking
discouraged NASA workers from taking the souped up car, capable of 140+
mph, out onto nearby the Nevada highways (with their lack of speed limits)
on the weekends. One story tells of the regular driver doing this regularly
to “calibrate the speedometer” at 100mph and higher.
The car body was painted with Tamiya Acrylic Lacquer rattle cans in
Pure White and Chrome Yellow – the interior was a mix of custom
grey enamel and acrylic brush painting. The doors sported not NASA blue
meatball logos, but the simple words “National Aeronautics and Space
Administration” in a generic non-serif font. They were simple to
print out using my ink-jet printer, some Super Cal paper, and Tamiya Clear
Lacquer to seal them. No clear coat was used, but the body was lightly
sanded and rubbed out with Novus polish before the decals were applied.
BMF and some light weathering were added later, as was the final detail
– a small white blade antenna on top of the left rear quarter panel.
The final result was installed in the display cases at the Museum of
Flight on August 23 (see photos).
Lessons Learned
I learned a lot doing this conversion, and there are a number of things
I would do differently if I could. First, I’d start with a different
kit – the AMT GTO has some fit issues outside the ones caused by
my hack and slash attacks. The hood doesn’t quite cover the entire
opening in the body, and the interior pan doesn’t fit up into the
body well either – you can see over the dash into the engine compartment.
The custom wheels don’t fit between the body and the chassis wheel
wells.
Second, I’d give myself more time. A wise modeler once said,
“Nothing sucks the joy out of this hobby like building on a deadline.”
(Oddly enough, this was the same Tim Nelson who started me down this path).
Taking more time to do more searching for the right kit, for asking more
folks for advice and help on scratch-building things, and for experimenting
with new techniques first is definitely in order.
Third, I’d add some more detail to parts of the model that got
overlooked. There are no seat belts, which would be necessary on a 100+
mph vehicle. I couldn’t find Catalina badges to add to the body.
I would either replace the windshield with the proper version, or detail
the inside of the vent windows. I’d rechrome everything properly,
or at least apply Alclad Chrome properly. More weathering is in order
as well.
However, I did learn one big positive lesson in this build: Modifications
shouldn’t be feared. I’ve been afraid to modify other models
for fear of “screwing it up”. This build taught me that even
if I screw something up, I can fix it with styrene, epoxy putty, or spare
parts from other kits.
Now if you’ll excuse me, I’ve got a couple of Model Ts and
As to hack into hot rods…
References
|
|


