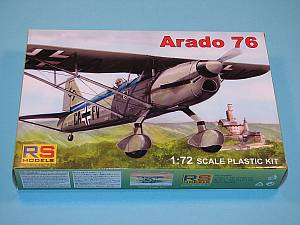
RS Models 1/72 Arado Ar 76
|
 |
Introduction
Taken from the instruction sheet:
"Among the earliest specifications drawn up by the C-Amt of Goring's
Lufthafrtkommissariat" was on calling for a lightweight single-seater
for use emergency Heimatschutzjager". The first prototype, the Ar
76a D-ISEN was completed late in 1934, this being followed in the spring
of 1935 by a second prototype, the Ar 76a (D-IRAS). The general characteristics
of the Ar 76 were adjudge excellent, but in the final evaluation of the
designs, the Arado was placed second to the Fw 56. Nevertheless, a small
production series of aircraft was ordered as a back-up for the Fw 56 program,
and these delivered to the Luftwaffe in the spring of 1936, were used
by the Jagdfliegerschulen FFS A/B 1, FFS A/B 8, FFS A/B 23 a LKS Kaufbeuern,
FFS A/B 32 Chrudim."
The Kit
 The
RS kit of the Ar 76 consists of 24 injected pieces, two injected clear
windscreens (maybe the second being an extra "just in case")
and a nice fret of colored photoetch from Eduard (consisting of 20 pieces
of metal). Pieces are very nicely cast and I can't see any flaws - pin
markings, etc. The
RS kit of the Ar 76 consists of 24 injected pieces, two injected clear
windscreens (maybe the second being an extra "just in case")
and a nice fret of colored photoetch from Eduard (consisting of 20 pieces
of metal). Pieces are very nicely cast and I can't see any flaws - pin
markings, etc.
Decals are in-register and nicely done. There are three schemes catered
for: Arado 76 FFS A/B 5 Seerapen 1939 (overall RLM 02 with a blue upper
fuselage); Arado 76 FFS A/B 23 Kaufbeuren 1940 (RLM 02 with a yellow stripe
on the fuselage and yellow wing tips); and Arado 76 I.JG 232 Bernburg
1936, D-IZVA (RLM 02 with a blue upper fuselage).
Construction by first building the cockpit floor and pieces, the nose
and propellor and wheels to the spats/landing gear. When I put this together,
I will only complete the first step, the cockpit pieces, prior to painting.
The rest will wait until painting is finished. In fact, you could paint
the wing prior to doing anything else so you can be sure it's painted
before final assembly.
Now the cockpit is put into the fuselage, the fuselage halves closed
and the horizontal tail added. The instructions also have you glue the
center struts on but I would have to check alignment first to be sure
things will line up at the end of the build.
 The
only thing I would add prior to painting would be the landing gear, just
in case there's a fit issue and seam work needs to be accomplished. That
way you can get all that out of the way prior to painting. After painting
the wing can be added along with the last of the struts for it and the
tail. Finally the windscreen is added last. The
only thing I would add prior to painting would be the landing gear, just
in case there's a fit issue and seam work needs to be accomplished. That
way you can get all that out of the way prior to painting. After painting
the wing can be added along with the last of the struts for it and the
tail. Finally the windscreen is added last.
Conclusion
This is an awesome model. I think it will look great sitting side-by-side
next to the Heller Fw 56. If you enjoy 'tweeners in general, and Luftwaffe
'tweeners specifically, then these are kits you must track down.
Huge thanks to RS Models for providing
the review kits. |
|
