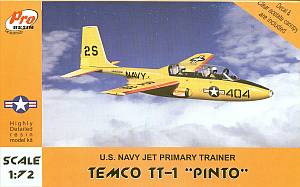
Pro Resin 1/72 Temco TT-1 "Pinto"
|
 |
Introduction
From the instruction sheet:
"The Temco TT-1 Pinto began as a private venture by Temco to show
that a jet primary trainer was feasible and to fill that need. Known as
Temco's Model 51, the Pinto was extensively engineered for economical
training of new pilots.
"Powered by a 920lb static thrust Continental J69-T-9 turbojet,
the Model 51 first flew on March 26, 1956. The U.S. Navy extensively evaluated
it at Patuxent River N.A.S on June 29, 1956, placed an order for 14 pre-production
models, designated TT-1. Temco modified the original prototype by installing
a more powerful YJ69-T-25 which increased the climb rate from 1,900ft/min.
to 2,090ft/min. and added over 30 mph to the top speed.
"The Navy seriously evaluated the TT-1 and its concept but no follow
on aircraft were ordered. The TT-1 Pinto was 26 years ahead of its time.
With a more poweful engine it would have qualified easily for the Navy's
new concept of an economical jet trainer."
The Kit
 Pro
Resin kits keep getting better and better. You can see how they build
up by reading Bill Powers' build of the Pro
Resin Gnat F, and when you look at them in the box, the level of detail
is astounding. I seriously think they are some of the best resins in the
world. Pro
Resin kits keep getting better and better. You can see how they build
up by reading Bill Powers' build of the Pro
Resin Gnat F, and when you look at them in the box, the level of detail
is astounding. I seriously think they are some of the best resins in the
world.
I'm sorry, but I'm not counting the parts. Just be it know there are
a lot of parts in the box and with the sheer number you really don't need
anything else to finish this kit. The seats have the belts molded in-situ
beautifully, so even that's taken care of for you. In fact, the detail
in the cockpit is just quite amazing and with the correct amount of washes
and drybrushes will really pop the cockpit to life. With the large glazing
this is a very good thing.
Naturally construction starts with the cockpit. But Pro Resin just doesn't
show you how to assemble the cockpit, they provide some very nice drawings
on how to actually paint the cockpit showing most parts with color call-outs.
Fantastic! Other subassemblies are assembled as well, including the nose
gear/gear well, pieces for the main gear and main gear doors. You might
get away with not gluing the nose gear into the gear well until after
the well is glued into the fuselage.
Now the instructions move you to assembling the fuselage and other pieces
once the fuselage halves are assembled. You need to pay close attention
to this instruction step closely because there are a lot of parts that
go in and on the fuselage halves.
The last step has you assemble pieces to the underside of the model
- gear, gear doors, etc. I would leave all this stuff off until after
all painting is accomplished.
 The
decals - printed by Begemot - are extremly nicely done and I see no registration
problems at all. There are two schemes catered for, the first is an all-yellow
machine, Bureau Number 144234 based at Mainside NAS, Pensacola, 1960.
The second scheme is an all-white aircraft registered as N7752A by "Mike
Dillon". I'm not quite sure what this means, unless it was a private
jet flown by Mike Dillon. The really cool thing about this machine is
not only the all-white paint job, but the cool emblem of Sylvester the
Cat (from Warner Brothers), on an orange background, on the tail. There
are plenty of stencils for either machine - in fact, there are separate
drawings showing the placement of the stencils. The
decals - printed by Begemot - are extremly nicely done and I see no registration
problems at all. There are two schemes catered for, the first is an all-yellow
machine, Bureau Number 144234 based at Mainside NAS, Pensacola, 1960.
The second scheme is an all-white aircraft registered as N7752A by "Mike
Dillon". I'm not quite sure what this means, unless it was a private
jet flown by Mike Dillon. The really cool thing about this machine is
not only the all-white paint job, but the cool emblem of Sylvester the
Cat (from Warner Brothers), on an orange background, on the tail. There
are plenty of stencils for either machine - in fact, there are separate
drawings showing the placement of the stencils.
Conclusion
Pro Resin keeps getting better and better. While building
the XF-92A proved interesting, building the Gnat F proved that they
have improved. The level of detail on this (and the Super Pinto) is extremely
well done and everything is just really nice and crisp. If US Navy jets,
training jets or prototypes are your "thing", then by all means
pick up this kit. You will not be disappointed.
Thanks to Pro Resin for this review
kit. |
|
