MiG-3 by Trumpeter in 1/48th ScaleBy Stephen Tontoni |
 |
The History
 Throughout
most of the 1930’s, Polikarpov esigned many of the fighters that
were used by the Soviet Air Force. He developed innovative and successful
designs that filled their needs adequately, although some stayed in active
roles a bit too long. In 1938, he began preliminary work on the I-180
prototype that would eventually develop into the MiG-1 through MiG-3 series
of fast fighters. But he was not to see these through; in 1939, he fell
out of Stalin’s good graces. In near-exile, Polikarpov went on to
design a number of fairly good aircraft that never saw production; in
fact, he was very fortunate to survive in the face of Stalin’s paranoia.
The I-180 project, however, was handed over to the new design bureau of
Mikoyan and Gurevich. Most of the subsequent work was done by Gurevich,
but there was a desire to call the line of aircraft “Mikoyan”.
Out of respect for his colleague and the tremendous work he had done,
Artyom Mikoyan insisted that the design bureau would retain both of their
names, and thus Mikoyan-Gurevich was born. The acronym became the now-famous
MiG. Mikoyan was not always the most loyal of friends however; he definitely
knew when to pick his battles. In the development of the operational series
of MiG-3’s, some rather serious flaws were discovered and a scapegoat
was needed. Major General A. I. Filin was accused of trumped up charges
of sabotage and delaying the project. Mikoyan testified at the military-style
tribunal against his good friend, and Filin was subsequently shot.
Throughout
most of the 1930’s, Polikarpov esigned many of the fighters that
were used by the Soviet Air Force. He developed innovative and successful
designs that filled their needs adequately, although some stayed in active
roles a bit too long. In 1938, he began preliminary work on the I-180
prototype that would eventually develop into the MiG-1 through MiG-3 series
of fast fighters. But he was not to see these through; in 1939, he fell
out of Stalin’s good graces. In near-exile, Polikarpov went on to
design a number of fairly good aircraft that never saw production; in
fact, he was very fortunate to survive in the face of Stalin’s paranoia.
The I-180 project, however, was handed over to the new design bureau of
Mikoyan and Gurevich. Most of the subsequent work was done by Gurevich,
but there was a desire to call the line of aircraft “Mikoyan”.
Out of respect for his colleague and the tremendous work he had done,
Artyom Mikoyan insisted that the design bureau would retain both of their
names, and thus Mikoyan-Gurevich was born. The acronym became the now-famous
MiG. Mikoyan was not always the most loyal of friends however; he definitely
knew when to pick his battles. In the development of the operational series
of MiG-3’s, some rather serious flaws were discovered and a scapegoat
was needed. Major General A. I. Filin was accused of trumped up charges
of sabotage and delaying the project. Mikoyan testified at the military-style
tribunal against his good friend, and Filin was subsequently shot.
 The
MiG-3 was a fast high-altitude fighter capable of tangling with the German
Bf109E in 1941, and some pilots had success with it. The MiG-3 had several
strikes against it though. First, it was developed as a high-altitude
interceptor, while most of the air battles over the Soviet Union were
fought at low altitude. Second, Stalin’s purges of the 1930’s
eliminated much of the skilled command both on the land in the air. All
units, by the time that Operation Barbarossa commenced, were lead by political
commissars rather than military tacticians. Finally, the pilots were not
trained well to fly the MiG monoplane, so although it was at the front
in force, when push came to shove, they opted to use their obsolete biplanes.
As a result, huge numbers of the MiG-3’s were either destroyed on
the ground or were captured as Operation Barbarossa overran huge areas
of Soviet territory. The design was fairly simple, using both wooden and
metal construction. The majority of the wings were wood while about half
the fuselage was wood. Visibility over its long nose could be poor but
its wide track made ground handling fairly stable, especially over rough
fields. Originally, it had a limited punch with just three machine guns
firing through the propeller arc, but later variants carried machine gun
pods under the wings to give it more firepower and a better rate of fire.
The
MiG-3 was a fast high-altitude fighter capable of tangling with the German
Bf109E in 1941, and some pilots had success with it. The MiG-3 had several
strikes against it though. First, it was developed as a high-altitude
interceptor, while most of the air battles over the Soviet Union were
fought at low altitude. Second, Stalin’s purges of the 1930’s
eliminated much of the skilled command both on the land in the air. All
units, by the time that Operation Barbarossa commenced, were lead by political
commissars rather than military tacticians. Finally, the pilots were not
trained well to fly the MiG monoplane, so although it was at the front
in force, when push came to shove, they opted to use their obsolete biplanes.
As a result, huge numbers of the MiG-3’s were either destroyed on
the ground or were captured as Operation Barbarossa overran huge areas
of Soviet territory. The design was fairly simple, using both wooden and
metal construction. The majority of the wings were wood while about half
the fuselage was wood. Visibility over its long nose could be poor but
its wide track made ground handling fairly stable, especially over rough
fields. Originally, it had a limited punch with just three machine guns
firing through the propeller arc, but later variants carried machine gun
pods under the wings to give it more firepower and a better rate of fire.

 Ironically,
these pods were often removed in the field, thereby limited its effectiveness.
This was at time in which more guns and higher caliber cannon were becoming
integral to fighter design. Its operational life was only a year or two
before it was out-classed by newer German fighters (most notably the Fw-190)
and well as replaced by newer Soviet birds (Yak’s and LaGG’s).
So in a nutshell, this was a capable aircraft when it arrived at its units,
but wasn’t utilized in any numbers, after which it had a very short
life before it was considered obsolete.
Ironically,
these pods were often removed in the field, thereby limited its effectiveness.
This was at time in which more guns and higher caliber cannon were becoming
integral to fighter design. Its operational life was only a year or two
before it was out-classed by newer German fighters (most notably the Fw-190)
and well as replaced by newer Soviet birds (Yak’s and LaGG’s).
So in a nutshell, this was a capable aircraft when it arrived at its units,
but wasn’t utilized in any numbers, after which it had a very short
life before it was considered obsolete.
The Kit
 Trumpeter
chose to model an early MiG-3, so it has a more complex series of intakes
on the cowl, but lacks leading edge slats. There’s also no shoe
for a hucks starter in the spinner. All of these are fairly simple conversions
if you’d like to build a late-model MiG-3, but I have to think that
Trumpeter will release later variants eventually. The parts are nicely
molded in medium gray styrene, and it’s very fully detailed. I’ve
been given to understand that this is a scaled-down version of their 1/32nd
scale MiG-3 kit. Looking at the way it’s designed, that’s
believable, but I don’t have the big kit for comparison. Consequently,
you’ll find the level of detail to be quite good on this kit, from
the interior (very logical and pretty much click-fits) to the wheel wells
and even the dropped flaps with interior detail about which I’ll
elaborate later. The decals are great and went down easily. The clear
parts are very clear and thin. The canopy is molded in two parts so it
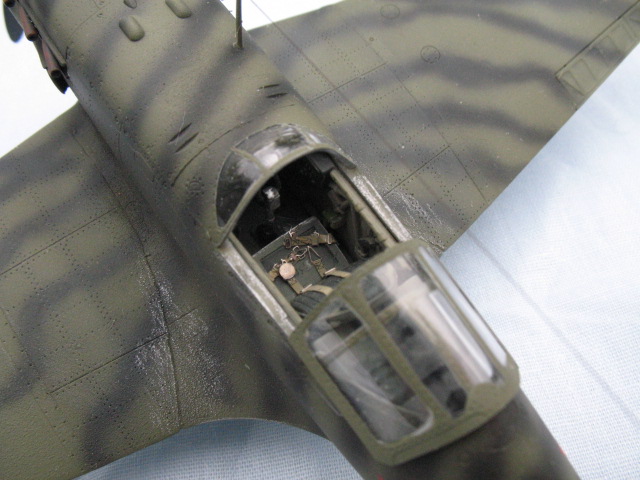
begs to be left open to show off the interior detailing.
Trumpeter
chose to model an early MiG-3, so it has a more complex series of intakes
on the cowl, but lacks leading edge slats. There’s also no shoe
for a hucks starter in the spinner. All of these are fairly simple conversions
if you’d like to build a late-model MiG-3, but I have to think that
Trumpeter will release later variants eventually. The parts are nicely
molded in medium gray styrene, and it’s very fully detailed. I’ve
been given to understand that this is a scaled-down version of their 1/32nd
scale MiG-3 kit. Looking at the way it’s designed, that’s
believable, but I don’t have the big kit for comparison. Consequently,
you’ll find the level of detail to be quite good on this kit, from
the interior (very logical and pretty much click-fits) to the wheel wells
and even the dropped flaps with interior detail about which I’ll
elaborate later. The decals are great and went down easily. The clear
parts are very clear and thin. The canopy is molded in two parts so it
begs to be left open to show off the interior detailing.
The Build
 I
built this FAST. Because we were coming up on the IPMS Vancouver show
on October 13, I realized that I needed to enter something in a serious
category. The other model that I built last summer, the Eduard Nieuport
16, suffered a catastrophic drop on a sidewalk, so I was empty-handed.
I was contemplating how time had slipped away from me when I was at Skyway
Model Shop on October 6 and saw this kit. As I looked at the parts, its
logical construction, absolute lack of flash or molding deformations…I
thought “I could build this in a week” and bought it immediately.
I took that kit home and immediately started the clean up process, which
was pretty minimal on this kit. The parts are very cleanly molded without
flash or mold part lines that need to be addressed. It was also fairly
obvious early on that with the excellent engineering on this kit, it’d
pretty much fall together.
I
built this FAST. Because we were coming up on the IPMS Vancouver show
on October 13, I realized that I needed to enter something in a serious
category. The other model that I built last summer, the Eduard Nieuport
16, suffered a catastrophic drop on a sidewalk, so I was empty-handed.
I was contemplating how time had slipped away from me when I was at Skyway
Model Shop on October 6 and saw this kit. As I looked at the parts, its
logical construction, absolute lack of flash or molding deformations…I
thought “I could build this in a week” and bought it immediately.
I took that kit home and immediately started the clean up process, which
was pretty minimal on this kit. The parts are very cleanly molded without
flash or mold part lines that need to be addressed. It was also fairly
obvious early on that with the excellent engineering on this kit, it’d
pretty much fall together.
 So
that first evening I had the kit, I went down to the shop and fired
up the compressor. I first shot all interior parts with Floquil Grimy
Black. I also hit the prop, wheels, flaps, etc. As soon as that was
done, I shot several color cups of lacquer thinner through my Iwata,
then shot RLM02 gray down at an angle to create some depth on the parts.
I applied decals on an otherwise boring instrument panel (I will confess
here and now that my instrument panel is more interesting, albeit less
than accurate, as a result of applying the instrument face decals),
did some dry brushing and began assembling the interior. I left off
the gunsight until later which was a tactical error. It was extremely
difficult to attach the gunsight at the end (which is my preferred approach)
because the windscreen is so deep. I finally bungled it in, but it took
several attempts and each one made it a little bit messier. Of note
here; the MiG-3 seat harnesses are fed through slots in the back of
seat. Trumpeter didn’t mold in those slots, so I recommend you
drill and open them up before painting. I figured they came down over
the top, and had to fix that error when I discovered it, which was AFTER
I’d already glued the seat in and closed up the fuselage. So I
had to rip the seat out to correct that. (I used Eduard pre-colored
seat harnesses from a Luftwaffe set, but added some bits to make it
resemble the Soviet seat harnesses) Fix it early and avoid that trouble!
So
that first evening I had the kit, I went down to the shop and fired
up the compressor. I first shot all interior parts with Floquil Grimy
Black. I also hit the prop, wheels, flaps, etc. As soon as that was
done, I shot several color cups of lacquer thinner through my Iwata,
then shot RLM02 gray down at an angle to create some depth on the parts.
I applied decals on an otherwise boring instrument panel (I will confess
here and now that my instrument panel is more interesting, albeit less
than accurate, as a result of applying the instrument face decals),
did some dry brushing and began assembling the interior. I left off
the gunsight until later which was a tactical error. It was extremely
difficult to attach the gunsight at the end (which is my preferred approach)
because the windscreen is so deep. I finally bungled it in, but it took
several attempts and each one made it a little bit messier. Of note
here; the MiG-3 seat harnesses are fed through slots in the back of
seat. Trumpeter didn’t mold in those slots, so I recommend you
drill and open them up before painting. I figured they came down over
the top, and had to fix that error when I discovered it, which was AFTER
I’d already glued the seat in and closed up the fuselage. So I
had to rip the seat out to correct that. (I used Eduard pre-colored
seat harnesses from a Luftwaffe set, but added some bits to make it
resemble the Soviet seat harnesses) Fix it early and avoid that trouble!
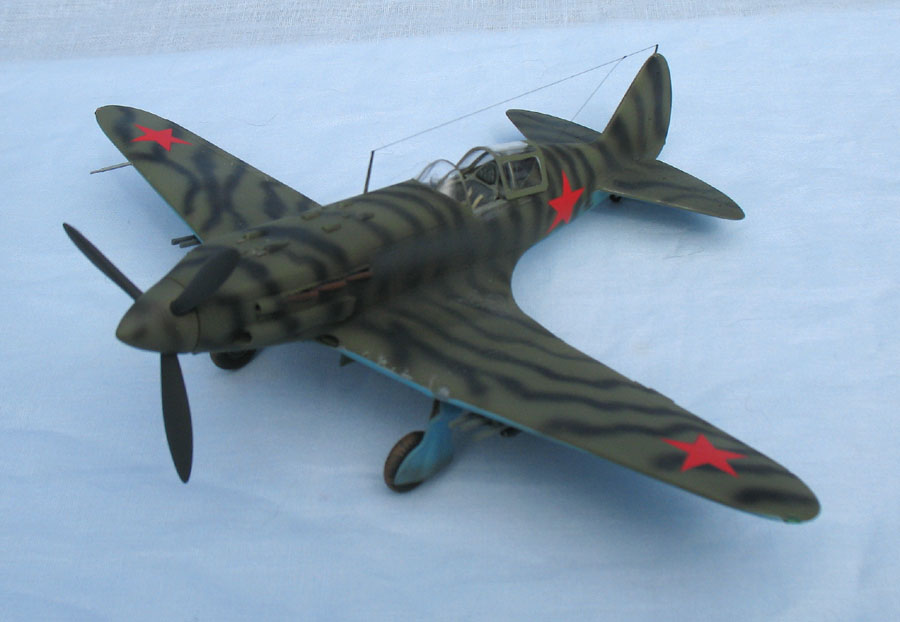
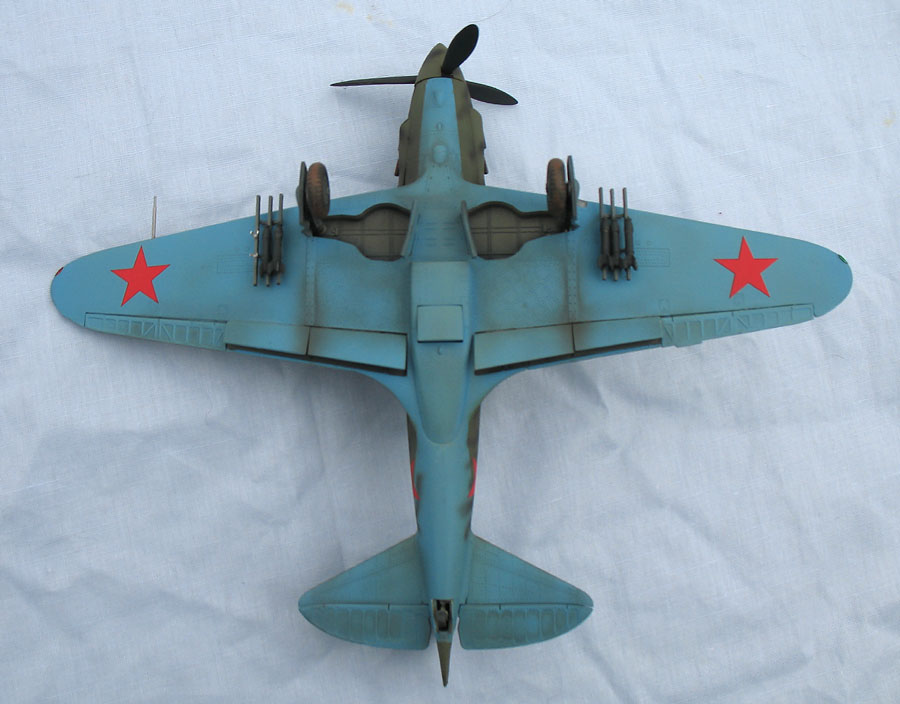
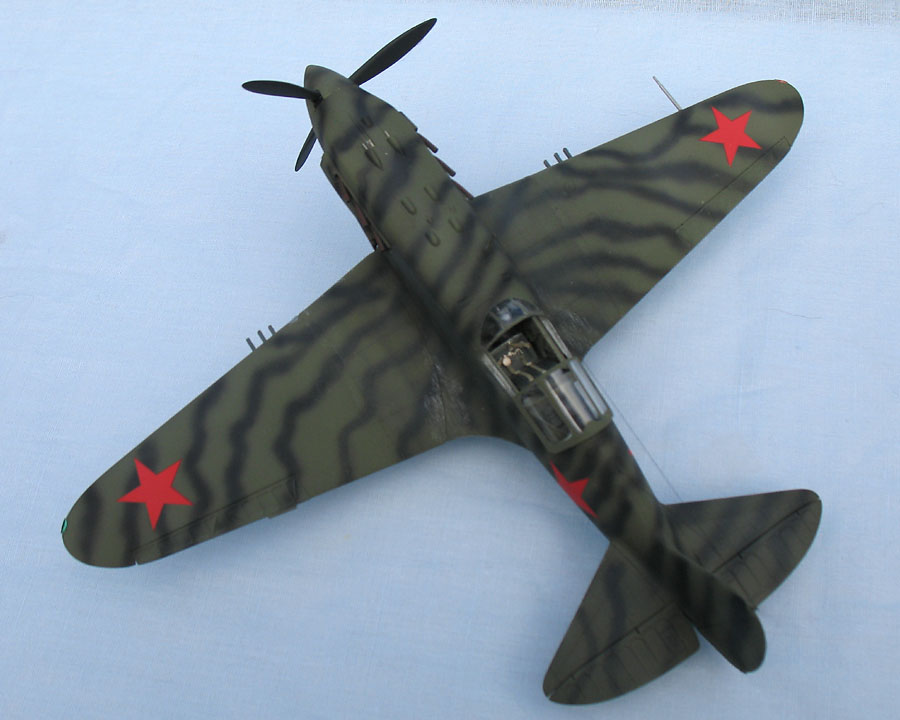
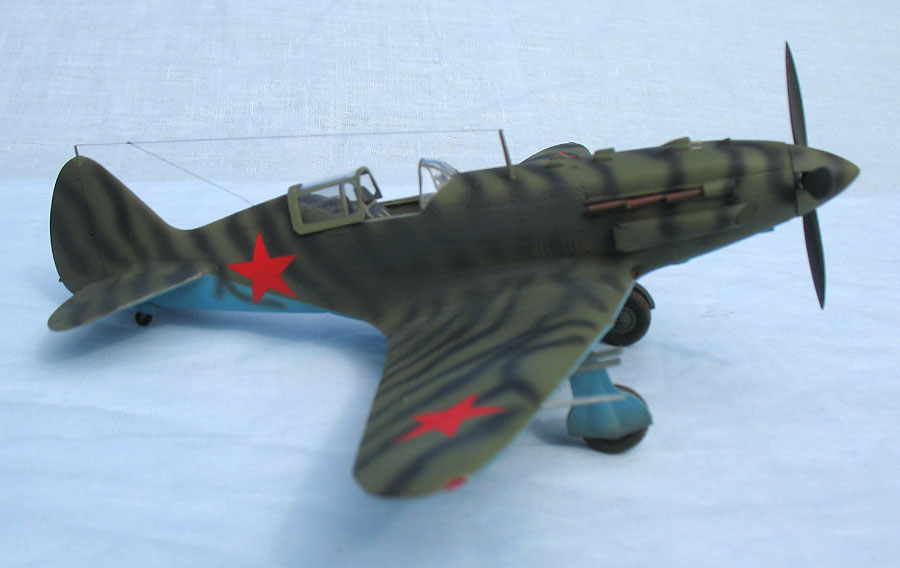
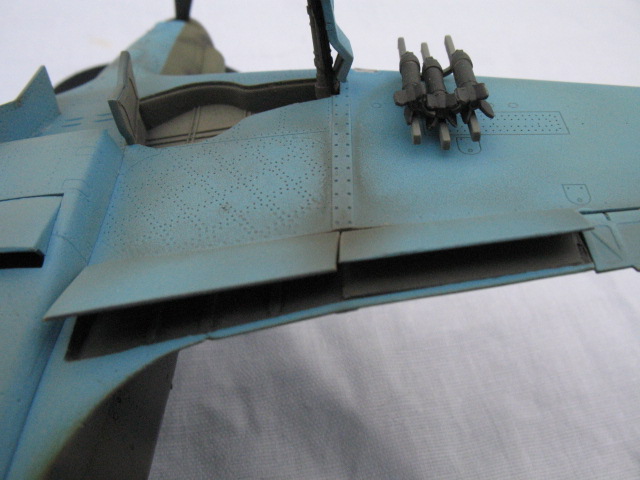
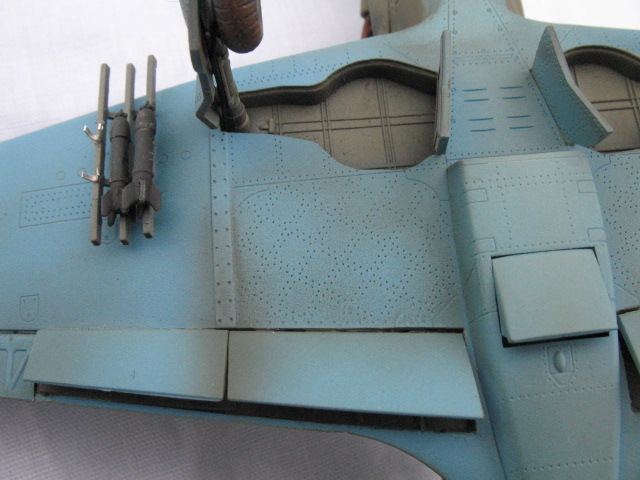
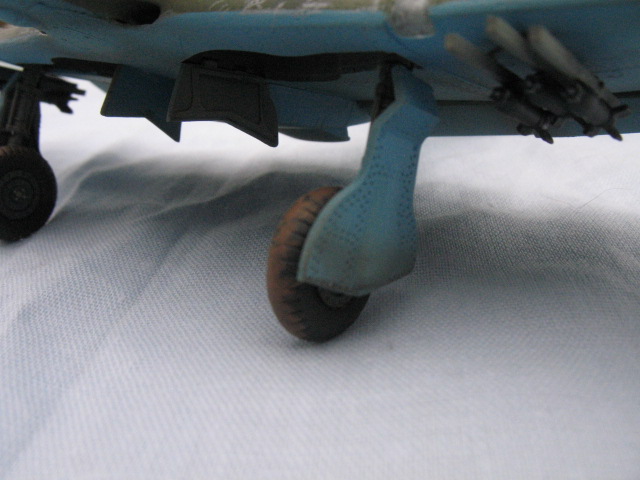 Since
the flaps were molded separately on the kit, I decided early on to build
the model with the flaps at least partially dropped. In looking at my
Mushroom Model book on the MiG-1 to 3, I saw that the interior of the
inboard and outboard flaps had detail in relief. Trumpeter only included
it on the inboard flaps, leaving the outboard flaps smooth. Further,
they didn’t do anything to suggest wing ribbing. On the real thing,
there is metal ribbing inside the wing over the inboard flaps, but the
wing over the outboard flaps is wooden, so that’s smooth except
for three very prominent holes made for the flap actuators. I did my
best to replicate this missing detail while I was waiting for the glue
to dry on the interior assembly. Another issue I had with the kit around
the flap detail was at the wing root. Trumpeter did nothing to box in
the entire flap opening so if you’d look under, you’d see
up into the fuselage. I glued in some sheet styrene and mixed up some
Epoxy Sculpt to fill any gaps. Also of note, should you decide to build
this model with the flaps open, on the MiG-3 the flaps did not extend
to the trailing edge of the wing. They stopped short of it. As a result
there is a thin lip that is painted the underside color; this is shown
very clearly
Since
the flaps were molded separately on the kit, I decided early on to build
the model with the flaps at least partially dropped. In looking at my
Mushroom Model book on the MiG-1 to 3, I saw that the interior of the
inboard and outboard flaps had detail in relief. Trumpeter only included
it on the inboard flaps, leaving the outboard flaps smooth. Further,
they didn’t do anything to suggest wing ribbing. On the real thing,
there is metal ribbing inside the wing over the inboard flaps, but the
wing over the outboard flaps is wooden, so that’s smooth except
for three very prominent holes made for the flap actuators. I did my
best to replicate this missing detail while I was waiting for the glue
to dry on the interior assembly. Another issue I had with the kit around
the flap detail was at the wing root. Trumpeter did nothing to box in
the entire flap opening so if you’d look under, you’d see
up into the fuselage. I glued in some sheet styrene and mixed up some
Epoxy Sculpt to fill any gaps. Also of note, should you decide to build
this model with the flaps open, on the MiG-3 the flaps did not extend
to the trailing edge of the wing. They stopped short of it. As a result
there is a thin lip that is painted the underside color; this is shown
very clearly 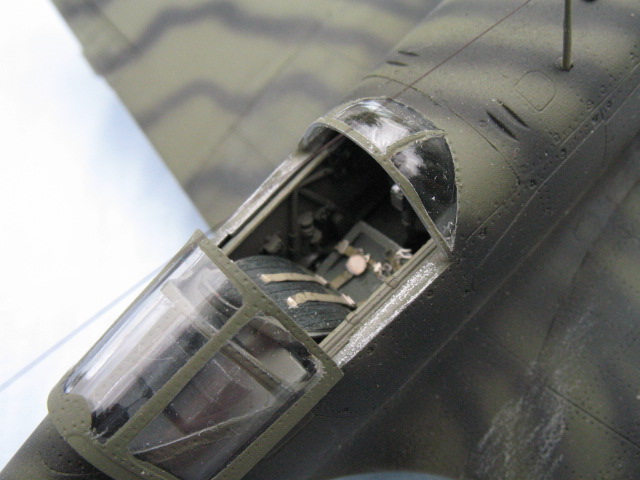 in
at least one of the photos on this page. The inside of the flaps and
wing will be whatever interior color you believe is correct. Yes, there’s
some controversy over what color the interior on this plane was during
WWII. You can’t really trust museum aircraft since many have been
painted incorrectly over the years. You probably won’t go wrong
with anything from RLM02 (gray) that I chose to use, some version of
sky blue, or something in between. Don’t worry; the color police
aren’t giving tickets any more. That first night, I was able to
close up the fuselage and attach the wing and horizontal stabilizers.
On the upper wing halves they’ve got some sort of clip molded
in to ensure a tight fit to the fuselage. I followed instructions, but
the clip, rather than pull the wing tight, seemed to cause a gap. I
will build this kit again, and remove that clip prior to assembly. That
was the only place I needed to fill anything on the model due to fit
issues. The very next day, I finished dressing the seams (minimal really)
and cleaned up the area of the flap where I’d used Epoxy Sculpt.
That was also very minimal since it’s water soluble until cured;
I had finger-smoothed that the night before so it wasn’t a problem
at all. After attaching the windscreen and the rear canopy hood, I masked
and shot Alclad primer. I thought that Alclad primer would shoot like
Alclad, that is, without thinning. That’s not correct; it went
on rough as a result. I paid the price for cutting corners; I should
have used a primer I knew, or tested the Alclad before using it on a
project. Anyway, it meant that I had to use a Scotch-Brite pad to smooth
over that roughness. I didn’t get it all and you can see some
issues on the final model.
in
at least one of the photos on this page. The inside of the flaps and
wing will be whatever interior color you believe is correct. Yes, there’s
some controversy over what color the interior on this plane was during
WWII. You can’t really trust museum aircraft since many have been
painted incorrectly over the years. You probably won’t go wrong
with anything from RLM02 (gray) that I chose to use, some version of
sky blue, or something in between. Don’t worry; the color police
aren’t giving tickets any more. That first night, I was able to
close up the fuselage and attach the wing and horizontal stabilizers.
On the upper wing halves they’ve got some sort of clip molded
in to ensure a tight fit to the fuselage. I followed instructions, but
the clip, rather than pull the wing tight, seemed to cause a gap. I
will build this kit again, and remove that clip prior to assembly. That
was the only place I needed to fill anything on the model due to fit
issues. The very next day, I finished dressing the seams (minimal really)
and cleaned up the area of the flap where I’d used Epoxy Sculpt.
That was also very minimal since it’s water soluble until cured;
I had finger-smoothed that the night before so it wasn’t a problem
at all. After attaching the windscreen and the rear canopy hood, I masked
and shot Alclad primer. I thought that Alclad primer would shoot like
Alclad, that is, without thinning. That’s not correct; it went
on rough as a result. I paid the price for cutting corners; I should
have used a primer I knew, or tested the Alclad before using it on a
project. Anyway, it meant that I had to use a Scotch-Brite pad to smooth
over that roughness. I didn’t get it all and you can see some
issues on the final model.
 All
the build after this went pretty much straightforward, following the
instructions. During all the painting stages, I just shot lacquer thinner
through my airbrush to clear it, and then put new color in the color
cup. The only time I bothered to let things dry a little more was if
masking was needed. That’s really the beauty of shooting enamels;
they dry very quickly. I shot a light blue for the underside, then masked
and shot Russian topside green. I free-handed the tiger stripes using
Floquil Oily Black, and regretted that choice of color. Oily Black doesn’t
really cover well, so it didn’t look like camouflage as much as
very bizarre weathering! So over those stripes I shot Floquil Grimy
Black and it seemed to work out all right. I hit that with Duracryl,
and then came back later that day to apply the decals. I used the kit
Soviet insignia, and they went down admirably well, responding to Solvaset.
The marking I chose was one that I found in the Mushroom Models book;
it was more interesting than most of the other early variant MiG-3’s.
After the decals had some time to dry, I sealed them in with Duracryl.
Over that I shot all the panel lines and rivet detail with very thinned
Grimy Black and polished with Novus plastic polish. This removes the
dark gray from everywhere but the recesses. The beauty of a dark gray
for getting into recesses is that it looks dark on a light surface and
light on a dark surface. As soon as that was completed, I overshot the
entire model with Testor’s Dull-Cote.
All
the build after this went pretty much straightforward, following the
instructions. During all the painting stages, I just shot lacquer thinner
through my airbrush to clear it, and then put new color in the color
cup. The only time I bothered to let things dry a little more was if
masking was needed. That’s really the beauty of shooting enamels;
they dry very quickly. I shot a light blue for the underside, then masked
and shot Russian topside green. I free-handed the tiger stripes using
Floquil Oily Black, and regretted that choice of color. Oily Black doesn’t
really cover well, so it didn’t look like camouflage as much as
very bizarre weathering! So over those stripes I shot Floquil Grimy
Black and it seemed to work out all right. I hit that with Duracryl,
and then came back later that day to apply the decals. I used the kit
Soviet insignia, and they went down admirably well, responding to Solvaset.
The marking I chose was one that I found in the Mushroom Models book;
it was more interesting than most of the other early variant MiG-3’s.
After the decals had some time to dry, I sealed them in with Duracryl.
Over that I shot all the panel lines and rivet detail with very thinned
Grimy Black and polished with Novus plastic polish. This removes the
dark gray from everywhere but the recesses. The beauty of a dark gray
for getting into recesses is that it looks dark on a light surface and
light on a dark surface. As soon as that was completed, I overshot the
entire model with Testor’s Dull-Cote.
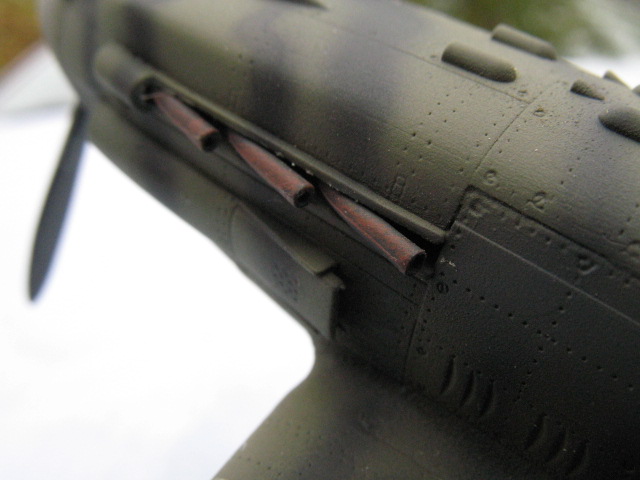
 With
a bit of weathering here and there, attaching hypodermic tube for the
machine gun blast tubes, lead wire for the brake lines, and radio aerial,
I was pretty much done. I succeeded in getting this model built in less
than a week so that I could bring it with me to the show at IPMS Vancouver.
With
a bit of weathering here and there, attaching hypodermic tube for the
machine gun blast tubes, lead wire for the brake lines, and radio aerial,
I was pretty much done. I succeeded in getting this model built in less
than a week so that I could bring it with me to the show at IPMS Vancouver.
I used my work planner (PDA) to write down the various stages of building the model, and what needed to be done in each session. By following a fairly rigorous schedule, I was able to complete all the necessary steps to get the model completed by the following Thursday; I slapped it together in 5 days. That’s pretty much a record for me since I’ve come back to the hobby as an adult.
Conclusion
I didn’t measure this model to see how accurate it is in profile,
but it sure looks like all the MiG-3 pictures that I’ve seen. I
really had fun building this one and recommend it to anyone without any
reservations. Build it and have fun. I’ll next wait and see if Trumpeter
decides to release a later variant. If they don’t, I’ll get
another of this kit and convert it myself.