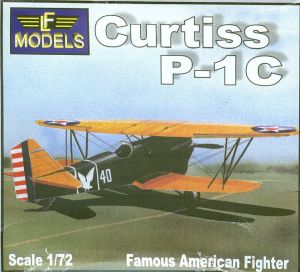
LF Models 1/72nd Curtiss P-1C
|
 |
Background
The Curtiss P-1C was a natural progression from the earlier P-1s. The
difference between it and the P-1B was the addition of a larger-output
engine as well as the removal of the headrest.
The Kit
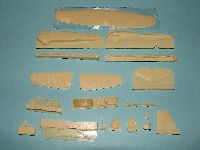 The
LF kit of the P-1C consists of 33 pieces of resin, a sheet of clear styrene
and a stiff, paper instrument panel. The resin is nicely cast and there
are very few air bubbles present. LF molds their kits in a most interesting
way. Their fuselage halves (I've seen it not only with the P-1C but also
with the A-18 I reviewed a few months ago) have a "step" of
resin that needs to be removed from the lower part of the fuselage, like
you would remove a vacuform kit from its backing sheet. It's a little
more difficult than removing a vac piece, because the "step"
of resin only exists on the lower part of the fuselage, ending half-way
up the nose and tail. I've successfully removed this "step"
from the A-18, but only by using a Dremel, and taking considerable time. The
LF kit of the P-1C consists of 33 pieces of resin, a sheet of clear styrene
and a stiff, paper instrument panel. The resin is nicely cast and there
are very few air bubbles present. LF molds their kits in a most interesting
way. Their fuselage halves (I've seen it not only with the P-1C but also
with the A-18 I reviewed a few months ago) have a "step" of
resin that needs to be removed from the lower part of the fuselage, like
you would remove a vacuform kit from its backing sheet. It's a little
more difficult than removing a vac piece, because the "step"
of resin only exists on the lower part of the fuselage, ending half-way
up the nose and tail. I've successfully removed this "step"
from the A-18, but only by using a Dremel, and taking considerable time.
In addition, some of the struts are attached to a pour block "flat".
That is, instead of pouring the struts with one end on the block, one
of the strut's "faces" is attached to the block. Now, there
appears to be a gap between the block and the part, so it may not be a
concern. Still, it's something that needs to be pointed out.
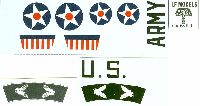
There is only one aircraft catered to in the instructions and on the
decal sheet. Naturally it's a machine from the 17th Pursuit Squadron (PS)
(No. 29-240, Spring, 1929), whose squadron emblem is a "snow owl",
and whose P-6Es were painted uniquely with their landing gear representing
the legs of the owl. Personally, I think the 17th PS is quite overdone,
since usually when you see a P-6E model, nine-times-out-of-ten it will
be finished in 17th PS livery. In other words, I doubt I'll finish my
P-1C (or my P-6Es) as 17th PS machines. One important item about the decals.
I believe they're ALPS printed, which means care must be taken with them.
In fact, LF provides a small explanation sheet pointing out basically
the same thing.
Instructions just show the basic assemblies, and only one side. Interior
detail is adequate, but not all there. Unless the insides don't matter
that much to you, additions are a must. One thing I do wish. That LF would
have provided their generic US photoetch set with this kit (that they
did with the A-18). The photoetch wasn't meant specifically for the A-18
since it's just labeled "US" on the fret, and you can buy it
separately direct from LF.
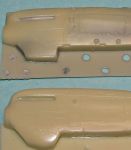 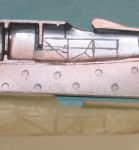 Naturally
modelers are going to compare the Pro Resin P-1A with the LF P-1C. While
the only major structural difference between the two is the nose - especially
the radiator - I think comparison overall is warranted. As you can see
in the two photos (the Pro Resin is on top, the LF on the bottom), the
level of detail is "different" between the two. The Pro Resin
interior (which is the one that's painted) - I think - has better definition
as well as more to it (LF molded only the side tubular structure, and
nothing else). However, on the exterior, I feel the LF has more finesse
to the detail, but Pro Resin provides a bit more. Specifically the hand
crank, engine starter that is usually kept on the port fuselage side.
Pro Resin molded this for us while LF did not, nor do they provide the
crank. However, I think that LF has the gas pipe in a more accurate position
than Pro Resin does. Naturally
modelers are going to compare the Pro Resin P-1A with the LF P-1C. While
the only major structural difference between the two is the nose - especially
the radiator - I think comparison overall is warranted. As you can see
in the two photos (the Pro Resin is on top, the LF on the bottom), the
level of detail is "different" between the two. The Pro Resin
interior (which is the one that's painted) - I think - has better definition
as well as more to it (LF molded only the side tubular structure, and
nothing else). However, on the exterior, I feel the LF has more finesse
to the detail, but Pro Resin provides a bit more. Specifically the hand
crank, engine starter that is usually kept on the port fuselage side.
Pro Resin molded this for us while LF did not, nor do they provide the
crank. However, I think that LF has the gas pipe in a more accurate position
than Pro Resin does.
One aspect that is not quite right is the wheels. According to every
reference I have seen on the P-1 series, the other discerning aspect between
the P-1A and the P-1B (and later versions) is that the wheels were larger.
Granted, after scaling out in 1/72nd it means just slightly over 1mm difference,
but it's still something. Significant or not is debatable, especially
in 1/72nd, but I suspect when you show a P-1A next to the P-1C, it could
be noticeable. The LF wheels are the same size (but more narrow) than
the Pro Resin wheels.
One note about the optional external fuel tank that resides on the underside
of the fuselage. As I mentioned, it was optional and not all aircraft
carried it. In addition, it was not a flat surface, but
was curved. So, there is a noticeable gap between the fuel tank and the
fuselage. I made the mistake on the P-1A of trying to get the fuel tank
flat to fit the fuselage, when it didn't have to be (and leaving the tank
off). If you plan on competing with the model, though, you may have to
provide a photo to show the judges that it was meant to be this way.
Conclusion
 Regardless
of what I've found with this kit, it still is a very nice model. Once
built you will definitely have a great looking P-1C in your collection.
Definitely recommended. Regardless
of what I've found with this kit, it still is a very nice model. Once
built you will definitely have a great looking P-1C in your collection.
Definitely recommended.
At one point I was considering combining the Pro Resin fuselage with
the LF nose and the rest of the LF kit. However, I think I'll just build
the LF complete, and add what's missing to that kit.
My thanks to Roll Models for
sending the review sample. |
|
