Build Review: Academy M1A1 Abrams, Iraq 2003
|
 |
Introduction
When I received this model kit
for review, I sat down, opened the box for first examination, and immediately
thought to myself, "Wow, this is a sweet one!" For the most
part, my original thought proved correct, but, (and here's the but), there
are a few downfalls with this new kit. I'm not going to beat around the
bush and try to polish a rock here, as I am always 100% unbiased with
any product review that I have done. Build style reviews are always the
most brutal, much more different than an in-box review, where the reviewer
is relying on his eyesight alone to describe a model kit, not the actual
assembly and explanation of such.
When I saw the physical size of this tank, some immediate thoughts of
ill fitting or warped parts flashed through my mind, and I must say that
all in all, not too many cropped up in the assembly of this little beauty.
I'm not going to go step-by-step through every move through the instruction
sheet, but I will follow through the construction highlights just to point
out what you're going to have to watch out for.
Construction
As with any model kit, and I really shouldn't have to say this except
to the most beginning of modelists, but I will anyway, study the instruction
sheet carefully. I won't say that this instruction sheet is bad, but there
are some "gray" areas here and there and some sections will
make even the strictest of language curse under his breath! But a little
more about this later.
Basically, this kit begins with the same beginning assembly as most tank kits, which is the lower hull and suspension/propulsion
systems. I chose, as I usually do, to not follow the instruction here
to build and mount the bogies at this step, until completion of the lower
hull and after first paint (but before weathering/washing). It just totally
baffles me as to why model manufacturers include this in the first steps
of construction without duly warning the beginning modeler about this
all too important fact-if you want the model to be finished accurately,
you first have to paint the hull, then the wheels and bogies before mounting
them. Oh, well, just my two cents on the matter…back to the build!
assembly as most tank kits, which is the lower hull and suspension/propulsion
systems. I chose, as I usually do, to not follow the instruction here
to build and mount the bogies at this step, until completion of the lower
hull and after first paint (but before weathering/washing). It just totally
baffles me as to why model manufacturers include this in the first steps
of construction without duly warning the beginning modeler about this
all too important fact-if you want the model to be finished accurately,
you first have to paint the hull, then the wheels and bogies before mounting
them. Oh, well, just my two cents on the matter…back to the build!
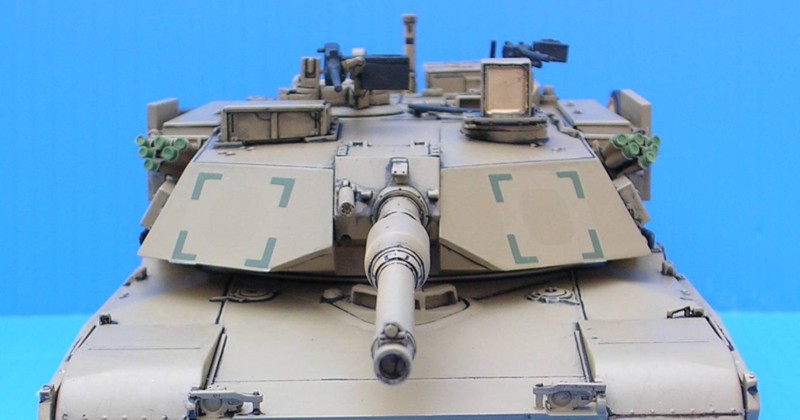
The first problem encountered on this kit by myself was when on attachment
of the rear plate of the lower hull section (which is quite detailed and
defined in itself, I might add), you will find that it just doesn't fit
tight at all on either side-if you choose to leave it this way, small
gaps will show on each side of the lower hull, but they will be hidden
by the tracks and skirts when the model is complete. I had to trim a little
here and there just to appease my conscience, though. In step three of
the build, I encountered the second fit problem, which involves the attachment
of the drivers site assembly onto the upper hull half-it just does not
fit at all without a trim job…also, I opted not to mount the clear
lenses at this point, but to wait until the model is painted to do so.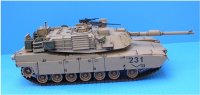
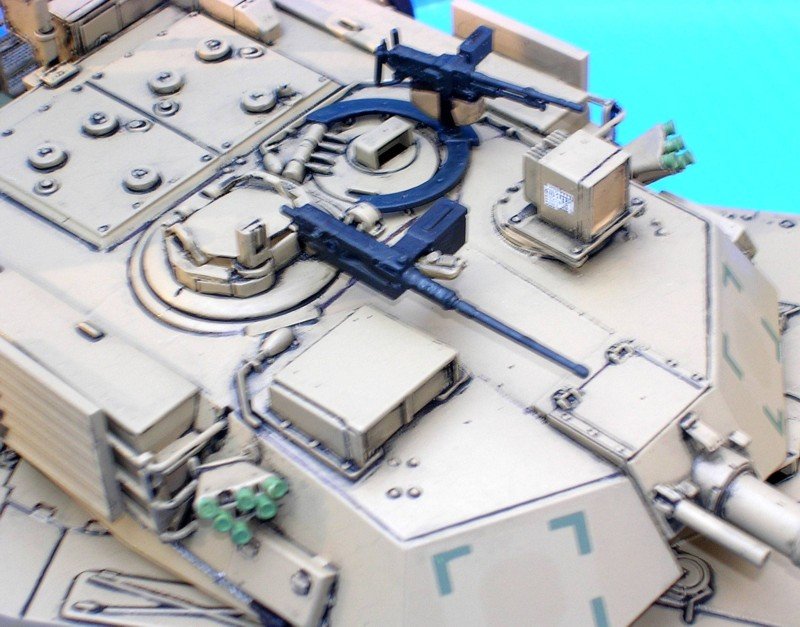
In step four, you will begin to build the turret assembly, which is well
molded and detail is good, with a lot of goodies like tool boxes, cables,
and smoke grenade launchers. While we are on the subject of smoke grenades,
this kit gives the modeler a choice as to which launcher design he wishes
to use, whether the modeler wishes to build either the Marine's version
or the Army's version of this M1A1. Both launchers are included, as well
as other options corresponding with each version. There are also other
options for the modeler, such as upon building the gunners sight window
assembly, you can either have the armored doors open showing the glass,
or a closed door assembly.
Overall, the entire upper turret assembly went on without a hitch, except
upon handling the very thin grab/guard rails, be very careful! I learned
this the hard way, of course…sanding of the thin pieces will be a
challenge for the clumsy handed of us, (in which I am a gold star member!),
but if you take your time you won't have to make any repairs to the broken
rails (in which again, I learned the hard way!). The big gun and the two
smaller machine guns were no problem at all, good fitting pieces and lots
of good, clear detailing.
Next, I stumbled upon a little snafu, which is concerning the main gunners
hatch assembly and mounting of such. As per the kit's instruction sheet,
it is to be built in an open position, which is fine, but for 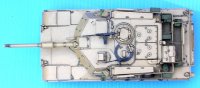 most
AFV Modelers, if you have an open hatch, there had better be interior
detail in that turret! Alas, there is none in this kit, but adding detail
would not be much of a problem for the scratch builders out there…But,
adding interior detail on a build style review is not really fair to the
kit buyer and does nothing to justify a build review…So, I chose
to mount the hatch in a closed position, which is shown in the instructions
photographs and in the box top photographs. But, there is no instruction
as how to mount the hatch in this position, as it is designed to be built
in an open position (oops, forgot something guys). To do this successfully,
there are some slight modifications that you must make, which first includes
cutting the hinge rods at a 45 degree bend, then mounting the hatch onto
the turret next, and then trimming the hinge rod pieces to fit the assembly
on the tank. Not much of a problem, really, just cut away a little at
a time until you get a good fit, glue them up and there you go!
most
AFV Modelers, if you have an open hatch, there had better be interior
detail in that turret! Alas, there is none in this kit, but adding detail
would not be much of a problem for the scratch builders out there…But,
adding interior detail on a build style review is not really fair to the
kit buyer and does nothing to justify a build review…So, I chose
to mount the hatch in a closed position, which is shown in the instructions
photographs and in the box top photographs. But, there is no instruction
as how to mount the hatch in this position, as it is designed to be built
in an open position (oops, forgot something guys). To do this successfully,
there are some slight modifications that you must make, which first includes
cutting the hinge rods at a 45 degree bend, then mounting the hatch onto
the turret next, and then trimming the hinge rod pieces to fit the assembly
on the tank. Not much of a problem, really, just cut away a little at
a time until you get a good fit, glue them up and there you go!
Onto more turret detail-there are two really cool wraparound style stow
away compartment sections that mount to the rear of the turret assembly,
complete with screen bottoms for water drainage! The kit comes with a
piece of vinyl mesh window screen for the bottom grates, although I would
choose a better grade brass micro screen if I was building this model
outside this review. The vinyl mesh works OK, though, but be careful when
you cut it…I tried both a razor knife (with a new blade) and a pair
of sharp scissors, and the scissors worked best to cut the screen. There
are templates supplied in the instruction sheet to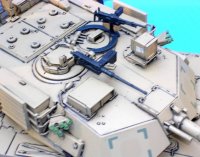 cut the screen to size, but take my advice, and don't bother to use them…both
are off measure and you will end up wasting a lot of time and screen because
they are too short and the cutouts for the rail braces and uprights are
just not right! I simply started with a basic measurement and kept trimming
until I got a good fit (after a choice word or two, though…).
cut the screen to size, but take my advice, and don't bother to use them…both
are off measure and you will end up wasting a lot of time and screen because
they are too short and the cutouts for the rail braces and uprights are
just not right! I simply started with a basic measurement and kept trimming
until I got a good fit (after a choice word or two, though…).
After completion of the turret, the following assembly steps go pretty
quick, which include attaching the top and bottom hull sections together,
turret, skirts, tracks and accessories…But let's back up a step!
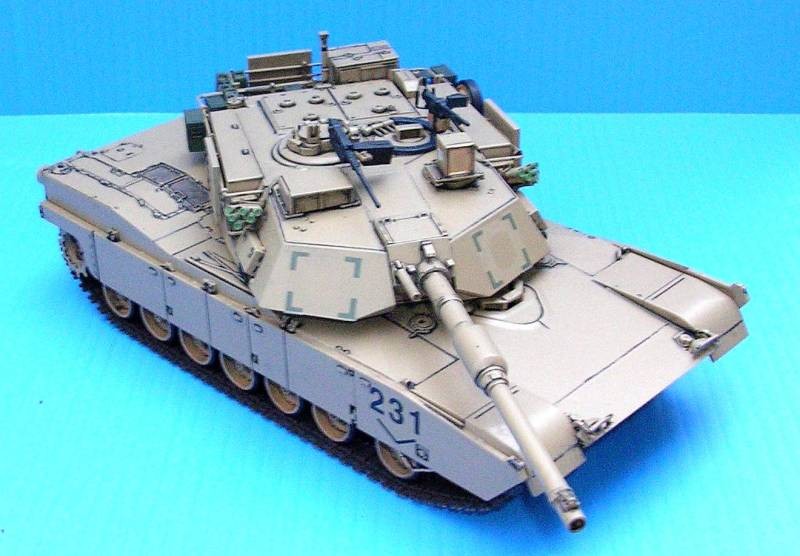
Time to paint! The color recommendation in the kit is Sandgelb, or Desert
Yellow, so I chose to use Model Masters Enamel for this task at hand.
I started with the tanks lower hull assembly, as this was the logical
choice, as it is still not completed without the bogies and tracks. I
also sprayed the turret, skirts, and the remaining of the models pieces
that were going to remain Desert Yellow at this point.
In the middle of paint coats, I had started construction of the kit's
bogie wheels, sixteen in all. I hand brushed both the Desert Yellow rims
and Flat Black for the rubber parts. Set aside to dry and give the second
coat to your tank pieces. I let my paint cure for at least three days
before handling, but that's up to the modeler to decide on when to proceed
with the build. Time to "dirty up" the piece a little, but not
too much, as I have chosen to make a fairly clean presentation with this
build…No mud or dust, just a little washing to bring out the finer
details. For the past year I have been experimenting with Acrylics for
washes, and I must say that the results can be amazing if you fool around
with your formulations and come up with some good ones. I have a small
cup that I mix my washes in and that's how I gauge water/paint/soap ratios.
A little unscientific, but it works for me! I really enjoy using an Acrylic
wash over an enamel wash, as cleanup of the piece is much easier, detail
seems to be more defined, and it's not as harmful to the paint job as
some washes can be.
After giving the entire model a good coat of Future Wax, and allowing
a day to dry completely, I washed the entire lower hull, turret, skirts
and accessories with a light wash of Burnt Umber and Dark Brown. After
I cleaned it up a bit, I decided to stop with the weathering right there
as I had achieved what I was after. Turning our concentration back to
the lower hull, push the bogie assemblies onto their respective spoke
(when you assemble the bogies initially, there is a small poly cap that
fits between the two wheels which in turn provides the means of attaching
them to the spokes on the hull…pretty neat!). Next, and this is entirely
up to the modeler's preferences, is the tanks tracks, and finishing them
to the model's desired final appearance. Now, I'm going to use the tracks
supplied by Academy, even though it goes against all that I stand for,
because these tracks are not the right ones for this tank! Totally inaccurate,
these tracks are of the wrong version, as none of the tanks used in OIF
by the USMC or the  Army
utilized this style of Chevron track. The dual horn center link connectors
in old T156 tracks should be between links, not in the middle of each
link as Academy (and early Tamiya) made them. But for this review's purpose,
use them I shall! They are the rubber band style tracks, and I chose to
finish them as follows: first an overall coat of NATO Black, followed
by a heavy wash of dark brown, dry brush lightly with metal tone on the
worn metal parts of the tracks, followed by a light dry brush of the pads
with NATO Black again. Seal up the whole deal with a coat of flat clear,
let them dry and time to mount them up! Attaching the tracks to the tank
is done by using the heated flat blade method of melting the tiny burs
on the rubber tracks.
Army
utilized this style of Chevron track. The dual horn center link connectors
in old T156 tracks should be between links, not in the middle of each
link as Academy (and early Tamiya) made them. But for this review's purpose,
use them I shall! They are the rubber band style tracks, and I chose to
finish them as follows: first an overall coat of NATO Black, followed
by a heavy wash of dark brown, dry brush lightly with metal tone on the
worn metal parts of the tracks, followed by a light dry brush of the pads
with NATO Black again. Seal up the whole deal with a coat of flat clear,
let them dry and time to mount them up! Attaching the tracks to the tank
is done by using the heated flat blade method of melting the tiny burs
on the rubber tracks.
You can now mount the tanks fender skirts which fit well, except for on
the right side of the skirt there is a small square cutout in the middle
of the top of the piece that shows to the eye…not very pleasing.
Attach the turret to your tank, and next you can add the accessories that
come supplied with this kit, such as water cans, gas cans, ammo boxes,
wire spools, tow cables, etc. They can be painted in either Desert Yellow
or Olive Drab, either being accurate for this model. I used most of what
came with the kit on this subject. After mounting all of your supplies
and other goodies, Academy supplies a decal sheet with a choice of two
different markings for this tank, which again unfortunately, are totally
inaccurate. Mount your choice of decals, and when your setting solution
is dry, time for a final coat of clear flat to seal the deal!


Conclusion
Overall, I have to say that for
myself, accuracy makes the model, and in this case there are a few strikes
against this kit…none that couldn't be fixed with some aftermarket
fix-em-ups. The model went together very easy and without much problem, but with the inaccuracies burning
in my mind it was very hard to finish this kit the way that Academy presents
it to the modelist. For quality of what was presented, I will give this
kit a hard 7, but overall rating will be a 6, for sure. My suggestion
to the modeler wanting to build this tank, buy this kit yes, but also
be prepared to make some changes to build an accurate version of this
Abrams.
very easy and without much problem, but with the inaccuracies burning
in my mind it was very hard to finish this kit the way that Academy presents
it to the modelist. For quality of what was presented, I will give this
kit a hard 7, but overall rating will be a 6, for sure. My suggestion
to the modeler wanting to build this tank, buy this kit yes, but also
be prepared to make some changes to build an accurate version of this
Abrams.
Just to be fair to both the modelist and Academy Models, I am listing
the minor problems with this kit here:1. Turret dimensions are off: this
kit has the dimensions of the original M1 Turret, so therefore it is about
5mm(1/4") too short at the front for the M1A1.2. T156 rubber Chevron
tracks: definitely, a big no-no…pick up a set of T158 Bigfoot tracks
to replace the ones supplied with the kit.
3. Decals/Markings: If you want to present an accurate reproduction, then
find a decent set of markings made aftermarket for the M1A1 Abrams that
are more true to this machine and time period. Many thanks and appreciation
to Academy Models for providing this review sample.
References
1. Abrams Main Battle Tank M1A1 and M1A2
Museum Ordinance Special #9
Darlington Productions Inc.
2. M1A1 Abrams Main Battle Tank
Osprey Publications, New Vanguard 2
3. M1A1/A2 Abrams
Mini Color Series #7502
Concord Publications
4. Abrams Company
Europa Militaria # 28
Crosswood Press Ltd.