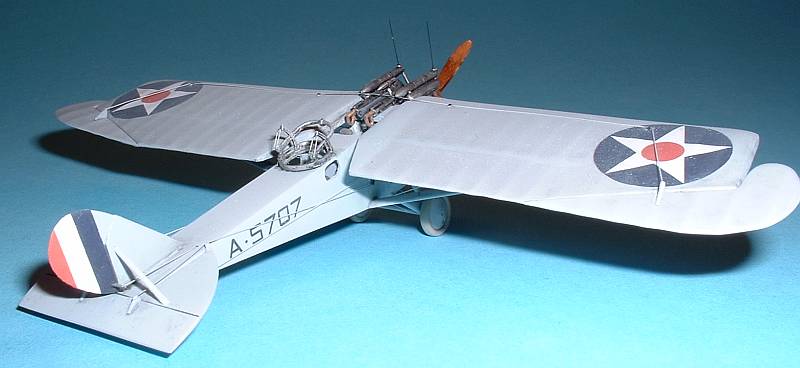
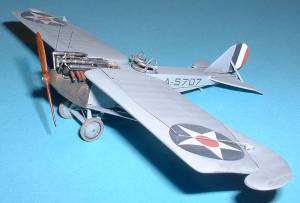
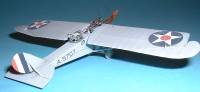
Pro Resin 1/72nd Loening M-8-1
|
 |
History
 I
won't go into a lengthy history on the type as I did so in my First
Look published in July 2004. However, the further research I did was
even more fun than when I started - along with a little more frustration.
There still is not a lot published nor known on these early aircraft.
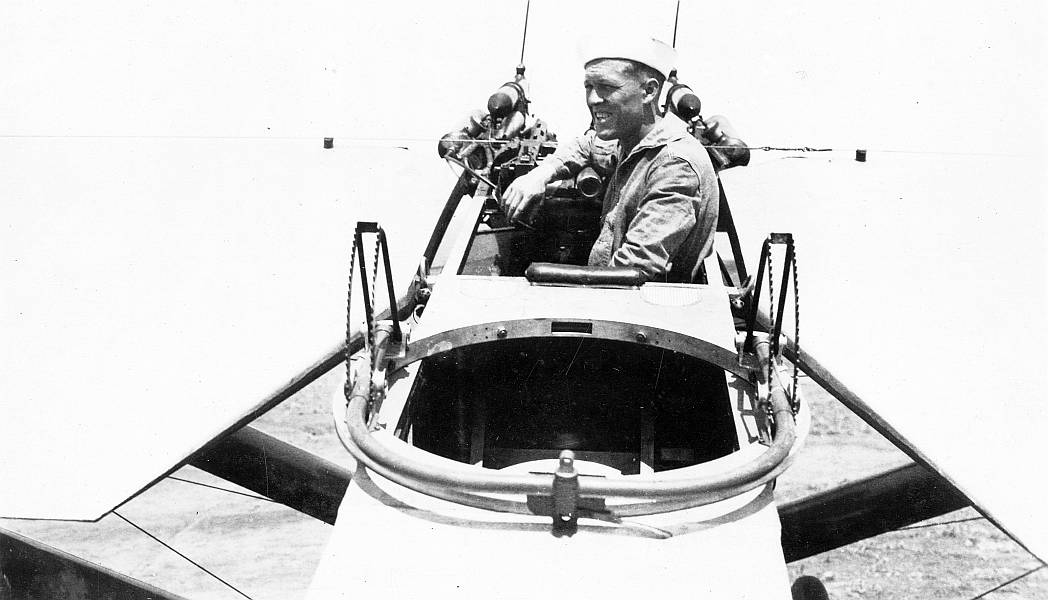
So far the best history of the type - in terms of a photographic record
- comes from the San Diego Aerospace Museum. They have a number of photos
of this machine in various stages of life. I was given permission to include
one of them with my article. I
won't go into a lengthy history on the type as I did so in my First
Look published in July 2004. However, the further research I did was
even more fun than when I started - along with a little more frustration.
There still is not a lot published nor known on these early aircraft.
So far the best history of the type - in terms of a photographic record
- comes from the San Diego Aerospace Museum. They have a number of photos
of this machine in various stages of life. I was given permission to include
one of them with my article.
Construction
 This
should be an easy and quick build. However, never let it be said that
I'm the quickest builder no matter how easy the kit is. I ran into a number
of problems on the way, all but one my own fault. First, I lose one of
the horizontal tail pieces when transporting the unbuilt kit from point
a to point b. Then I mess up the engine because that one area of assembly
befuddled me for the longest time. When I started the painting, the paint
didn't adhere correctly in one spot (again, my fault for not washing the
kit properly) so I had to strip the first run of painting. Which meant
putting on Polly S' "Easy-Lift-Off" on the entire kit, which
included the masks that were in and around the cockpit openings. This,
in turn, meant the "Easy-Lift-Off" stayed in direct contact
with the resin for longer than it should have been, which turned some
of the resin in and around the cockpits to rubber - which meant some of
this area had to be replaced. Finally, not knowing how the decals reacted
to anything, I tried to put them on using the usual Microscale method,
which didn't work. Urgh. More on all of these "problems" as
I progress with the article. This
should be an easy and quick build. However, never let it be said that
I'm the quickest builder no matter how easy the kit is. I ran into a number
of problems on the way, all but one my own fault. First, I lose one of
the horizontal tail pieces when transporting the unbuilt kit from point
a to point b. Then I mess up the engine because that one area of assembly
befuddled me for the longest time. When I started the painting, the paint
didn't adhere correctly in one spot (again, my fault for not washing the
kit properly) so I had to strip the first run of painting. Which meant
putting on Polly S' "Easy-Lift-Off" on the entire kit, which
included the masks that were in and around the cockpit openings. This,
in turn, meant the "Easy-Lift-Off" stayed in direct contact
with the resin for longer than it should have been, which turned some
of the resin in and around the cockpits to rubber - which meant some of
this area had to be replaced. Finally, not knowing how the decals reacted
to anything, I tried to put them on using the usual Microscale method,
which didn't work. Urgh. More on all of these "problems" as
I progress with the article.
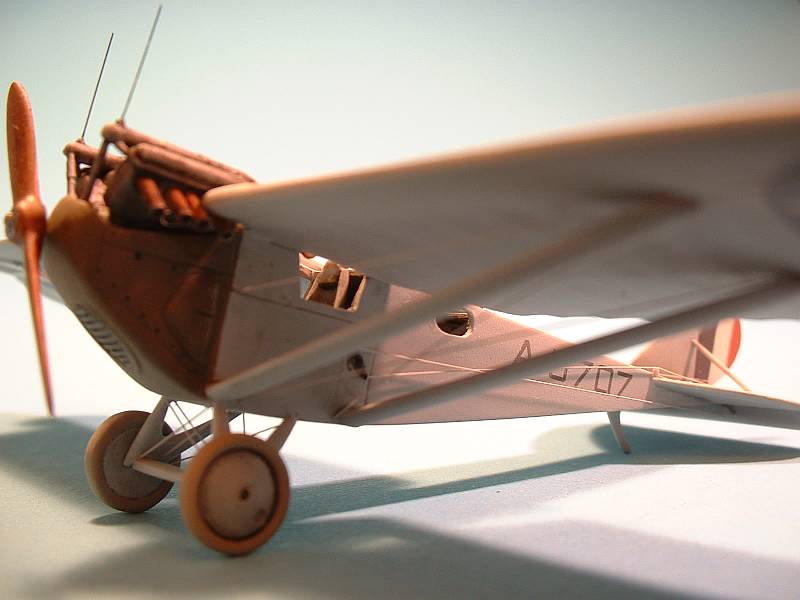
 While
the instructions have you assemble the engine first, I started construction
in the cockpit. Pro Resin provides an excellent start in the cockpit,
and if you don't want to do any further detail to it, it's a perfect representation
out of the box. The instrument panel and seat belts are photoetch, while
the rest of the pieces are resin (minus the clear film which represents
the instruments). It's all a decent representation of what's inside, especially
since there are no clear photos of the inside of any of the Loenings.
I decided - since there wasn't any documentation to tell me any different
- to paint the interior the same color as the exterior. Pretty easy, I
thought. With the proper drybrushes and washes (which I applied with oils)
the cockpit will really "pop out". While
the instructions have you assemble the engine first, I started construction
in the cockpit. Pro Resin provides an excellent start in the cockpit,
and if you don't want to do any further detail to it, it's a perfect representation
out of the box. The instrument panel and seat belts are photoetch, while
the rest of the pieces are resin (minus the clear film which represents
the instruments). It's all a decent representation of what's inside, especially
since there are no clear photos of the inside of any of the Loenings.
I decided - since there wasn't any documentation to tell me any different
- to paint the interior the same color as the exterior. Pretty easy, I
thought. With the proper drybrushes and washes (which I applied with oils)
the cockpit will really "pop out".
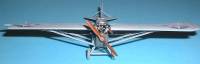
 Now
it was time to assemble the fuselage halves. No problems at all in this
area, and only a minimum of seam filling was needed. The instructions
now have you add all the flying surfaces, which I did, after I cut out
all control surfaces to mount them in different positions. There are some
models where doing this makes all the difference in the world, and this
is one of them. Now
it was time to assemble the fuselage halves. No problems at all in this
area, and only a minimum of seam filling was needed. The instructions
now have you add all the flying surfaces, which I did, after I cut out
all control surfaces to mount them in different positions. There are some
models where doing this makes all the difference in the world, and this
is one of them.
Again, there was only a little bit of attention needed on the seams
once the horizontal tail halves and wings were glued on. Remember I said
I lost one-half of the horizontal tail? This was because I  removed
the stabilizer to be repositioned. This will sound comical, but I was
taking the kit to work on at a local-club model meeting, and I'm pretty
sure it slipped out of the box I was carrying it in, and - since it was
raining - washed down a drain. You can't make this kind of stuff up. When
I mentioned this to Chris, he was kind enough to send out the one he had
from the LS-1 he still had laying around. Again, you can't make this stuff
up - it was literraly lost in the mail, as it never made it from his house
to mine. So, I asked Pro Resin, and they were kind enough to send a replacement
for free - even though it was my own fault. removed
the stabilizer to be repositioned. This will sound comical, but I was
taking the kit to work on at a local-club model meeting, and I'm pretty
sure it slipped out of the box I was carrying it in, and - since it was
raining - washed down a drain. You can't make this kind of stuff up. When
I mentioned this to Chris, he was kind enough to send out the one he had
from the LS-1 he still had laying around. Again, you can't make this stuff
up - it was literraly lost in the mail, as it never made it from his house
to mine. So, I asked Pro Resin, and they were kind enough to send a replacement
for free - even though it was my own fault.
 If
you happened to read my First Look on the Loenings, you would have seen
that I came to the conclusion that the production Loenings were not left
Clear Doped Linen, and instead were painted. I then deduced that the color
would have been "Aircraft Gray" which was close to FS16473.
As I had no close matches to that color in my paint stash, I mixed my
own using Polly Scale paints. Unfortunately I don't remember what I used
to come up with that color, but that's all moot now as Xtracrylix has
this color in their line-up, which I hope to use on Pro Resin's F6C-2. If
you happened to read my First Look on the Loenings, you would have seen
that I came to the conclusion that the production Loenings were not left
Clear Doped Linen, and instead were painted. I then deduced that the color
would have been "Aircraft Gray" which was close to FS16473.
As I had no close matches to that color in my paint stash, I mixed my
own using Polly Scale paints. Unfortunately I don't remember what I used
to come up with that color, but that's all moot now as Xtracrylix has
this color in their line-up, which I hope to use on Pro Resin's F6C-2.
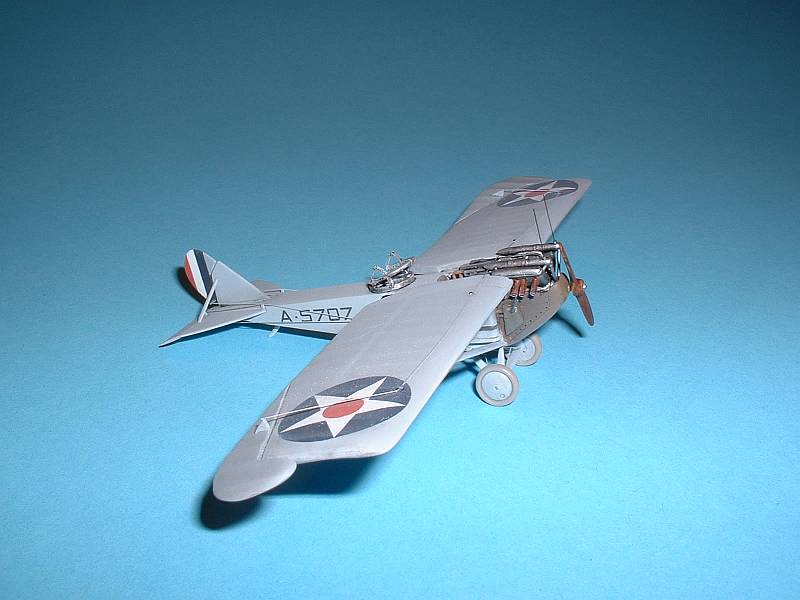
Painting
 Okay.
Now that the major parts were assembled it was time to paint. I decided
to prime the kit first, which I did with Mr. Surfacer 1000 out of the
can. Worked great, with only a little follow up sanding to completely
smooth over the finish. I then started to spray the "Aircraft Gray",
but something happened and it didn't adhere in a couple of places, prompting
me to break out the "Easy-Lift-Off" and strip the kit, which
included the Mr. Surfacer. Unfortunately the "E-L-O" (not the
band) soaked into the material I had masking the cockpit - unbeknownst
to me - and proceeded to turn some of the areas around the cockpit into
"rubberized-goo". The worst area was behind the rear cockpit.
I ended up having to cut that area entirely away and replaced it with
sheet styrene. Again, folks, I can't make this kind of stuff up. Murphy
knows me on a first-name basis. The rest of the cockpit areas worked out
fine, once I let them dry. For two weeks. Urgh. Okay.
Now that the major parts were assembled it was time to paint. I decided
to prime the kit first, which I did with Mr. Surfacer 1000 out of the
can. Worked great, with only a little follow up sanding to completely
smooth over the finish. I then started to spray the "Aircraft Gray",
but something happened and it didn't adhere in a couple of places, prompting
me to break out the "Easy-Lift-Off" and strip the kit, which
included the Mr. Surfacer. Unfortunately the "E-L-O" (not the
band) soaked into the material I had masking the cockpit - unbeknownst
to me - and proceeded to turn some of the areas around the cockpit into
"rubberized-goo". The worst area was behind the rear cockpit.
I ended up having to cut that area entirely away and replaced it with
sheet styrene. Again, folks, I can't make this kind of stuff up. Murphy
knows me on a first-name basis. The rest of the cockpit areas worked out
fine, once I let them dry. For two weeks. Urgh.
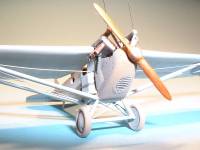
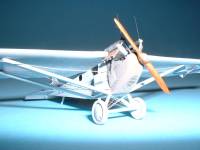 Finally,
the aircraft and major components are painted (I left the struts off while
painting) and then pieces were assembled to make this into something that
looked more like an airplane. It's finally progressing. Finally,
the aircraft and major components are painted (I left the struts off while
painting) and then pieces were assembled to make this into something that
looked more like an airplane. It's finally progressing.
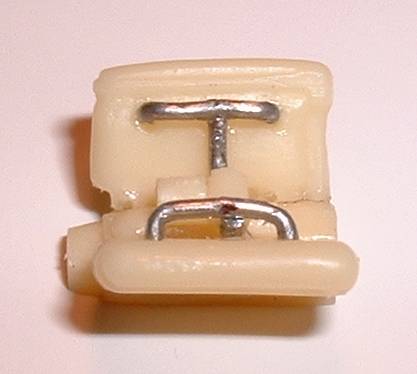
There were three areas where I replaced the parts instead of using the
kits'. First, I thought the control horns on the sides of the fuselage
that held the wires leading to the horizontal tail were too big, so I
substituted parts I thought would work from the Tom's Modelworks 1/72nd
British photoetch set. While I thought the photoetch pieces were too thin,
there were enough on the fret that I could double them up giving me better
thickness. Another piece I replaced was the resin axle. I didn't think
it would give me enough strength in this area so I replaced it with brass
rod. Finally, the struts that led from the fin to the horizontal tail
pieces were replaced with Contrail struts.
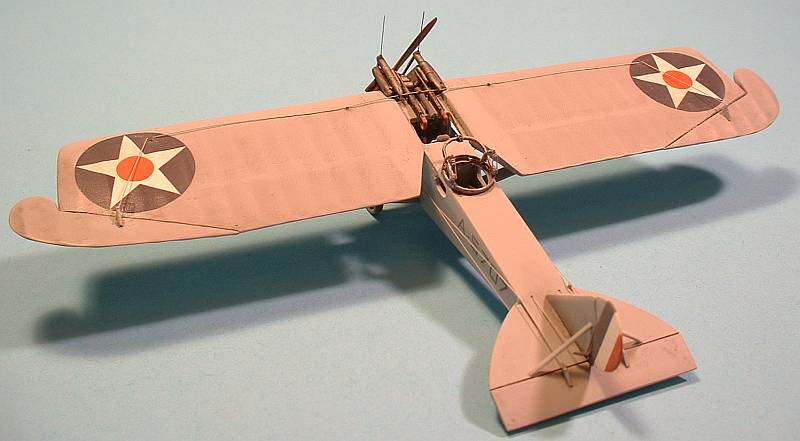
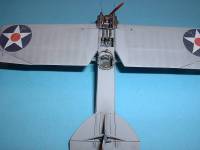
 Some
pieces missing I thought were too obvious to leave off were: two small
"stems" that exist on the front of the leading edge of the horizontal
tail pieces, on top of the horizontal tail. It appears these were in place
to hold up the control cable that came from the fuselage and went to the
stabilizer. Looking over the photos, these were too obvious to leave off.
The other items that were left off the kit that need to be added are the
"stems" on the wing that keep its rigging in line. These were
easy to add as I drilled through the wing for each piece and glued in
brass rod, which was then snipped to size. Some
pieces missing I thought were too obvious to leave off were: two small
"stems" that exist on the front of the leading edge of the horizontal
tail pieces, on top of the horizontal tail. It appears these were in place
to hold up the control cable that came from the fuselage and went to the
stabilizer. Looking over the photos, these were too obvious to leave off.
The other items that were left off the kit that need to be added are the
"stems" on the wing that keep its rigging in line. These were
easy to add as I drilled through the wing for each piece and glued in
brass rod, which was then snipped to size.
Decals and Final Finishing
After I put on a coat of Future, it was time to add the decals. First,
the top-most roundels from the kit went on without a hitch. I used Future
as the setting agent which really helped. Then I moved 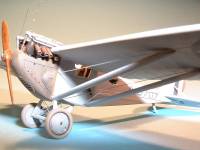 onto
the roundels on the underside of the wings, and for some reason I used
the Microscale method instead of Future. Well, the decals did not
like the Microscale products since once they touched the stuff, they started
to break apart. Ick. (Pro Resin advises their decals should be dipped
in room-temperature water, not left to soak, and no setting
agents should be used at all.) Luckily, the Micro/Superscale roundels
from their early US decal sheet are almost the same size and color as
the Pro Resin decals, so I used those on the underside. While not exact,
since you can't see the top and the bottom at the same time, I thought
no problem at all. I then started to cut up the fuselage-side decals so
I could have a unique code for my kit. Well, it turns out I left them
in the water too long, as they started to float into itty-bitty pieces
when I went to pull them out of the water. Another ick but I was able
to have some numbers and letters made via the ALPS and put them on instead.
No problem, everything was still progressing. onto
the roundels on the underside of the wings, and for some reason I used
the Microscale method instead of Future. Well, the decals did not
like the Microscale products since once they touched the stuff, they started
to break apart. Ick. (Pro Resin advises their decals should be dipped
in room-temperature water, not left to soak, and no setting
agents should be used at all.) Luckily, the Micro/Superscale roundels
from their early US decal sheet are almost the same size and color as
the Pro Resin decals, so I used those on the underside. While not exact,
since you can't see the top and the bottom at the same time, I thought
no problem at all. I then started to cut up the fuselage-side decals so
I could have a unique code for my kit. Well, it turns out I left them
in the water too long, as they started to float into itty-bitty pieces
when I went to pull them out of the water. Another ick but I was able
to have some numbers and letters made via the ALPS and put them on instead.
No problem, everything was still progressing.
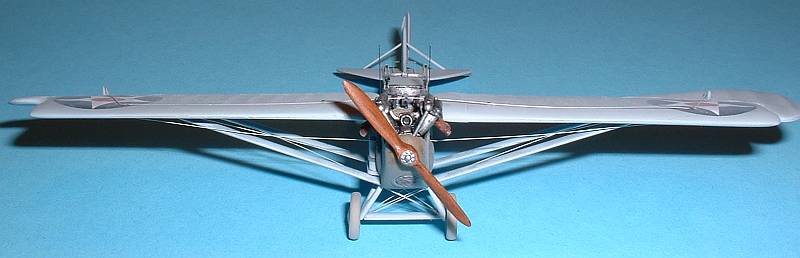
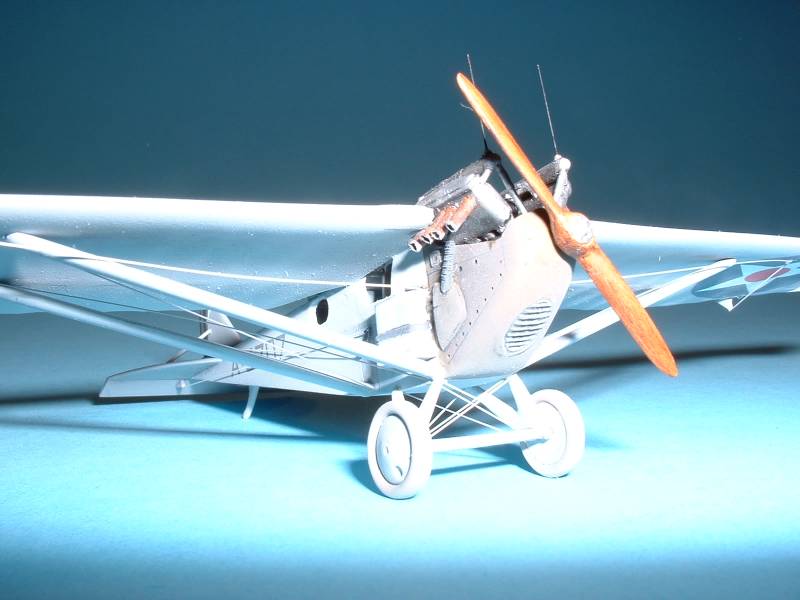
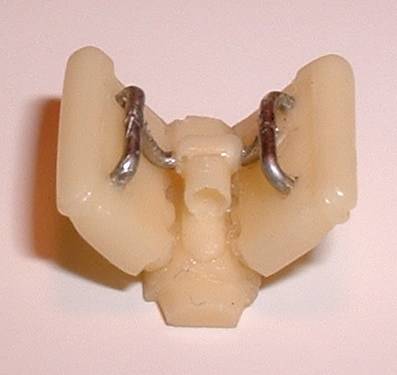
  It
was at the point of everything drying I decided to tackle the engine.
Three times. Triple ick. First, I sanded the cylinder heads too much which
made the engine looked to "squat". Second, I don't remember
what I botched, but botched it I did. Finally Pro Resin was kind enough
to send me a replacement engine, and as the cliché goes, the third
time is the charm. However, the instructions leave a lot to be desired
- and I don't think parts of the engine are that accurate. You can see
a "stock" Hispano-Suiza 300hp engine at the Old
Rhinebeck site. The one area that is different between this "stock"
engine and the engine on the Loening is in the area of the small intake
and - what I think - is the exhaust manifolds. On the "stock"
engine I think this area sits too high and the guns would never have cleared
it. So, I think this whole area was redesigned just for this aircraft.
While probably not exact, I think my rendition comes close to the real
thing. It's difficult to see exactly what this area looks like as there
are no pictures - I know of - that just show this area of the engine. It
was at the point of everything drying I decided to tackle the engine.
Three times. Triple ick. First, I sanded the cylinder heads too much which
made the engine looked to "squat". Second, I don't remember
what I botched, but botched it I did. Finally Pro Resin was kind enough
to send me a replacement engine, and as the cliché goes, the third
time is the charm. However, the instructions leave a lot to be desired
- and I don't think parts of the engine are that accurate. You can see
a "stock" Hispano-Suiza 300hp engine at the Old
Rhinebeck site. The one area that is different between this "stock"
engine and the engine on the Loening is in the area of the small intake
and - what I think - is the exhaust manifolds. On the "stock"
engine I think this area sits too high and the guns would never have cleared
it. So, I think this whole area was redesigned just for this aircraft.
While probably not exact, I think my rendition comes close to the real
thing. It's difficult to see exactly what this area looks like as there
are no pictures - I know of - that just show this area of the engine.
 The
area between the ribs received a wash of black oil color. I went over
these areas three times before I achieved acceptable results. Once the
oil wash dried, I then dipped an "eye liner applicator" (look
for these in the makeup section of your favorite store) into Turpenoid
(which I use to thin the oils) and squeezed most of the Turpenoid out.
Then I lightly and slowly went over the ribs and "high details"
to remove any oil wash on those areas, bringing back the original color. The
area between the ribs received a wash of black oil color. I went over
these areas three times before I achieved acceptable results. Once the
oil wash dried, I then dipped an "eye liner applicator" (look
for these in the makeup section of your favorite store) into Turpenoid
(which I use to thin the oils) and squeezed most of the Turpenoid out.
Then I lightly and slowly went over the ribs and "high details"
to remove any oil wash on those areas, bringing back the original color.
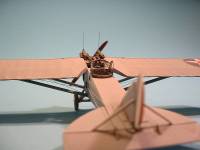
It was now time to add the rest of the bits as well as rig it. Once
it was all accomplished I sprayed the entire model with Polly Scale's
flat.
Conclusion
 This
is a really great kit, one that would be a perfect first-time, resin,
short-run kit, since the struts don't have to help align the wing at all.
The biggest area of difficulty is applying the rigging since all the problems
with the model I did myself. This
is a really great kit, one that would be a perfect first-time, resin,
short-run kit, since the struts don't have to help align the wing at all.
The biggest area of difficulty is applying the rigging since all the problems
with the model I did myself.
I'm not sure why the rigging for the ailerons isn't staying taught (all
of my rigging is .005" stainless steel wire). When I glued it down
it was very tight, but something happened after drying which made it "loose".
Not sure what that is.
Note that there are windscreens in front of both cockpit openings on
the fuselage sides. As I wanted to finish this model for this issue I
haven't added them yet.
Acknowledgements
My sincere thanks to Pro Resin
not only for the kit, but also for the help and the spare parts. I would
also like to thank Sergei Serebryanskiy
for his help with the kit, especially with trying to figure out the engine. |
|