Valom 1/72 Boeing XF8B-1
|
 |
History
In late 1942 the Bureau of Aeronautics (BuAer) of the US Navy issued
Specification SD-349 for a carrier-based bomber/torpedo plane. Boeing,
Curtiss, Douglas, Kaiser-Fleetwings, Martin and Ryan responded. Boeing
got the first contract in early 1943 for three XF8B-1s. By year's end
Curtiss (XBTC-1), Douglas (XBT2D-1), Kaiser (XBTK-1) and Martin (XBTM-1)
all had contracts for prototypes too. Many believe the "F", "Fighter",
designation assigned to the Boeing Model 400 by BuAer was a factor in
killing the project; the others all had "BT", "Bomber/Torpedo" designators,
which fit the intended mission better than "Fighter". Only Douglas and
Martin received production contracts for, ultimately, 3,180 Skyraiders
and 151 Maulers. Had the Boeing been produced its designation would have
been "AB-1". It was never named. Most Boeing airplanes were, and are,
un-named. Boeing also never uses the "B" prefix that you see in print
so often, as in "B-314"or "B-707", it should be simply "314" and "707",
etc.
On November 27, 1944, XF8B-1, BuNo 57984 (msn [MANUFACTURER'S SERIAL
NUMBER] 8484) was flown for the first time by Bob Lamson from Boeing Field
in Seattle. The second plane, BuNo 57985 (msn8485) rolled out January
31, 1945 and, like the first, was in bare metal. The third plane, BuNo
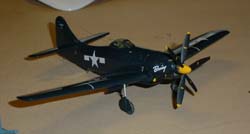
57986 (msn8486), painted overall Sea Blue Gloss, first flew in early 1946.
The second plane was the only one to be given full USN markings. These
are well shown in a fine airbrush rendering by E. Mayer in the October
1994 issue of Wings magazine. This plane was aslo the only one to get
the later red bar in the national insignia. The type was extensively tested
for over five years by Boeing, the Navy and the Army. No production contract
was issued and by Spring 1950 all three planes had been scrapped whilst
the Skyraider was becoming famous.
The Kit
The kit is packed in a fairly stout, top-opening, box, which contains:
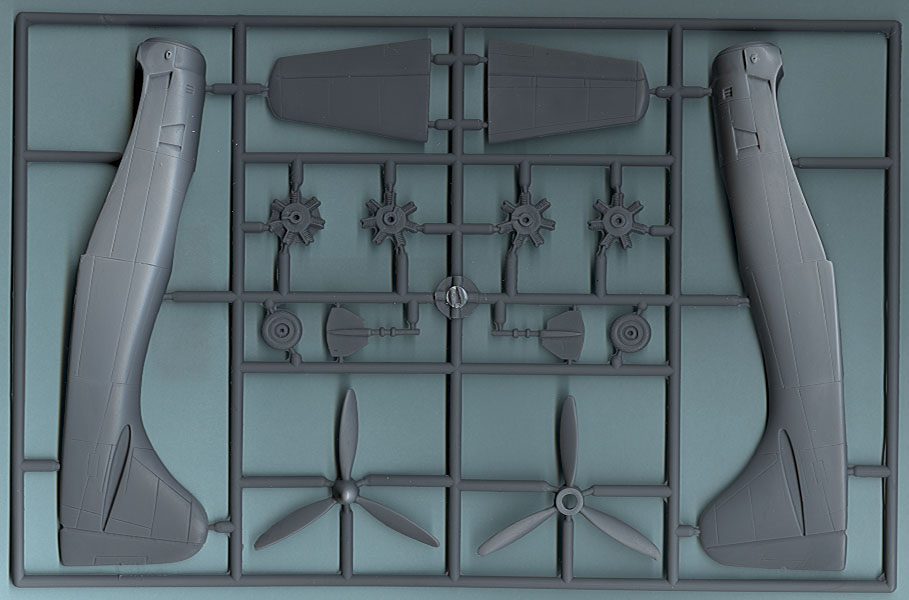
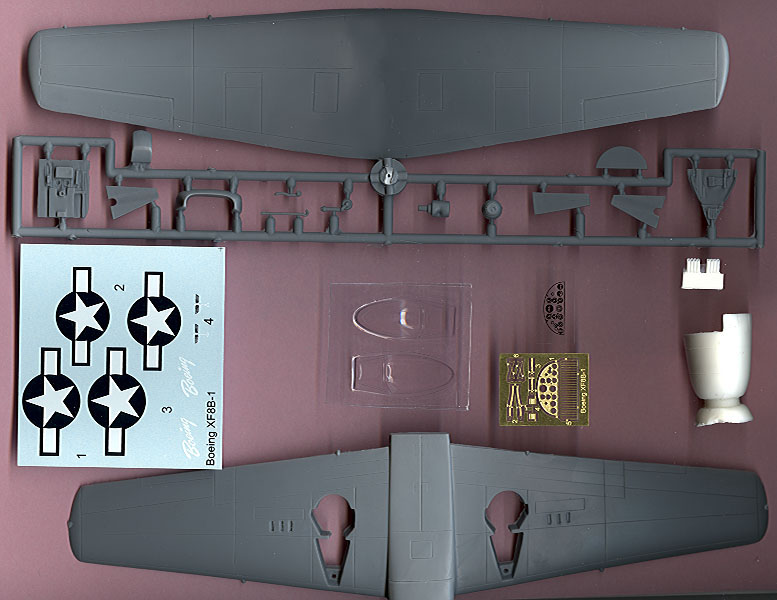
• 46 parts injection molded in medium gray styrene,
• Three parts cast in white resin,
• Two clear vac formed canopies,
• One small decal sheet and
• A four-page, A-4 size set of instructions, which include: a brief
history in Czech, German and English, a parts map, a seven-step assembly
procedure and colors/markings information.
The molded parts remind me of Matchbox parts without the trenches.
Bill mentions the thick wing TEs in his narrative below; the same is true
of the rudder. Detail and outline wise, the kit is completely acceptable.
The prop blades are, however, thin and flat and have almost no pitch twist
from root to tip. As you can see form the scan of the parts, engineering
of the kit is conventional.
I must note that the color/markings instructions are a bit limiting.
They are accurate for one plane at one time. The propeller spinners were
sometimes bare metal and sometimes Sea Blue to match the overall color.
The Boeing "Bug" totem logo on the decal sheet has black wings; they should
be white. The decal sheet has none of the myriad small white stencils
that add interest to this overall blue plane. No wing walk outlines are
included nor are the Aeroproducts logos and data blocks for the props.
Note also that for the Sea Blue Gloss scheme, the blue should be trimmed
from the national insignia leaving only the white star and white bars.
The Build - by Bill Osborn
When Jim asked me if I would do a "build" writeup to go with his in-the-box
review, I thought it would be a hoot. Well, this old owl started trying
to remember all the steps he went through to finish this model. You've
got to know the model was finished for about two months when Jim asked
me and by then several other models had taken its place in my few remaining
brain cells. I had to e-mail Jim for a copy of the instructions to jog
my memory. So, if this review doesn't track with your appraisal of the
kit, please remember I'm an old man with a very short memory.
 Ok
- let's get started. The cockpit floor and rear bulkhead were glued together
and painted. You get etched brass seat belts and instrument panel. I used
the belts but the panel didn't fit the body halves so I worked it down
until it looked square with the split line. After truing up the body sides
to get a good match, they were glued together. There is little concern
about the instrument panel as not a whole lot can be seen when you get
the canopy on. I almost forgot, the instrument panel is so deep that the
poor pilot would have his knees up under his chin and could never reach
the neat brass rudder pedals that I glued to the floor. Ok
- let's get started. The cockpit floor and rear bulkhead were glued together
and painted. You get etched brass seat belts and instrument panel. I used
the belts but the panel didn't fit the body halves so I worked it down
until it looked square with the split line. After truing up the body sides
to get a good match, they were glued together. There is little concern
about the instrument panel as not a whole lot can be seen when you get
the canopy on. I almost forgot, the instrument panel is so deep that the
poor pilot would have his knees up under his chin and could never reach
the neat brass rudder pedals that I glued to the floor.
Now with the body somewhat done let's do the wings. Do you own stock
in 3M? If not, now would be a good time to get some. The wing trailing
edges, both upper and lower, are THICK; about 1/16" in total! I scraped
and sanded almost a whole day to get them to the point they didn't look
like the leading edges. The floor of my room looked as if a gray blizzard
had blown in. At this time I glued the upper and lower wing halves together.
The fit was fair with only a little filler needed to clean up the leading
edges.
With the wings in an acceptable state, I tried to fit them to the body.
Like many smaller manufacturers they don't always get everything as good
as we would wish. The lower body where the wings attach is a solid surface
as is the upper surface of the wing. Are you starting to see the problem
here? Also, about now that big scoop front needs to be fitted. With all
this going on I did manage to get everything into proper alignment - I
think.
The horizontal tail was glued on next. No tabs are given but there
are deep sockets in the fuselage to locate the parts.
 With
the model almost assembled, I started looking at the engine(?). If you
have looked at the kit you'll see what I mean. In case you can't find
it on the sprue, it's those four semi-round things that defy recognition.
After carefully checking the instructions, I figured out that they were,
in fact, the four rows of the engine. After removing these blobs from
the tree, I stacked them together to check the fit. I think Valom wanted
to turn this model into a racer* as the stack of cylinders had a very
distinct lean to the left. Well this could be a problem. I drilled a hole
through each row and inserted a brass rod to align the four rows of cylinders.
Did I mention that each row was clocked so that you get the "corncob"
effect. Well after all this fuss and fitting the engine into the cowling
and putting the props on, you can't see that great looking engine. [NB
After reading Bill's dissertation on the engine, I threw an Aeroclub R-4360
into my kit box to avoid the problems he had. JJ] With
the model almost assembled, I started looking at the engine(?). If you
have looked at the kit you'll see what I mean. In case you can't find
it on the sprue, it's those four semi-round things that defy recognition.
After carefully checking the instructions, I figured out that they were,
in fact, the four rows of the engine. After removing these blobs from
the tree, I stacked them together to check the fit. I think Valom wanted
to turn this model into a racer* as the stack of cylinders had a very
distinct lean to the left. Well this could be a problem. I drilled a hole
through each row and inserted a brass rod to align the four rows of cylinders.
Did I mention that each row was clocked so that you get the "corncob"
effect. Well after all this fuss and fitting the engine into the cowling
and putting the props on, you can't see that great looking engine. [NB
After reading Bill's dissertation on the engine, I threw an Aeroclub R-4360
into my kit box to avoid the problems he had. JJ]
Speaking of the props, they have engineered the molds so that you can
have the props spin in opposite directions just like the real thing. Sure
you can! You get a semi-round hub that needs to be glued into the forward
prop and spinner with no clear way to get it square. This semi-round hub
then slides into the semi round, and under sized, hole in the aft blade
group. When you have this done, the shaft of the hub goes through the
separate accessory case for the engine and is held by a collar in the
recess in the back of the accessory case. All of this needs to be done
after the engine and cowling have been mounted. I'm too lazy to do all
that so I just painted the props and spinners and glued them together,
stuck the hub in and waited until the rest of the model was finished to
stick them into that neat hole that I had drilled to align the rows of
cylinders. Hey, it's beginning to look like an XF8B-1!
Now that all the major stuff has been done it was time to put on the
canopy, landing gear doors and other fiddly bits that are always getting
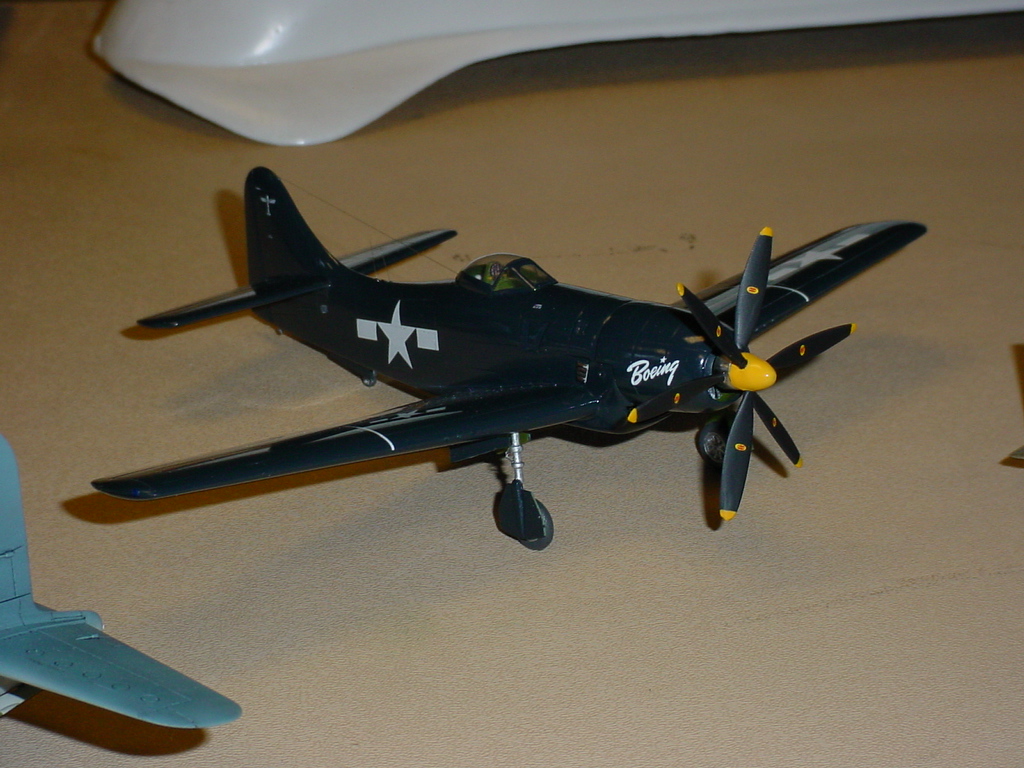
in the way. With the model ready for paint, I had to make a choice as
to the color scheme. Since I had just had a bad bout with natural metal
finishes, I opted for the Sea Blue Gloss bird. Painting finished, it's
time for the decals. A bare minimum of four stars and bars, two Boeing
names and two Boeing "Bug" logos and it's finished. All went on without
problems. However, this does make for a somewhat plain looking model,
so I added the white wing walks and some white stencils, per the box art,
from my spare decal stock.
The only weakness of the kit that can't be handled without a lot of
hassle is the landing gear. The oleo and wheel cover are integrated parts
as they should be, but with such thin struts, the model is very shaky
when put on the table. Aluminum tube replacements would be a good idea.
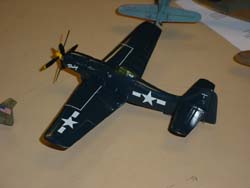
All in all the model didn't come out badly. This is the second Valom
kit I've built and it won't be the last. All of the gripes I mentioned
are just part of the hobby. If you turn your nose up at anything less
than a HasaTamigawa kit, you don't know what you're missing.
Conclusion
On balance this is a decent kit of a rare bird and no more difficult
to build that any other kit from a second-tier manufacturer. Bill and
I both bought our kits from Emil Minerich's Skyway Model Shop in Seattle
for $33.98 plus 8% sales tax.
References:
-
Wings magazine, October 1994: Article by Peter M. Bowers.
-
Wings of Fame magazine, Vol. 8: Article by Robert F. Door.
-
Airpower magazine, issue unknown: Article by Richard C. Koehnen.
-
Aviation News, Jan. 27-Feb. 9, 1984: Article by Donald Drucker.
-
The American Fighter: Enzo Angelucci & Peter Bowers, Orion Books,
New york, 1985, ISBN 0-517-56588-9.
-
Boeing Aircraft Since 1916: Peter M. Bowers, Putnam, London, 1966,
Library of Congress No. 66-11374.
* Bob Lamson tried, and failed, to buy one of the planes to enter the
1949 Thompson Trophy Race
|
|