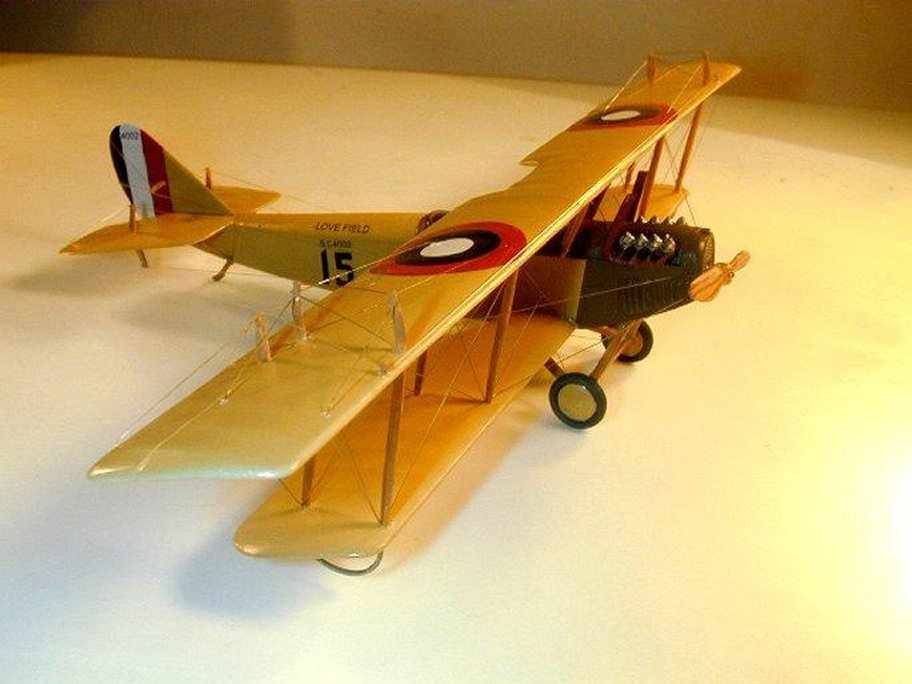
Olimp 1/72nd Curitss Jenny JN-4A/D (early)By Dennis Ugulano |
 |
Introduction
I will start this build article with a thank you to Matt Bittner for asking me to build the kit and OLIMP MODELS for providing the kit.
This is an easy, basic kit to build. The instructions are easy to read, providing two color schemes. There was no flash on my kit and the sprue attachment points are small and easy to remove. However, there are a few places that will cause problems and I will point those out as we go. Another modeller and I were building the kit at the same time and we both ran into the same problems. Enough talk; let's model.
Wings
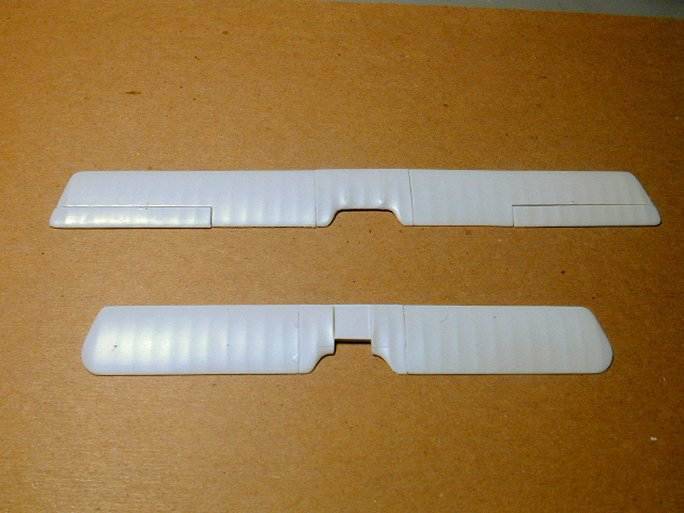
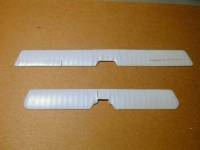 The
wings are multi pieces with five pieces for the top wing and three pieces
for the lower wing. The parts do not fit as good as they could. Care must
be taken to sand the ajoining surfaces flat to get as good a fit as possible.
Then the parts were laid on a flat surface, glued together and left to
dry for a day. The control surfaces do not fit in very well so dry fit
several times before the glue. A little putty is necessary at the main
joints and the final results are good. After the wings are dry, I drilled
all of my rigging holes. The control horn locating hole on the control
surfaces have to be moved one rib outward as in their molded in position,
they will conflict with the upper wing supports. After my wings are sanded
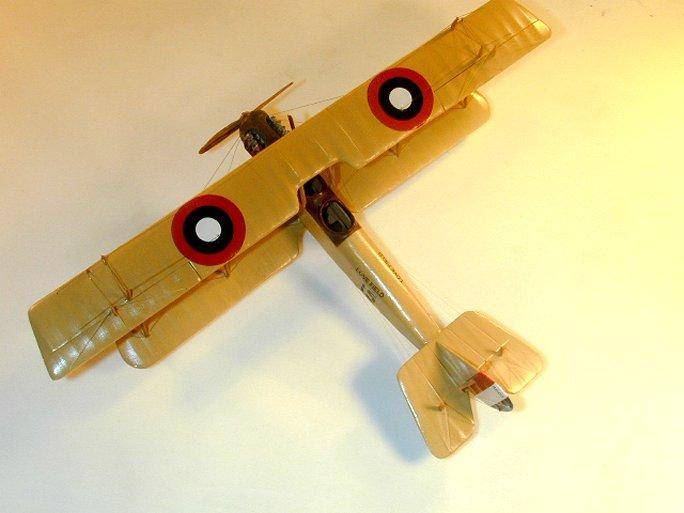
and to my satisfaction, they were painted, glossed and decals were applied.
I always apply decals prior to assembly and the roundels went on flawlessly.
The
wings are multi pieces with five pieces for the top wing and three pieces
for the lower wing. The parts do not fit as good as they could. Care must
be taken to sand the ajoining surfaces flat to get as good a fit as possible.
Then the parts were laid on a flat surface, glued together and left to
dry for a day. The control surfaces do not fit in very well so dry fit
several times before the glue. A little putty is necessary at the main
joints and the final results are good. After the wings are dry, I drilled
all of my rigging holes. The control horn locating hole on the control
surfaces have to be moved one rib outward as in their molded in position,
they will conflict with the upper wing supports. After my wings are sanded
and to my satisfaction, they were painted, glossed and decals were applied.
I always apply decals prior to assembly and the roundels went on flawlessly.
Decals
 While
on the subject of decals, here is one of the problem areas if you are
not alerted. Coat the decals sheet with some sort of gloss coat or varnish.
The roundels will present no problems but the instructment panel and Love
Field decals will float away after a very short time in the water. I would
assume the Royal Naval Air Service "B 1934" will do the same. Also, the
decals are very brittle, and will not tolerate any effort to make them
go around an edge such as the rudder decals. When dry, they broke and
chipped as if they were very old. Since that is not the case because the
kit and company are brand new, I have no explanation for the way the decals
reacted. Other than that, the decals are very thin and look good when
finished.
While
on the subject of decals, here is one of the problem areas if you are
not alerted. Coat the decals sheet with some sort of gloss coat or varnish.
The roundels will present no problems but the instructment panel and Love
Field decals will float away after a very short time in the water. I would
assume the Royal Naval Air Service "B 1934" will do the same. Also, the
decals are very brittle, and will not tolerate any effort to make them
go around an edge such as the rudder decals. When dry, they broke and
chipped as if they were very old. Since that is not the case because the
kit and company are brand new, I have no explanation for the way the decals
reacted. Other than that, the decals are very thin and look good when
finished.
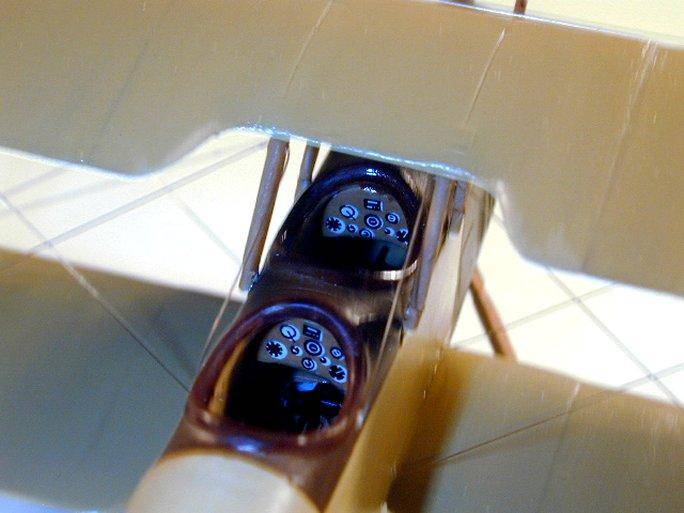
Interior
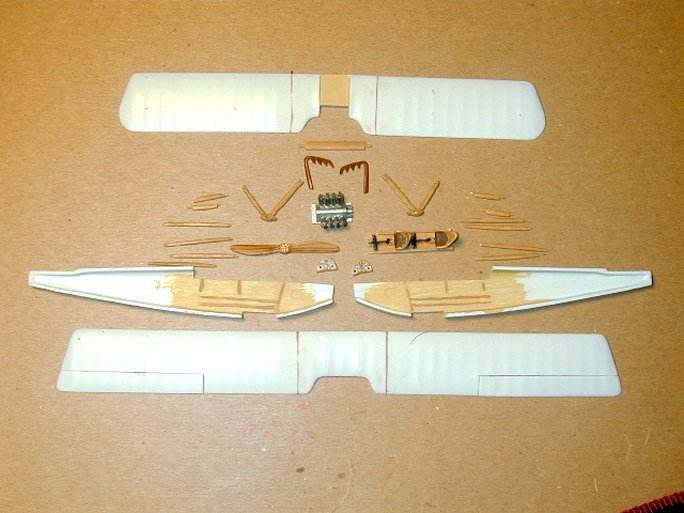
 The
interior parts are very straight forward with minor fit problems. Assemble
the floor board section and then dry fit as a little sanding is necessary
when you close up the fuselage. It is a very minor problem and after painting,
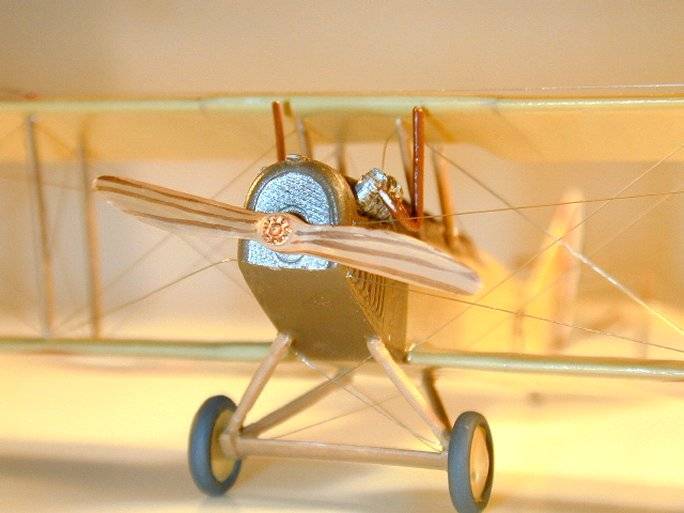
the interior is very convincing. The engine does not have a positive location
system so dry fit using the engine cover to locate the engine so it will
be equally spaced back and front with the engine cover. I got my back
a little too far and had to trim the cover for a better looking nose.
The
interior parts are very straight forward with minor fit problems. Assemble
the floor board section and then dry fit as a little sanding is necessary
when you close up the fuselage. It is a very minor problem and after painting,
the interior is very convincing. The engine does not have a positive location
system so dry fit using the engine cover to locate the engine so it will
be equally spaced back and front with the engine cover. I got my back
a little too far and had to trim the cover for a better looking nose.

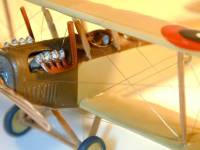
Fuselage
 Not
the best fitting parts but no real problem. A light sanding of the edges
is necessary. There are no locating pins but that seldom is a problem.
Match up the halves as close as possible and let dry. The cockpit section
will need a little work but the fit is reasonalble and takes only a few
minutes of sanding to get it looking good. The main concern will be the
engine cover. It's a little big in the front so be careful and let your
glue dry before letting go the the part. With the engine cover attached,
sanding will be necessary to get the angle right for the radiator. The
radiator will be a little too big so I lined up with the upper section
and a little sanding on the bottom made the world right. Well, not actually
the world but my kit anyway. A fair amount of putty and sanding will be
necessary for the fuselage. Increase the notch for the tail piece and
trim out for the lower wing and the fuselage is complete. I attached the
lower wing at this time so as to accomplish all of the sanding at one
time.
Not
the best fitting parts but no real problem. A light sanding of the edges
is necessary. There are no locating pins but that seldom is a problem.
Match up the halves as close as possible and let dry. The cockpit section
will need a little work but the fit is reasonalble and takes only a few
minutes of sanding to get it looking good. The main concern will be the
engine cover. It's a little big in the front so be careful and let your
glue dry before letting go the the part. With the engine cover attached,
sanding will be necessary to get the angle right for the radiator. The
radiator will be a little too big so I lined up with the upper section
and a little sanding on the bottom made the world right. Well, not actually
the world but my kit anyway. A fair amount of putty and sanding will be
necessary for the fuselage. Increase the notch for the tail piece and
trim out for the lower wing and the fuselage is complete. I attached the
lower wing at this time so as to accomplish all of the sanding at one
time.

Undercarriage
 I
am making this a separate section because of a problem that both of the
builders ran into in this section. As I'm writing this I think I know
the problem and the solution. The kit provides you with two sets of undercarriage
supports. If you use both legs from one sprue, which is the accepted practice,
the leg width will be different. There are no front locating holes for
these parts so generally you make both holes with the width of one part.
If you do that, the holes will be different for each leg. My suggestion
is to cut out all four undercarriage supports and match the two that are
the same width. I think that will solve the problem. After that excerise,
the undercarriage fits good and looks good when completed.
I
am making this a separate section because of a problem that both of the
builders ran into in this section. As I'm writing this I think I know
the problem and the solution. The kit provides you with two sets of undercarriage
supports. If you use both legs from one sprue, which is the accepted practice,
the leg width will be different. There are no front locating holes for
these parts so generally you make both holes with the width of one part.
If you do that, the holes will be different for each leg. My suggestion
is to cut out all four undercarriage supports and match the two that are
the same width. I think that will solve the problem. After that excerise,
the undercarriage fits good and looks good when completed.
Upper Wing Attachment
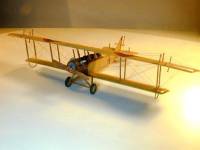
 This
did not present any problems. The struts are all the same length with
a very nice locating pin at the end of each strut. Make sure all locating
holes are drilled out as they are too small to accept the strut. I attached
the struts to the lower wing, flipped the model over and attached each
strut one at a time. With a little tweaking I got the wing in the position
I wanted and then added the cabanes. The cabanes look like they are different
lengths but they are not. The flared section on two of them is slightly
smaller than the other two. Since I could live with this defect, I did
nothing to change it. With that, the model is complete and ready for rigging.
I have not added the propeller or the exhausts yet as they get in the
way of the rigging. They will go on last.
This
did not present any problems. The struts are all the same length with
a very nice locating pin at the end of each strut. Make sure all locating
holes are drilled out as they are too small to accept the strut. I attached
the struts to the lower wing, flipped the model over and attached each
strut one at a time. With a little tweaking I got the wing in the position
I wanted and then added the cabanes. The cabanes look like they are different
lengths but they are not. The flared section on two of them is slightly
smaller than the other two. Since I could live with this defect, I did
nothing to change it. With that, the model is complete and ready for rigging.
I have not added the propeller or the exhausts yet as they get in the
way of the rigging. They will go on last.
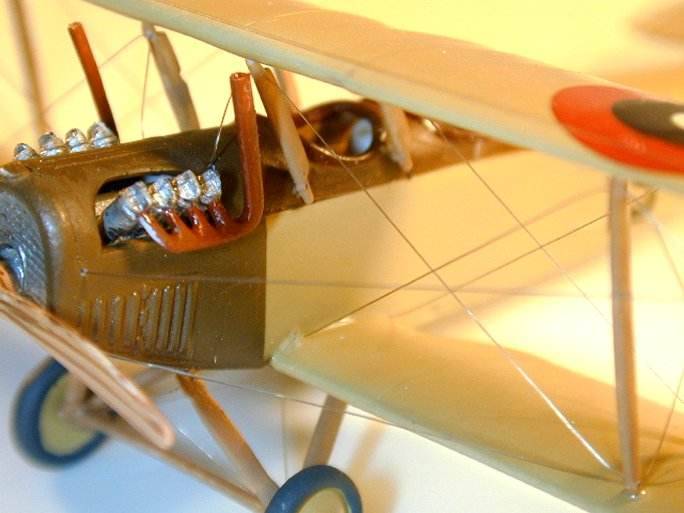
Rigging
 During
construction, I have drilled all of my locating holes so I can thread
my rigging through these holes using "DURAS". The main rigging is "Clarks"
Transparent Nylon and I switched to "Merlin's" Invisible Thread for the
control lines. The Jenny has a fairly complex rigging system and this
took me a little longer than normal. After all of the rigging is in place,
I attached the final parts, did touch up painting and the model was complete.
During
construction, I have drilled all of my locating holes so I can thread
my rigging through these holes using "DURAS". The main rigging is "Clarks"
Transparent Nylon and I switched to "Merlin's" Invisible Thread for the
control lines. The Jenny has a fairly complex rigging system and this
took me a little longer than normal. After all of the rigging is in place,
I attached the final parts, did touch up painting and the model was complete.

Conclusion
 This
was a pleasant kit to build. No real surprises with the exception of the
decals but that can be solved with a little varnish. The kit is basic
but gives a great foundation for the person who wants to super detail
the kit. I did not check with any reference material to see if the dimensions
are exact or if the "do hickey" on the left side under the pilot's seat
was the right size. I will leave that to the person that has terminal
AMS to determine. But I will visit that person regularly as he or she
is recovering. Total building time about 10 hours maybe a little more
due to the rigging. OLIMP MODELS
is to be commended for a nice kit and their ambitious plans for three
more Jennys.
This
was a pleasant kit to build. No real surprises with the exception of the
decals but that can be solved with a little varnish. The kit is basic
but gives a great foundation for the person who wants to super detail
the kit. I did not check with any reference material to see if the dimensions
are exact or if the "do hickey" on the left side under the pilot's seat
was the right size. I will leave that to the person that has terminal
AMS to determine. But I will visit that person regularly as he or she
is recovering. Total building time about 10 hours maybe a little more
due to the rigging. OLIMP MODELS
is to be commended for a nice kit and their ambitious plans for three
more Jennys.
References
AIRCRAFT ARCHIVE "AIRCRAFT OF WORLD WAR ONE" Volume 3, pages 90 - 92
 |
 |