CzechMaster Resin
Speed Spitfire 1/72 By Matt Melchert |  | Introduction  The Speed Spitfire is one in CzechMaster Resins' extensive range of Spitfire variations which provides an interesting change from the usual military versions. The Speed Spitfire was developed in late 1937 for an attempt on the landplane world speed record. Unfortunately, while it was being developed it was pipped at the post four times by the Germans, which put the record far out of reach. As a result the Speed Spitfire was never actually used for a record attempt. The Speed Spitfire is one in CzechMaster Resins' extensive range of Spitfire variations which provides an interesting change from the usual military versions. The Speed Spitfire was developed in late 1937 for an attempt on the landplane world speed record. Unfortunately, while it was being developed it was pipped at the post four times by the Germans, which put the record far out of reach. As a result the Speed Spitfire was never actually used for a record attempt.
During the war, the Speed Spitfire had an equally successful career as a photo-reconnaissance plane, flying one mission which it failed to complete due to lack of range. It spent the rest of the war as a squadron hack and, the world being awash with obsolete military aircraft, it was ignominously scrapped in 1946; yet another of those planes I wish they'd saved. Ah, well. Never mind! CzechMaster Resins' kit of the Speed Spitfire is a real beauty, so now you can build your own. The Kit  The kit comes in a zip-lock bag, complete with attractive artwork by one young Chris Banyai-Riepl. Inside, the parts are nicely laid out in several more bags, which are heat-sealed into different sections to keep the parts from rattling around too much and getting damage; a nice touch. The kit comes in a zip-lock bag, complete with attractive artwork by one young Chris Banyai-Riepl. Inside, the parts are nicely laid out in several more bags, which are heat-sealed into different sections to keep the parts from rattling around too much and getting damage; a nice touch.
A comprehensive set of parts and decals are provided to make early and later versions of the Speed Spitfire, plus two schemes from its PR career days. Perfectionists may quibble, but the options appear to be comprehensive. The kit is made of polyurethane resin, which is tougher and more brittle than the usual styrene plastic. Unlike styrene, the polyurethane doesn't respond to solvents, so superglue or epoxy is required for gluing parts together. The kit has beautiful detail, with finely engraved panel lines and nice touches like the optional bumps for the PR versions and the lip on the enlarged radiator intake. Construction  Our local model club was going to have a meeting with a "blue" theme, i.e. building kits that are blue in colour or have some other association with blue. The Speed Spitfire would fill the bill perfectly, so out it came from the pile! Our local model club was going to have a meeting with a "blue" theme, i.e. building kits that are blue in colour or have some other association with blue. The Speed Spitfire would fill the bill perfectly, so out it came from the pile!
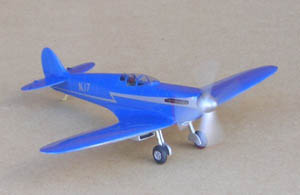
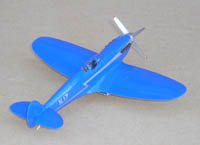
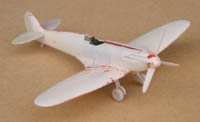
Realizing that regular solvent glue wouldn't work with the resin parts, I rushed out and bought some superglue and accelerator, then rushed back to begin construction. The cockpit was perforce assembled first, painted, and then set aside before turning to the fuselage. Unfortunately, I think I bent the fuselage halves slightly while sanding the resin pour tabs off. This then required 2-step gluing: the rear half was glued together and sprayed with accelerator, after which the front half was glued together. The front half didn't quite match up as well as expected, and required some filling and sanding along the top (see photo). The cockpit was then slid into place, and fit very nicely. Then the wings were added. These are a one-piece affair, which seemed like it might save a bit of work, but there were complications. Much to my chagrin, I noticed bubbles had formed in the resin in at both the front and rear edges and required filling (see photo). To get the fuselage to match up with the wings equired a bit of fiddling as well, as the fuselage sat too high and left a ridge at the rear joint along the top and across the bottom in the rear. However, careful filing and repeated fittings soon set that right. About this time, a friend mentioned that he liked to use superglue as a filler, so I thought I'd try using it to smooth the always-difficult joint between the fuselage and the wings. The first application didn't seem to do much, so I put more on, shooting it with the accelerator so I could get back on it quickly.  It was at this point that I learned a useful principle: if you put a lot of filler on, you have to sand a lot of it off again. Duuh. It was at this point that I learned a useful principle: if you put a lot of filler on, you have to sand a lot of it off again. Duuh. As is my wont, I cut off the fitter tab for the propeller and made my own bearings out of two sizes of Contrail styrene tubing: small diameter for the bearings themselves, mounted in a housing of a larger diameter approx. 3/4 of an inch long. For the shaft of the propeller I used a bit of old guitar string about 1 inch long, securing it inside the bearings with a drilled-out section of toothpick secured with superglue. I took the photographs outside and the wind was blowing, so yes, the propeller really is spinning that fast! Painting and markings I chose to do the early Speed Spitfire version, with the silver four-bladed prop and red tips. The original was painted in the mysterious "Royal Blue" colour, for which I thought Humbrol's French Blue might be a reasonable approximation (this choice may make those Brits involved with the original plane turn in their grave, but I can't help that). On application, this colour looks like it may be a little light and a little milky, but I'm putting that down to the "scale effect". I first sprayed the silver coat on the underside, which revealed a disturbing number of flaws in the finish. The date of the "blue" meeting was fast approaching, but I assumed an air of firm resolve and cleaned it up before giving it a second coat. I also checked the as-yet-unpainted top sides of the model for similar flaws to avoid a similar shock. Knowing that the gloss paint would show every little flaw, I was especially careful to remove all traces of dust before airbrushing the French-cum-Royal Blue. There wasn't much dust, but the gloss paint revealed a number of tiny bubble holes on the top of the starboard wing, which had been all but invisible before painting. Groan... Never mind! It wasn't really that noticable, and the date of the "blue" meeting was almost here, so I left it and put the decals on. These proved to be of reasonable quality, the long silver stripes going on without too much difficulty. However, the stripe decals had problems conforming to the compound curves at the extreme nose. They cracked and flaked off when I tried to slit the bubbles with an Xacto knife, so I had to touch them up with paint. Conclusion The Speed Spitfire caused a bit of a sensation at the "blue" meeting, largely because of the novelty factor. I have heard people say they don't like the Speed Spitfire as well as the normal military ones, with its abbreviated wings and elongated canopy. Yet it provides an interesting variation if you're one of those who has many Spits in your collection, and it's not without appeal: it looks to me like it flew straight out of the pages of a 1930's "Boy's Own" comic book (Aw, wow! Keen!). The kit itself is not cheap, being a low-volume affair, but it is a rare subject and of delightful quality. Furthermore, most modeling budgets could handle resin kits at the rate the kits actually get built, and you don't get that embarassing buildup of unbuilt kits! Because of the gloss paint of this particular subject, perfectionists will want to sand and/or polish the polyurethane surfaces before putting on the paint. Many tiny flaws will only turn up after painting, so I'd recommend using a primer coat of some sort before the final coat. In conclusion, thumbs up! This kit represents a unique subject that makes a nice change from just another Mustang or Spitfire. (Come to think of it, it IS just another Spitfire. Oh well...) References The Spitfire Story, Alfred Price, 2nd edition Silverdale Books, 2002 Chapter 5, pp 83-92 | 


|
