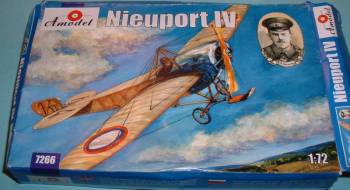
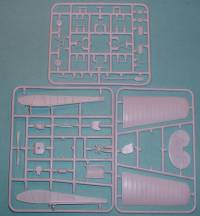
Amodel 1/72nd Nieuport IV |  | History The Nieuport IV was actually a pre-WW1 aircraft. During the early part of the war it did see some limited service. One of its claims to fame is that it was the first aircraft to be looped, by Imperial Russian Air Service (IRAS) pilot P.N. Nesterov. The Kit The Amodel Nieuport IV consists of 39 injected molded  pieces (in my example, the plastic is white). While some consider Amodel's molding techniques "short run", in general I have no complaints because Amodel is able to get the parts close to scale (minus the thickness of the flying surfaces). Unfortunately this means that removing these small parts from the thick sprue mounting points is quite the test. A thin razor saw with a lot of teeth is definitely a must if these parts are to be cut from the sprue with little to no breakage. There are two schemes on the decal sheet, one for a Swedish machine, and the other for the IRAS Nieuport IV piloted by Nesterov - both Nieuports dated 1914. Decals are nicely done and in register. Both schemes call for Clear Doped Linen (CDL) fabric surfaces and "gunmetal" for the metal surfaces. pieces (in my example, the plastic is white). While some consider Amodel's molding techniques "short run", in general I have no complaints because Amodel is able to get the parts close to scale (minus the thickness of the flying surfaces). Unfortunately this means that removing these small parts from the thick sprue mounting points is quite the test. A thin razor saw with a lot of teeth is definitely a must if these parts are to be cut from the sprue with little to no breakage. There are two schemes on the decal sheet, one for a Swedish machine, and the other for the IRAS Nieuport IV piloted by Nesterov - both Nieuports dated 1914. Decals are nicely done and in register. Both schemes call for Clear Doped Linen (CDL) fabric surfaces and "gunmetal" for the metal surfaces. Construction naturally starts with cockpit pieces. The cockpit is nicely detailed out of the box, and if you're not one to super detail there isn't much else needed. Naturally, since this is a mid-wing monoplane the cockpit is there for all to see, so the super-detailers have plenty of room to add and modify at whim. Amodel supplies a very nice blow-up to the instructions to help place all the cockpit pieces. Once the cockpit is complete then the fuselage halves are assembled. This includes the top of the turtledeck behind the pilot as well as the "firewall" and prop attachment. From there the instructions have you attach the top front of the fuselage in front of the cockpit as well as the landing gear pieces. One thing I have read about this model on another site is that it wants to sit on its tail, instead of correctly on its wheels, "nose down". Weight will need to be added to the nose in order to accomplish the correct stance. There are a couple of ways to go about this. You could re-make the fuel drum out of metal instead of using the plastic one, or – better yet – you could purchase a white-metal aftermarket engine and prop. This should be enough weight to sit this model onto its landing gear correctly. From here construction moves into adding the last of the pieces – the flying surfaces and the struts above and around the cockpit. For rigging, there are two ways to go. You could drill holes all the way through the wings so you can rig the model  almost like the real bird, or you could attach separate wires for each rigging piece, avoiding the holes. One advantage to drilling holes all the way through is the extra support the rigging will give to the model. In essence, the rigging works the way it would on the real thing – hold everything together. Since this is a mid-mounted wing and the cockpit is placed at the wing "roots", it would be obvious if you added some sort of rod going through the fuselage connecting both wings together. almost like the real bird, or you could attach separate wires for each rigging piece, avoiding the holes. One advantage to drilling holes all the way through is the extra support the rigging will give to the model. In essence, the rigging works the way it would on the real thing – hold everything together. Since this is a mid-mounted wing and the cockpit is placed at the wing "roots", it would be obvious if you added some sort of rod going through the fuselage connecting both wings together. Unfortunately I find the flying surfaces way too thick. While thinning these down isn't necessary if you're not concerned about scale effect, I think it's a necessity. This means you lose the nicely molded rib effect Amodel provides on these surfaces. Conclusion All in all this is a great kit. Yes, some of the pieces are a little thick – primarily the flying surfaces – but overall there is nothing in this kit to disappoint. There is a distinct possibility that Part is going to provide a photoetch fret for this kit, and if they do I'm sure it will be extremely welcomed to enhance this already very decent kit. Recommended. | 


|
