Scratchbuilt 1/72 Short 184 by Joel Christy | 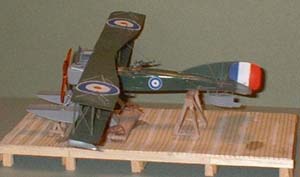 | 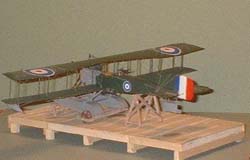 The Short 184 was one of Britain's mainstays during the Great War. Although a pre-war design the aeroplane served in all theatres through to the end of the conflict. Its notable success was the torpedoing of a Turkish warship in the Dardanelles on August 12, 1915. However the 184 was a tricky aeroplane to fly, especially when carrying a torpedo and the role was soon abandoned. The type carried on though in useful reconnaissance, anti-submarine patrol and bombing work. Over 900 184s were built by Short and other manufacturers. By the end of the war 312 were still in service. The Short 184 was one of Britain's mainstays during the Great War. Although a pre-war design the aeroplane served in all theatres through to the end of the conflict. Its notable success was the torpedoing of a Turkish warship in the Dardanelles on August 12, 1915. However the 184 was a tricky aeroplane to fly, especially when carrying a torpedo and the role was soon abandoned. The type carried on though in useful reconnaissance, anti-submarine patrol and bombing work. Over 900 184s were built by Short and other manufacturers. By the end of the war 312 were still in service.
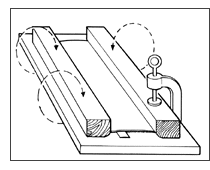
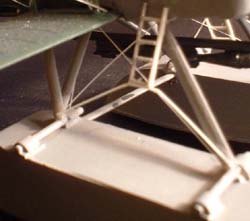
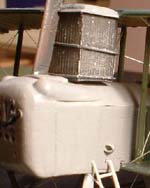
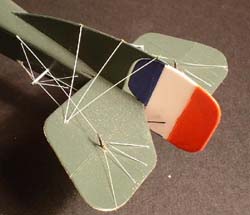
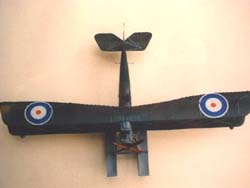 I had scratchbuilt my first Short 184 over six years ago. I was inspired by a photo in Jack Bruce's book, Britain's First Warplanes. It showed this huge single engine biplane sitting on a dock with its ailerons hanging straight down and looking absolutely pre-historic! Of course there was no kit available (maybe soon?), but I did find a set of old plans from the now discontinued vacform producers, Airframe. These were 3-view drawings that had early and late 184s including the original. A few years later I decided to do the bomber version and scratchbuild it using drawings from the book "Aircraft of the World, the Early Years". But I still had a hankering to have a late model 184 so I dug out the old Airframe plans recently and started to work. I had scratchbuilt my first Short 184 over six years ago. I was inspired by a photo in Jack Bruce's book, Britain's First Warplanes. It showed this huge single engine biplane sitting on a dock with its ailerons hanging straight down and looking absolutely pre-historic! Of course there was no kit available (maybe soon?), but I did find a set of old plans from the now discontinued vacform producers, Airframe. These were 3-view drawings that had early and late 184s including the original. A few years later I decided to do the bomber version and scratchbuild it using drawings from the book "Aircraft of the World, the Early Years". But I still had a hankering to have a late model 184 so I dug out the old Airframe plans recently and started to work. Although I had scratchbuilt the 184 years ago, my techniques had changed and hopefully improved. I had experienced and used methods that other modelers have used for years. I usually start by making the wings. If I can get them right then I figure the rest will work out too. I cut four blanks out of 40 thou sheet styrene. These were then put in a rig a'la Harry Woodman. This consists of a thin sheet of plywood with a batten at one edge. The plastic is inserted, bent over a thin spine and clamped with a C-clamp. This gives an airfoil camber to the plastic. The whole rig is then immersed in boiled water for about 10 seconds, taken out, cooled in cold water and the plastic removed from the rig. The sheet now has a permanent camber. The plastic is shaped using sandpaper and elbow grease to achieve the proper airfoil section. I work from the top down, rough sanding and then finishing off with 600-1200 grit wet'n'dry paper. Once satisfied with the sanding (no scratches are apparent) a coat of liquid poly is applied to get a perfect finish. Rib impressions are now applied to both sides using a small set square and sharp scalpel blade. The Short 184 fuselage is pretty straight forward; it has slab sides and only one complex part and that is the double curved turtle deck. I cut out side panels and attached the formers at their positions using styrene glue. As seen in the photo the box like structure is quite simple and easy to construct.But for the turtle deck I had to carve a plug out of hardwood and then plunge form a sheet of 20 though plastic sheet over it. I usually do this several times and choose the best of the lot to use on the model. I also used this method to make the nose and valve covers of the model. Plunge forming is an easy way to make small parts that are complicated in shape. The plastic sheet is then heated over a candle until it is floppy and quickly plunged over the prepared plug that has been securely clamped in place. Once you have chosen the best shape it is easy to trim and cut out details by placing it over the plug. The next parts to be made were the tail surfaces and these were made similar to the wings except that they were cut out of 20 thou sheet. The detailing was done using the same process as on the wings. The floats are like little fuselages and went together in a similar fashion as can be seen here in the photos. Formers were glued to the sides and then the top and bottoms were attached over the assembly.Contrail strut material was used to join the two floats and the lugs for strut attachment were fashioned out of plastic rod and tube. Thin strips of sheet plastic formed the strakes and these were attached to the bottom of the floats using liquid poly. With the basic parts completed I started to paint. My airbrush had packed up so I bought a Humbrol spray can of no. 108 dark green for the top surfaces and used no. 71 for the under surfaces. No. 106 grey finished off the cockpit, cowling areas and floats. Assembly of the main parts was pretty straightforward; as usual I constructed the wing cell first by attaching the outer interplane struts to the lower wing and then inverted that and glued it to the upper wing. Once good and dry the other interplane struts were glued on and the whole assembly set aside to dry thoroughly. Then the wing cell is simply glued to the fuselage and squared up. Next the tail surfaces are attached. The float struts look complicated but really are not and careful study of the plans soon makes it all clear. I used Contrail strut material here. There are plenty of details on the Short 184 and what follows is a brief description of some of them. Starting with the wing tip floats; I made these out of thick sprue and shaped them with a razor saw and sandpaper. A small skid was attached to the bottom of each float made of a strip of sheet plastic.. As already mentioned the engine valve covers were plunge formed over a piece of rounded sprue and then cut to shape. Small air scoops were fashioned out of plastic tube and glued to either side of the fuselage. The radiator was simply a small box of 20 thou plastic that was scraped with a razor saw to get the striations and finished off with a 40 thou lid. The exhaust pipe is piece of 10 thou clamped around a piece of wire which is then slid out after the glue is dry. I installed a seat, steering wheel and instrument panel with Reheat dials into the front cockpit. I decided to use an Eduard etched metal Scarff ring and Lewis gun in the rear cockpit. I recommend this item as it adds a great deal of realism to the model. The small tail float was made up of two tear drop shaped formers of 20 thou plastic wrapped around with 10 thou card and a rudder added to the trailing edge. This item was then attached to the fuselage with brass wire struts. The tail surfaces had some interesting rigging which like the rest of the model was done with hot stretched sprue. Conclusion Even though I have scratchbuilt two other Short 184s, building this late version aircraft has been just as enjoyable. It will look great next to my new Felixstowe F.2A.
| 


|

 The Short 184 was one of Britain's mainstays during the Great War. Although a pre-war design the aeroplane served in all theatres through to the end of the conflict. Its notable success was the torpedoing of a Turkish warship in the Dardanelles on August 12, 1915. However the 184 was a tricky aeroplane to fly, especially when carrying a torpedo and the role was soon abandoned. The type carried on though in useful reconnaissance, anti-submarine patrol and bombing work. Over 900 184s were built by Short and other manufacturers. By the end of the war 312 were still in service.
  I had scratchbuilt my first Short 184 over six years ago. I was inspired by a photo in Jack Bruce's book, Britain's First Warplanes. It showed this huge single engine biplane sitting on a dock with its ailerons hanging straight down and looking absolutely pre-historic! Of course there was no kit available (maybe soon?), but I did find a set of old plans from the now discontinued vacform producers, Airframe. These were 3-view drawings that had early and late 184s including the original. A few years later I decided to do the bomber version and scratchbuild it using drawings from the book "Aircraft of the World, the Early Years". But I still had a hankering to have a late model 184 so I dug out the old Airframe plans recently and started to work.