DML 1/35 60cm MORSER "KARL" GREAT 040 Kit no. 6179
MSRP: $69.95
GreatModels Price: $55.95 |  | I did the in box review of this kit in last month's issue of Internet Modeler. So, I will not repeat the history of the vehicle again. However, a few things were not mentioned. First, I said that no Karls exist anymore. I found out I was wrong and that one does exist in the Kobinka museum in the USSR. Pictures of it can be seen on the Kobinka website Secondly, from reading the latest issue of Allied-Axis, number 9 - I found out that Karl carried a crew of 19. I started building my Karl with steps 1 & 2, naturally. I used mostly Tenax 7R liquid glue for all assemblies. The first thing I did was to assemble all 22 of the all steel road wheels (parts G3 & G4). This was followed by 12 of the return rollers (parts G1 & G2). This is where I made my first mistake.  I was under the impression that these return rollers were all steel too. I found out, by looking at the pictures of the actual Karl at Kobinka, that these return rollers had rubber tires on them. My mistake was to glue them to the axles on the hull. This will make the painting of the rubber on them harder to get at now. I should have left them off for easier painting and glued them on later. I then added the pipe (part no. A19) to the end piece (A4) and also the two part ladder (parts B4 & B15). Now, here is where the instructions are WRONG - .part number B-15 is called out as B22 - there is NO such part number on the B tree. I also scratch my head as to WHY this ladder is in two parts, because the two ladders that go on the other end piece (part no. A5) are single piece units (C11 each). Oh well, no big problem. I glued the end pieces, ladders and the pipe pieces in place. I left the tools, a shovel (A8), sledge hammer (A7), axe (A9), and pick (A10) off for the time being. This is to facilitate painting them separately later. I was under the impression that these return rollers were all steel too. I found out, by looking at the pictures of the actual Karl at Kobinka, that these return rollers had rubber tires on them. My mistake was to glue them to the axles on the hull. This will make the painting of the rubber on them harder to get at now. I should have left them off for easier painting and glued them on later. I then added the pipe (part no. A19) to the end piece (A4) and also the two part ladder (parts B4 & B15). Now, here is where the instructions are WRONG - .part number B-15 is called out as B22 - there is NO such part number on the B tree. I also scratch my head as to WHY this ladder is in two parts, because the two ladders that go on the other end piece (part no. A5) are single piece units (C11 each). Oh well, no big problem. I glued the end pieces, ladders and the pipe pieces in place. I left the tools, a shovel (A8), sledge hammer (A7), axe (A9), and pick (A10) off for the time being. This is to facilitate painting them separately later. There is a big ommission in these steps, in regards to not mentioning parts numbered E6, E7, E8, and E9. These parts are to be glued inside of the tow shakles located low on the ends of the bottom hull piece. They get glued into the recesses, molded into the end pieces (A4 & A5) Step 3: This step is pretty straightforward and covers the assembly of the drive sprockets and return rollers. However, here again we have errors in part numbers called out. The part shown as G6(G6) on the instructions should say G5(G5) which is the one with the hole in it. The part shown as G5(G5) should be just the reverse..and be G6(G6) the one with NO hole in it. The plans have reversed these two part numbers. G10(G10) is correct for the outer gear, as is G9(G9) for the inner gear. I glued idler wheel parts G7(G7) & G8(G8) together and then to the hull. [The putting of the part numbers in parenthesis a second time is to show the modeler that this is to be done on BOTH sides of the assembly.] Step 4: 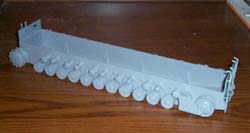 In this step, I glued the small parts C14(C14) to the ends of the C8(C8) pieces after I had already glued the C14s to the hull. This was a mistake, as it was more difficult to glue them on then because of the tight quarters. I recommend you glue them to the C8s beforehand. In this step, I glued the small parts C14(C14) to the ends of the C8(C8) pieces after I had already glued the C14s to the hull. This was a mistake, as it was more difficult to glue them on then because of the tight quarters. I recommend you glue them to the C8s beforehand. Assembly of C5(C5) to the idler wheel and the cover pieces D13 and D14 is very tricky to line up. I recommend that you get everything aligned right before any glueing. D13 & D14 are handed, so get them on the correct sides where they belong. Step 5: This is the assembly of the link and length type tracks. I passed this step in order to be able to paint these links later, after the rest of the vehicle is painted for ease in painting and weathering. These links all have two injector pin cup marks inside of each link. I intend to putty these, as a filing experiment on one link lost too much detail on the length type pieces. The engraving of the spaces between the links on these pieces got filed away with the cup marks. So, at least on these length type pieces, putty is needed in order to fill them. The individual/single links can probably be sanded down with no problems. Steps 6 & 7: This is the assembly of what I believe are hull lifting positions to hull side pieces. Part numbers are all shown correctly on the instructions. However, part no. C19 is only illustrated as going on the back of only two of these positions and should show as going on all eight of them. These are locking nuts. I managed to lose two of these tiny pieces into my shag rug. I made new ones, using some Grant Line brand ones I had in my spares box. So, be very careful with these tiny parts. Step 8: This is the assembly of the two side pieces, to the hull (parts B1 & B2) that you have just put the lift positions onto in the previous step. Put these on FIRST. The way the instructions are drawn shows that you put the walkway braces C19 & square frames B3 & B9 on first. It you do that, it will almost impossible to put the side pieces on the hull top A1 afterwards. With the square frame B9, make sure that it goes on the right walkway with the 45į angled brace slanting inward. There are also two bars, that are spanning the large rectangular hole in the large hull top piece A1. There are actually excess and part of the part molding process. Remove them and sand their attachment points smooth. Finally, the remaining two lift positions are added to the front of the hull top piece. Then the two mufflers were glued together, from their two halves B5 & B6 and B7 & B8. These mufflers are handed and go on a particular side, with their pipes aimed outwards and towards the rear of the vehicle. By the way - you can tell the FRONT of this vehicle by the round air intake vent and the driver's compartment next to it. After the mufflers were assembled I added them to the front walkways. Step 9: In this assembly the steel trusses and gun support framework, are added to the hull top piece. First, you want to glue the storage box D16 to the depressions molded into parts D9 & D12. Then, glue part D15 to the rear of this assembly. Finally, I glued the smaller parts E3, E27, E17, E23 & E25 to this assembly too. E23 & E25 are crew steps and glue to raised lips on the outside of the gun support pieces. Make sure they line up nice and horizontal. Next glue the steel trusses, parts C21, to the hull top. The center triangular opening fits over the raised triangle on the side pieces. Make sure that these parts are straight vertically. Now position the gun support framework assembly into the center of the hull top piece. Make sure that the storage box D16 is facing the front of the hull top piece. Slide the assembly towards the rear of the hull top piece until it leaves a 1/2" gap in front of it and glue all in place. The instructions depict you putting it TOO FAR FORWARD. Step 10: Here is where you add the three lids E34, the air intake grill piece B18 and driver's compartment interior parts to the front of the hull top piece. If you donít want to detail the driver's compartment and paint it, there is a lid that covers this opening. It is part no. B10. I chose to leave this part loose and display this compartment. This assembly step also shows attaching steps C3(C3) to the rear of the walkways on each side and the attachment of the walkway support walls B19 & B20 to the undersides of the walkways. Glue these walls on first, then add all the support arms under the walkways. Part no. E12 should have itís hole drilled out slightly larger, so that the end of the rod E28 will slide into it easier. Four grab handles C17 are also added to the top of the rear deck now too. Step 11: Several crank assemblies and small fittings are added at this time. I also added two storage boxes to the right front walkways to mimic what is shown on the box top painting. However, mine are a little larger than what are pictured there. I thought it would add SOMETHING to the finished model and they do look good on there now. Call it poetic license. Step 12: This is the assembly of the elevation wheels, which are a double set, to the side of the gun support apparatus. There is a small section E1 that should span two of the spokes on the outside of the smaller inner wheel. This wheel has indentations on the inside of it. These are wrong for mounting this part, it should go on the OUTSIDE of this wheel. This assembly step also shows the placing of the handrails onto the walkways. This top section was added to the lower hull assembly and set aside to paint as a sub-assembly before adding the other later parts. However, I left the handrails on until last - as they get in the way of other assemblies later, and in the way of painting too. Step 13: Is the assembly of the ammunition loading cradle. I found some push out pin cup marks on the inside of the two side pieces and sanded them off. They would have been barely visible, after assembly, but I sanded them off to make sure. Steps 14 & 15: 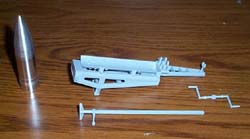 Is the assembly of the top parts to the ammunition loading cradle. I sanded off two injector pin cup marks from each of the cross braces molded into the bottom of part E19 and then glued it to the bottom framework assembled in step 13. There are two support legs C4 that go on the bottom of the framework assembly. The instructions do not illustrate how these parts actually are. There are half-moon base plates on the bottom of these support legs. Make sure you glue them so that the curved edges are facing the rear of the assembly. That would be the end which has the pointed end of the shell cradle. This has to be that way to mate up correctly, later, with the mounting areas on part D16 (which was assemble earlier in step 8). I glued the crank arms C25 to the the C12 rods, and then these rods into the little gear E4 so that crank arm is up and the other down. I did this while the little gear was still on the sprue tree, so that I would not lose it into the shag rug. After all was dry, I cut the gear away. This assembly was just laid into the supports E15 without glue. The shell push bar E29 was then glued to its wheels E37 and push plate E14 and then just rested onto the cradle. You will now see that when you push this bar assembly, with the gear teeth below it, against the little gear, the handles will turn. I prefer to leave this operating like that, but other modelers may want to glue it all solid to the cradle. If you do glue it down, make sure it is far enough rearward to accomodate the aluminum shell in the kit. Is the assembly of the top parts to the ammunition loading cradle. I sanded off two injector pin cup marks from each of the cross braces molded into the bottom of part E19 and then glued it to the bottom framework assembled in step 13. There are two support legs C4 that go on the bottom of the framework assembly. The instructions do not illustrate how these parts actually are. There are half-moon base plates on the bottom of these support legs. Make sure you glue them so that the curved edges are facing the rear of the assembly. That would be the end which has the pointed end of the shell cradle. This has to be that way to mate up correctly, later, with the mounting areas on part D16 (which was assemble earlier in step 8). I glued the crank arms C25 to the the C12 rods, and then these rods into the little gear E4 so that crank arm is up and the other down. I did this while the little gear was still on the sprue tree, so that I would not lose it into the shag rug. After all was dry, I cut the gear away. This assembly was just laid into the supports E15 without glue. The shell push bar E29 was then glued to its wheels E37 and push plate E14 and then just rested onto the cradle. You will now see that when you push this bar assembly, with the gear teeth below it, against the little gear, the handles will turn. I prefer to leave this operating like that, but other modelers may want to glue it all solid to the cradle. If you do glue it down, make sure it is far enough rearward to accomodate the aluminum shell in the kit. 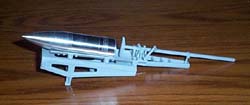 I left this cradle assembly off the model, so I can paint it as a sub-assembly and add it later to the model. I left this cradle assembly off the model, so I can paint it as a sub-assembly and add it later to the model. By the way, it says on the kit box that this aluminum shell is a bonus - only packaged in the first run of the kits. So, it may disappear in later retails of this same kit. Step 16: 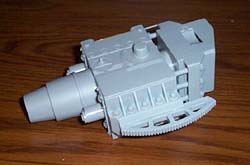 This step covers the assembly of the gun. I assembled the breech pieces and the three large nuts that go into recesses at the top rear of this assembly. On the door piece D2 there is what I believe is a inspection window molded into it. This should be at the bottom of the door after placing it into the wall of the breech. This step covers the assembly of the gun. I assembled the breech pieces and the three large nuts that go into recesses at the top rear of this assembly. On the door piece D2 there is what I believe is a inspection window molded into it. This should be at the bottom of the door after placing it into the wall of the breech. Make sure the holes in these nuts are entirely visible from the other side after gluing them into the recesses, because three rods have to glue into them later. Part no. D4 is drawn with the the slot, on one side of the center hole, shown REVERSED. It should face the other direction. Then the barrel halves were glued together and glued to the front of the breech assembly. Next, position the three rods E35 into the holes at the top of plate D10 with a metal spring trapped on the right one. Do not glue yet! Then do the same with the three rods E38, into the bottom three holes in this same plate, trapping the second metal spring on the left rod. Slide the hole in this plate, carefully holding the six rods, onto the barrel and glue the ends of the six rods into the location holes in the three nuts and the base of part D7. Do not glue the rods to plate D10! Step 17: 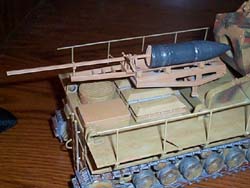 There is a part number E36 which is a long rod. The support leg for it glues to the edge top edge of the breech assembly and the end of the rod rides free into a hole in the D10 plate. It is drawn on the plans, but no part number is there referring to it. Make sure you add this part!! There is a part number E36 which is a long rod. The support leg for it glues to the edge top edge of the breech assembly and the end of the rod rides free into a hole in the D10 plate. It is drawn on the plans, but no part number is there referring to it. Make sure you add this part!! Steps 18 & 19: These are the assemblies of the forward parts of the gun to the breech. After putting the gun barrel collar, side pieces, face plates, and swivel gear together, slide the brass metal rod into the holes at the top of the side of this forward assembly, from the rear, and weld it in place with drops of super-glue. Then, slide the gun barrel, on the breech assembly, into the back of this forward section and glue the loose D10 plate in place. You will now see that the recoil mechanism, due to the springs, now WORKS. I will leave this gun assembly off the model so I can paint it as a a sub-assembly and put it on the rest of the model afterwards. Step 20: 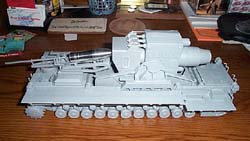 Is the final assembly of the model. You drop the gun pivot arms into the gun support half circle recesses, which have gear teeth, and then add the upper gun pivot arm retainers C15, carefully glueing them so that the gun will pivot up and down. The shell loading cradle is now glued onto part D16 (shown in step 9) and what I believe is a sight apparatus D18 is glued to the side of the gun support. Is the final assembly of the model. You drop the gun pivot arms into the gun support half circle recesses, which have gear teeth, and then add the upper gun pivot arm retainers C15, carefully glueing them so that the gun will pivot up and down. The shell loading cradle is now glued onto part D16 (shown in step 9) and what I believe is a sight apparatus D18 is glued to the side of the gun support. I bought some railroad metal chain, and I am going to add a short piece of it to the eight lift assemblies. Pictures in the Allied-Axis book show that the pins in these had short retaining chains on them and so does the box art. I want to add some gun crew figures also. I went ahead and added the hand-railings now and glued on the individual and link and length type tracks. By the way, you wind up with eight extra individual ones after doing the two runs. FInishing 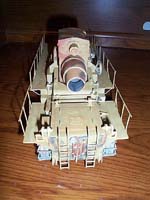 I sprayed the Karl with a base coat of Model Master dunklegelb. Then the second wave pattern was done with Polly-S armor red-brown. After this had dried, I shot lines of Tamiya dark green next to the red-brown waves. I only did this to the vertical surfaces as I was doing ZIU and the Allied-Axis book makes it seen that the horizontal surfaces were left dunkle-gelb. All these above-mentioned paints were acrylic. I did a wash, around hatches etc. with burnt umber oil paint. The tracks were painted with a wide brush using Model Master enamel stainless steel buffing formula paint. Then some burnt umber was added here and there and Testors aluminum paint was touched to gear teeth and areas of wear - like the rims of the steel road wheels etc. I sprayed the Karl with a base coat of Model Master dunklegelb. Then the second wave pattern was done with Polly-S armor red-brown. After this had dried, I shot lines of Tamiya dark green next to the red-brown waves. I only did this to the vertical surfaces as I was doing ZIU and the Allied-Axis book makes it seen that the horizontal surfaces were left dunkle-gelb. All these above-mentioned paints were acrylic. I did a wash, around hatches etc. with burnt umber oil paint. The tracks were painted with a wide brush using Model Master enamel stainless steel buffing formula paint. Then some burnt umber was added here and there and Testors aluminum paint was touched to gear teeth and areas of wear - like the rims of the steel road wheels etc. I then added the two "ZIU" names to each side of the gun housing and the Roman numeral "VI" was placed just above the breech opening. 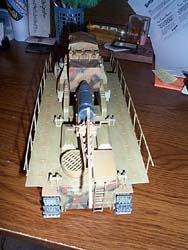 I painted the aluminum shell (that came as a BONUS in my kit) with Model Master dunklegrun enamel paint. I left the rings around the shell bare metal, as they appeared in pictures in Allied-Axis no. 9. I painted the aluminum shell (that came as a BONUS in my kit) with Model Master dunklegrun enamel paint. I left the rings around the shell bare metal, as they appeared in pictures in Allied-Axis no. 9. The tools were now painted and super-glued into their holes between the two crew ladders on the back of the vehicle. Finally a shot of Testors spray dull-coat was done to the three decals to blend them in and hide any carrier film. Conclusion This was a very enjoyable build, with few problems. I wish DML had included some crew figures though - after all, this thing had a crew of 19. I think armor modelers, that have a few kits under their belts first, will have no problems with this kit. However, it is by no means a fast weekend build. Better give yourself a week or two at least. | 


|
