Unicraft 1/72 Curtiss XF-14C-2 | 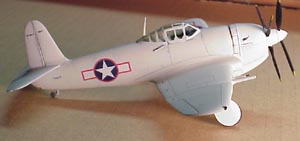 | History Attempting to regain its position as a supplier of fighter aircraft to the U.S. Navy (a position then dominated by Grumman Aircraft), Curtiss proposed in early 1941 the 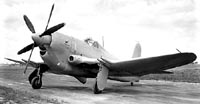 development of a high-performance, heavily armed fighter designed around a liquid-cooled engine. At that time the Navy was dedicated to air-cooled engines, but Curtiss' experience with the P-40 gave the company good grounds for its faith in a liquid-cooled unit, and on June 30, 1941 it received a contract for two prototypes, to be designated XF14C-1. The Lycoming XH-2470-4 engine in the first prototype failed to deliver the expected performance during wind tunnel testing, and the Navy eventually concluded that the performance of the XF14C-1 would be inadequate by the time it could be ready to enter service, and the program was cancelled in December 1943. Because the first airframe was virtually complete, the Navy suggested that it be flown with the Wright XR-3350-16 development of a high-performance, heavily armed fighter designed around a liquid-cooled engine. At that time the Navy was dedicated to air-cooled engines, but Curtiss' experience with the P-40 gave the company good grounds for its faith in a liquid-cooled unit, and on June 30, 1941 it received a contract for two prototypes, to be designated XF14C-1. The Lycoming XH-2470-4 engine in the first prototype failed to deliver the expected performance during wind tunnel testing, and the Navy eventually concluded that the performance of the XF14C-1 would be inadequate by the time it could be ready to enter service, and the program was cancelled in December 1943. Because the first airframe was virtually complete, the Navy suggested that it be flown with the Wright XR-3350-16 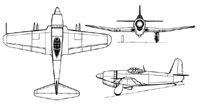 Cyclone engine, driving six-blade contra rotating propellers. In this configuration the aircraft was redesigned XF14C-2 and the first flight was made in July 1944. Performance again fell below expectations, and the R-3350 engine continued to suffer teething problems. The progress of the war in the Pacific made further development of the XF14C-2 unnecessary, and the program was cancelled in the early months of 1945. This history taken from the Unicraft website. Cyclone engine, driving six-blade contra rotating propellers. In this configuration the aircraft was redesigned XF14C-2 and the first flight was made in July 1944. Performance again fell below expectations, and the R-3350 engine continued to suffer teething problems. The progress of the war in the Pacific made further development of the XF14C-2 unnecessary, and the program was cancelled in the early months of 1945. This history taken from the Unicraft website.
 The Kit The Kit
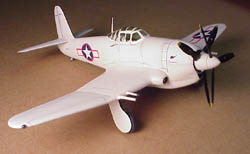
Lo and behold, one of the many American prototype aircraft has finally been made into a resin kit, and here’s a short ditty about what you can expect if you should want to pick up a copy for yourself. Expect the usual colorful Unicraft box, with a plastic bag, heat-sealed to create pockets in which all the resin parts are tucked away in. Tan resin is the normal type now with a very clear, but very thin canopy and a master in case you need to make another because of a boo-boo. Decals are for one aircraft, given not a lot of history is involved with this aircraft, color photos are near impossible to find to verify the color of Stars and Bars used. I chose the red outlined insignia, mostly because of the added color. One thing that is a fact, this airframe was painted in non-standard white during its testing phase. Now, on to the nitty-gritty. Clean up time, make sure all parts are clear and free to navigate from their mold blocks, most are not a big problem, but the resin is always brittle so saw the parts off. The fuselage halves mate up cleanly, and an added engineering item is the separate tail section. This is more a hassle than anything else is is, as is the separate tail fin, which in most kits would be part of the fuselage, but go figure. The key to this kit is alignment. With the gull wings one must make sure that both are ‘gulled’ the same amount, and then the wing must be lined up correctly to the fuselage, so on and so on. Best to make some sort of jig while the epoxy is setting. My example needed a little filler to make the outer wing panels fit properly onto the main wing section. The outer panels being a little different thickness in chord I believe. 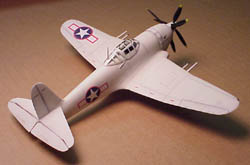 It came to my attention that this kit came with no interior, none. With a CMK Corsair interior in one hand, and my trusty Dremel in the other, it is possible to mate the resin interior into the Uncraft fuselage, but just barely and after two or three hours. Let’s call it stepping outside the safety bubble we all have, doing something different to see if it can be done with minimal risk. By gosh it actually worked pretty darn well. You won’t be able to see it all, but at least there is something in there. It came to my attention that this kit came with no interior, none. With a CMK Corsair interior in one hand, and my trusty Dremel in the other, it is possible to mate the resin interior into the Uncraft fuselage, but just barely and after two or three hours. Let’s call it stepping outside the safety bubble we all have, doing something different to see if it can be done with minimal risk. By gosh it actually worked pretty darn well. You won’t be able to see it all, but at least there is something in there. Another concern was some small details that were overlooked, I suspect that’s why this kit is for experienced modelers. The wing, once offered up to the fuselage, was lacking something in my opinion. The chord was a bit thin and that made that area around the wing filet look a bit, well, thin. Some bondo and sandpaper improved the thinness, and built up the area around the two air intakes so they could be Dremeled out. Another area was the landing gear wheel wells. From looking at numerous photos, the wheel wells and the landing gear is a bit short. The inner most edge of the wells are well inboard of the leading edge air inlets, where as the kits’ are well outboard. This tends to make the whole aircraft sit rather low and squat to the ground. Some quick work with the Moto-tool, along with some plastic card for gear covers solved that problem, the gear was robbed from a Siga MA-1 Mauler and looked just right. It’s looking pretty good folks; I can’t however get over the sight of an all white fighter plane. 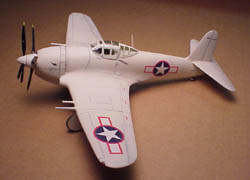 One of the last areas to be dealt with is the propeller assembly. My example’s spinner was a bit misshapen and need a nose job. Some bondo and a spin on the Dremal with sandpaper, as the cutting agent was all it took. The individual propellers look pretty good once painted black with the usual yellow tips. Some new mounting holes needed to be added after the plastic surgery using a makeshift guide. One of the last areas to be dealt with is the propeller assembly. My example’s spinner was a bit misshapen and need a nose job. Some bondo and a spin on the Dremal with sandpaper, as the cutting agent was all it took. The individual propellers look pretty good once painted black with the usual yellow tips. Some new mounting holes needed to be added after the plastic surgery using a makeshift guide. Oh, don’t forget to scratch build an exhaust. As Uhura said in Star Trek, The Undiscovered Country, “ Well, the thing's gotta have a tailpipe”. Well, this one didn’t but it should have, smack in the underside of the wing, mid point between the leading edge and the trailing edge. Honest, the pictures show it very clearly. Conclusion The overall finished product is testimony to the skill of the builder, whether a Tamiya kit or a Unicraft kit. This kit was not a disappointment, but to someone used to slapping glue and paint on a Hasagawa kit, this kit will be a challenge. I give this an 8 on the Cool-O-Meter, 5 on the ease of assembly and need for scratchbuilding many parts and a 7 for the Fun-Factor, because I always enjoy a bit of a challenge. I hope you think the effort looks worth it and that you might give one of Igor’s current offerings a try soon. | 


|
