Converting Revell's 1/48 F-15E into an Israeli F-15I | 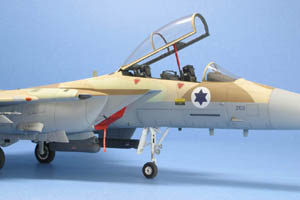 | Introduction The McDonnell-Douglas(now Boeing) F-15E Strike Eagle was developed for the U.S. Air Force from the two seat F-15B fighter/trainer as a more modern and sophisticated replacement for the long range F-111 interdiction aircraft. First delivered to the USAF in 1988, the Strike Eagle will remain one of the world's most potent strike aircraft for many years to come. Export versions include the F-15S for Saudi Arabia and the F-15I for Israel. The newest customer is the Republic of Korea Air Force (ROKAF), which is scheduled to receive the F-15K beginning in 2005. Export Strike Eagles differ from their USAF counterparts in some of the specialized avionics systems. The Israeli Defence Forces received 25 F-15I Ra'am(Thunder) aircraft during 1998-99, which serve in the No. 69 Patisham(Hammers) Squadron. My model depicts aircraft No. 269 of the Hammers Squadron, which was widely photographed during its visit to RAF Waddington in July, 2001. The Kit 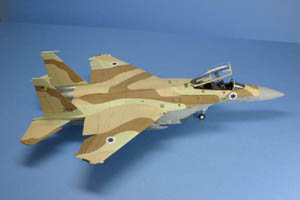 Revell's F-15E is a very good kit and builds into an accurate and highly detailed model of the subject. Most parts are crisply molded with fine engraved lines and no flash. There were two bad sink marks on the lower right fuselage, but I left them alone because I knew that they would not be visible when covered by the Conformal Fuel Tank (CFT). However, I filled another sink mark on the right outboard upper wing surface. The main wheels are molded with a flat surface to simulate the weight of the tire contacting the ground (a bit too much flattening I think). Revell's F-15E is a very good kit and builds into an accurate and highly detailed model of the subject. Most parts are crisply molded with fine engraved lines and no flash. There were two bad sink marks on the lower right fuselage, but I left them alone because I knew that they would not be visible when covered by the Conformal Fuel Tank (CFT). However, I filled another sink mark on the right outboard upper wing surface. The main wheels are molded with a flat surface to simulate the weight of the tire contacting the ground (a bit too much flattening I think).
Options include a separate speed brake, boarding ladder, two-piece canopy, and positionable separate forward nose gear door (normally up when the aircraft is on the ground). Air intake covers are also provided. External stores include drop tanks, Sidewinder missiles, and LANTIRN pods. Construction This is not a trouble-free, fall-together kit, as many reviews have suggested. The main problem is with the wings. The inboard sections of the wing tops are molded as part of the fuselage, and the outboard wing panels, as well as the bottom wing sections, all have to join together. This is difficult to accomplish and still get a 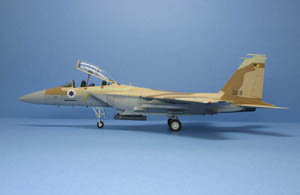 completely straight line (no kink or droop) on the leading edge. I also found that I had to add small styrene plastic strips inside the wing at key positions to strengthen the joints and eliminate flexing. Some restoration work was also required on the wing top surfaces to restore detail lost in the filling and sanding process. completely straight line (no kink or droop) on the leading edge. I also found that I had to add small styrene plastic strips inside the wing at key positions to strengthen the joints and eliminate flexing. Some restoration work was also required on the wing top surfaces to restore detail lost in the filling and sanding process. Another serious fit problem was at the joint where the forward fuselage meets the main fuselage. I could not get a nice tight fit in both the upper and lower areas of this joint. I had to leave one them (the upper area) with a gap and then later fill it with plastic sheet and putty. There is limited room for maneuver here when sanding because of an adjacent large vent structure. Other tricky areas to fill include the gaps produced by the nose wheel well assembly and the lower fuselage, several of the pylon-to-fuselage joints, and the inside of the gun port. CFTs also required filler in several areas where they contacted the fuselage. The canopy does not fit well in the rear where it contacts the canopy frame. And the windscreen is too small where it meets the fuselage in front and on the right side, resulting in a slight step. 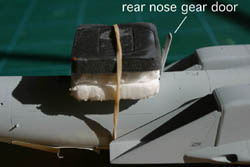 One awkward problem to deal with is that the rear nose gear door is already attached to the rear wall of the nose gear well. Instead of cutting this door off and trying to reattach it later, I decided to take a chance and leave it in place. I rigged up an "eagle supporter" of styrofoam pads and a rubber band to protect this area during the construction process. It worked surprisingly well. One awkward problem to deal with is that the rear nose gear door is already attached to the rear wall of the nose gear well. Instead of cutting this door off and trying to reattach it later, I decided to take a chance and leave it in place. I rigged up an "eagle supporter" of styrofoam pads and a rubber band to protect this area during the construction process. It worked surprisingly well.
Contrary to the instructions, I left off the nose gear strut until the model was completed, and then had considerable trouble fitting it inside the well to reach the attachment points. Surgery was definitely required to achieve a fit. 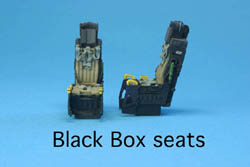 I had some difficulty mating the air intakes to the fuselage--I couldn't get them quite high enough. A small step was the result on the top surfaces (this area should be flat) and again it was time to bring out the filler to minimize this pesky problem. I had some difficulty mating the air intakes to the fuselage--I couldn't get them quite high enough. A small step was the result on the top surfaces (this area should be flat) and again it was time to bring out the filler to minimize this pesky problem.
I omitted the intake ducts because these areas would be hidden by the intake covers. I found it necessary to install a styrene post in between the fuselage top and bottom to add ridgidity and stop any flexing in this giant hollow space. Conversion I used the Cutting Edge F-15I conversion kit to help build my model. This involved replacing the lower tail boom sections, the left tail boom antenna, and the forward CFT pylons with the conversion set's resin parts. The Cutting Edge GPS antenna was too large, so I scratch-built mine from a 1/72 Sidewinder missile nose and installed it in the proper location on the fuselage top. Instead of using the Cutting Edge "thin" port fin tip replacement antenna, I simply substituted the appropriate entire vertical stabilizer from a second Revell F-15E kit. 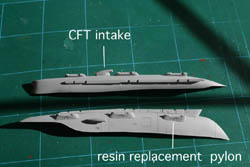 (Both "thin" fin tip structures on the F-15I are actually mass balances, not antennae). (Both "thin" fin tip structures on the F-15I are actually mass balances, not antennae). The F-15I (and late F-15Es) have two additional air scoops to help cool the engine bay, because of the higher thrust Pratt & Whitney F-100-PW-229 engines. The scoops are provided in the Revell kit--although not mentioned in the instructions. I installed these small air intakes on the rear of each CFT. A circular vent on the right fuselage near the canopy was filled in and eliminated, and appropriate changes were made to the rear formation lights pattern when I painted them on. Another difference--and this is a biggie--is the fact that the Israeli F-15I retains the "turkey feather" plates on the engine nozzles. Since the Revell kit nozzles cannot be used, the choice is to go with the the Cutting Edge nozzles or get them from another source. I elected to use Hasegawa nozzles. Building a Better Eagle 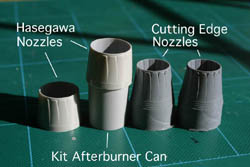 Although the Cutting Edge resin nozzles have superior detail, they are molded in the closed (constricted) position. This is simply not correct for an F-15 on the ground--it should have wide-open nozzles. I therefore chose to use open nozzles from two Hasegawa F-16A kits (one I already had and the other was scrounged from a friend). I think that the Hasegawa nozzles are preferable, although they required some effort to cut and adapt for a proper fit. The Revell afterburner cans also required modification to fit the Hasegawa nozzles. Although the Cutting Edge resin nozzles have superior detail, they are molded in the closed (constricted) position. This is simply not correct for an F-15 on the ground--it should have wide-open nozzles. I therefore chose to use open nozzles from two Hasegawa F-16A kits (one I already had and the other was scrounged from a friend). I think that the Hasegawa nozzles are preferable, although they required some effort to cut and adapt for a proper fit. The Revell afterburner cans also required modification to fit the Hasegawa nozzles.
The second improvement I made was to cut out and lower the ailerons. Drooped ailerons are a feature of all F-15 variants due to the lack of hydraulic pressure when the aircraft is parked on the ground.(The horizontal stabilizers will eventually droop for the same reason). 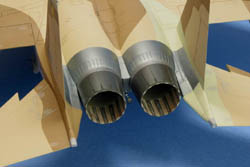 I was pleased with the Revell cockpit components, but I substituted the throttles and ACES ejection seats from the Black Box set, as they have more realistic detail. I was pleased with the Revell cockpit components, but I substituted the throttles and ACES ejection seats from the Black Box set, as they have more realistic detail.
I like these enhancements, especially the nozzles. Now the Accuracy Police can't pull me over and give me a ticket! Markings and Paint I used decals from the Sky's Decals Sheet No. 2, which provideds a choice of 3 different Hammers Squadron F-15Is, plus one from the test center. The only thing missing was a tiny blue hammer on the squadron badge, but I made that from scrap blue decal. As for paint, my model was airbrushed with Testors Model Master and Humbrol enamels. Panel lines were detailed with my usual method of colored pencils. Minimal weathering and staining was done with chalk--mostly on the underside--because I wanted a relatively clean aircraft. References 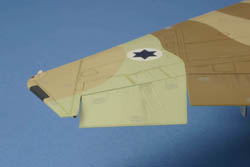 Essential equipment includes Squadron's Walk-Around No. 28, the F-15 Eagle. I referred to photos in my Air International and Combat Aircraft magazines, and to some of my own color slides. The March 2000 issue of Scale Aircraft Modeling has a great cover picture showing the top view of a flying F-15I. Essential equipment includes Squadron's Walk-Around No. 28, the F-15 Eagle. I referred to photos in my Air International and Combat Aircraft magazines, and to some of my own color slides. The March 2000 issue of Scale Aircraft Modeling has a great cover picture showing the top view of a flying F-15I.
Many useful photos are on the internet as well. For the F-15I, I recommend Craig Sargent's excellent web site on the Israeli Air Force. This can be accessed through the IPMS-USA home page links. Conclusion At last I am an Eagle Keeper and can add this bird to my airplane zoo. I recommend the Revell Strike Eagle to anyone but the novice modeler. I am surprised that Revell did not release a new-tool F-15A or C fighter as a follow-up subject to the F-15E. Hint...Hint... | 


|
