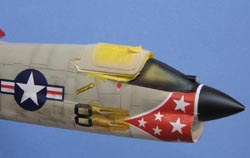
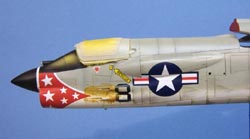
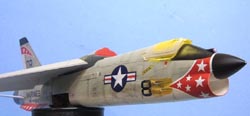
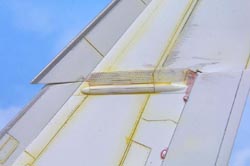
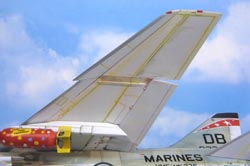
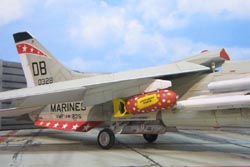
Building the F-8E Crusader Number 8 from VMF(AW)-235 | 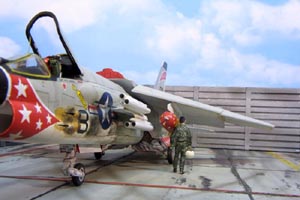 | Introduction Hasegawa has done it again! Now we have an F-8E Crusader with flaps and slats down. The only other kits that were out there are the old ESCI and the Monogram kits and neither of them had the flaps and slats down. 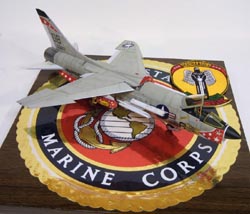 With my first look at the kit, I could see that we just might have an RF 8 down the line. On the inside of the fuselage they have a mold mark just in front of the main landing gear door. This would be the place that they would have to split the fuselage if they want to do an RF 8. So let us hope that we will see one next year. With my first look at the kit, I could see that we just might have an RF 8 down the line. On the inside of the fuselage they have a mold mark just in front of the main landing gear door. This would be the place that they would have to split the fuselage if they want to do an RF 8. So let us hope that we will see one next year.
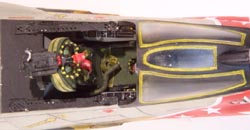
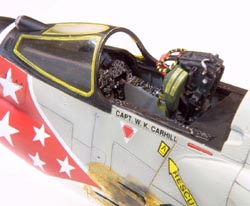
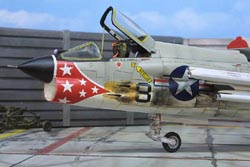
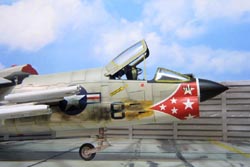
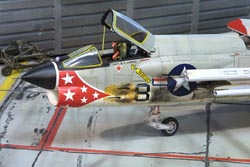
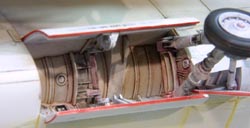
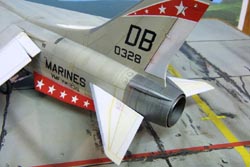
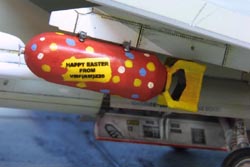
There are some things that I have seen in the last two new kits from Hasegawa. In the Ar 234 and in the F-8 the scribing on the bottom of the fuselage has been very light, almost not there. I had to rescribe some of the lines on the Ar 234, and the same on the F-8. It would be nice if they could keep the lines all the same depth. I think that is about the only big gripe that I have with the kit. The canopy is molded in the closed position, but all you have to do is to file the inside of the top of the canopy with a round file. File down the inside of the tabs a little and it can be in the open position. 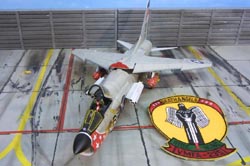 For the most part this kit can be built right out of the box and it will be a good-looking F-8E. However, there are some things that you can do to improve the kit. The cockpit is good enough to do out of the box. There are some after market interior cockpits that you might want to use that will make it look a little better. I used the kit decals for the instrument panel and added some paint to make it look more realistic. The kit seat can be used, but there are some after market Martin Baker Mk. 7 seats out there and you might want to use one of them. I used an old one that I had. For the most part this kit can be built right out of the box and it will be a good-looking F-8E. However, there are some things that you can do to improve the kit. The cockpit is good enough to do out of the box. There are some after market interior cockpits that you might want to use that will make it look a little better. I used the kit decals for the instrument panel and added some paint to make it look more realistic. The kit seat can be used, but there are some after market Martin Baker Mk. 7 seats out there and you might want to use one of them. I used an old one that I had. The Kit The first step is the air intake trunk. At first glance it looks like you could have some troubles with a good fit. First I made sure that the top and bottom of the intake would match up. I sanded down the high spots until it looked like there would be very little seam showing when I got it together. I then painted the in side of the intake trunk white. It was a lot easier to do this first. I then glued it together, let it dry and sanded down any glue on the seam. I then hand painted some wash of white on the seam to help cover up the seam. Next I fitted the trunk to one side of the fuselage making sure it would line up with the front part of the fuselage. I sanded down the high spots on the fuselage and trunk, and did the same with the other side. I then finished putting the rest of the parts in the fuselage. One nice thing is you do not have to put any weight in the nose. I then glued the two halves of the fuselage together. When the fuselage is all dry, I sanded the inside of the intake. I then sprayed some white on the inside of the air intake. I then cut a white decal so it would fit into the inside of the intake. I made it longer so it would go beyond the seam. I then put it in the intake. This is an easy way to take care of the seams. Next is the wing. At this point you should know if you will have the wing up or down. If you do it down just glue the slats and flaps in the up position and that would be it. But if you want the wing up that will take some work. In dry fitting I saw that the inboard flap (F7 and F8) would not fit to the fuselage and the same with the slat. I could see that if you would take about 1/32 � off the flap where it fits to the fuselage it will fit. On the slat, remove the 1/32 � from the outboard end of the slat (G4 & G5). You do not want to take it off at the fuselage side. I made a template cut at 20 degrees for the flaps and 28 degrees for the slats so they would be correct on both sides of the wing. If you put the bomb rack on the wing, make sure you get the right angle to the wing. I used some 10thou plastic card on the inside of the pylon to get the right angle. To make the air scoops (R3) lie flat onto the fuselage burner can you will need to cut on the seam and bend them down to fit the contour. I also did not like the fit of the ventral fins. If you put them in the holes that are on the kit they will not be at the right angle. I made a template of the angle that they should be. Then I put a bevel on them so they would fit to the fuselage better. The unit that I wanted to do was VMF(AW) 235. With the red nose and white stars it was a very colorful Marine unit that was in Vietnam. The most interesting F-8 from that unit was Number 8 (BuNo. 150328). I found six different pictures of this aircraft. I came across a good side view of Number 8 and what is interesting is the star and bar on the fuselage. It looks like they had to replace the forward part of the refueling housing from another aircraft. It was missing part of the bar. In the other pictures of Number 8 they had bombing missions on the nose. One picture has three bombs, and another one had three rows of bombs. The unit was in Vietnam from 1966-1968. The challenge of doing a Marine F-8 was to get all the dirt and grime on the aircraft. The Marines had a saying back then, “"Kick the tire, Light the fire. Last one airborne is the flight leader." So not too much time was spent in keeping the aircraft clean. I painted the model Poly Scale Light Gull Gray and White. I then went back with some Dark Gull Gray and started to do some panels and lines and some patches of darker color. One thing that they did back then was to take a spray can of gray and spray over the seams. This was corrosion control. Usually the gray spray paint did not mach the color of the aircraft, and you would get a very two-toned paint job. In addition, the ordnance people and the plane captain would put a lubri-plate (grease) around the gun ports. This would make it easy to clean up after a mission. For the most part this was a brown-looking grease. I then started on the weathering. I use an oil wash, because I have more control of the wash by using oil paint. I use Black, Alizarin Crimson, Yellow and Burnt Umber and Turpentine or Turpenoid. I made a very thin wash in a paint palette bubble tray. This way you can have all the colors that you are using for your wash. Look at pictures showing where to add the wash. It would be around the guns, the engine and any of the oil lines and hydraulic lines and fuel lines. I use an OOO brush to put the wash on. I have a good control of the wash with that small brush. You can touch a line and it will flow down the line. Remember if you get too much on you can just add some thinner and wash it away. One thing that you should remember is to go with the flow. That is air flow across the wing and the fuselage. I pick up some wash on the brush. I then touch the panel line and let the wash flow along the line. I then take my finger and drag it across the line; this will pick up some wash and give you a streaky look. Also put some wash along the side of the panel and then drag it back with the flow. This will make the wash a little darker; you can carry it as far back that you want. This works great for oil streaks and stains. . In the wheel wells I used the Black, Burnt Umber and Alizarin Crimson. The black will bring out the detail of the inside of the wheel well and the Red will be around the gear were the hydraulic lines are. This is one area where there is a lot of grime and dirt. I start with the Crimson and go around the struts and the back and sides of the wheel well. When you look at pictures of the wheel wells you can see that it is not always just black. You will have some hydraulic fluid mixed with dirt and that will look blackish-red. I then add the grease around the gun ports. This was done using Delta Ceramcoat Antique Gold. You can get this paint at any craft store. They have a nice selection of colors and I use them a lot for painting parts and detailing cockpits. I made a thin wash of this color and hand painted it on. You want it to look very transparent. In addition, it should look like it was put on with your hands. Next, I airbrushed black on some of the panels around the guns. I wanted a very transparent look to these panels. I used some Poly Scale Dirty White for some of the panels on the under side of the wings and fuselage. For the yellowish color along the seams and wing folds I used the yellow wash. Around the wing fold I used the Crimson for the hydraulic fluid. I kept looking at pictures so I would not go too far with the wash. When it looks right, stop! When I got all the weathering done, I put a coat of Future Floor Wax on the aircraft before decaling. There are three sheets of decals out for the VMF(AW) 235. One is in the Monogram kit; another is a Super Scale sheet. There is also a Cutting Edge sheet (48212) designed for the Hasegawa kit. I did not have the Cutting Edge decals, so I used some from of the Monogram kit and some of the Super Scale. The Monogram decals had the No 8 with the right decal for the serial number on the tail and the pilot's name. The nose and ventral fin decals were from Super Scale. The nose decal fit well. But the ventral fin decal was too short. I had two sets of the decals so I cut some red off the one that I did not use and used it on the end of the fin. I used the kit decals for the other little markings (do not step, jack points, etc). The decals for the bomb were made on the computer. I put another coat of Future Floor Wax mixed with Tamiya Flat Base. This gives a flat finish to the model. By mixing these two products, you get the degree of matte finish desired. I then added the ordnance. I used the Zuni rockets, and I found two 1000lb. bombs from a Monogram P-61. Now for the Easter Bombs. Now you are going to ask why they painted the bomb this way. Well, it was Easter and they wanted to spread a little happiness around. So that is why it is painted up that way. And yes I do have a picture of it! At last it is done. Now take some pictures of it. I made the revetment out of some wood. I used a digital camera for all the pictures. So that is My VMF(AW)235 F-8-E No 8 Sn 150328 Crusader. VMF (AW) 235 was the last Marine Squadron to fly the F 8 Crusader. RIDE NUNC! REFERENCES -
Marine Fighter Squadrons Part 3 No 18 by Steve Ginter -
Vought's F-8 Crusader No 16 Part 1 by Steve Page -
Famous Airplanes of the World. No. 1 F8 Crusader -
Famous Airplanes of the World No 41 September 1973 -
F-8 Crusader in Action No. 7 -
Air War over Southeast Asia Vol.1 1962-66 -
Wings of Fame Vol. 5 | 


|

 With my first look at the kit, I could see that we just might have an RF 8 down the line. On the inside of the fuselage they have a mold mark just in front of the main landing gear door. This would be the place that they would have to split the fuselage if they want to do an RF 8. So let us hope that we will see one next year.
 For the most part this kit can be built right out of the box and it will be a good-looking F-8E. However, there are some things that you can do to improve the kit. The cockpit is good enough to do out of the box. There are some after market interior cockpits that you might want to use that will make it look a little better. I used the kit decals for the instrument panel and added some paint to make it look more realistic. The kit seat can be used, but there are some after market Martin Baker Mk. 7 seats out there and you might want to use one of them. I used an old one that I had.