Toko Siemens-Schuckert Werke (SSW) D.III | 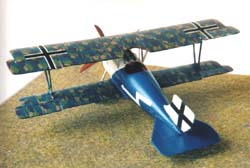 | Introduction A description of building this kit was in an earlier edition of Internet Modeler (November 1998) so I shall provide only a brief description of the aeroplane and the kit. According to Grosz (1991), between March and April 1918, 41 SSW D.III's and a single D.IV were delivered to the front. The increased speed, maintained at altitude, and maneouverability were welcomed by its pilots though problems developed with the engines after only a few hours of flight time due to the use of an oil with incorrect viscosity. The same engines built at a different plant were used in the next batch of SSW D.IIIs and IVs. After further tests and another 'Fighter Competition', delivery began in larger numbers from July 1918 until the end of the war. The Kit 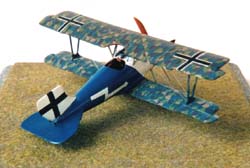 The Toko (this kit has been re-released under the Eastern Express label following Toko's demise) kit contains two sprues of nicely molded grey plastic: a little flash but nothing problematic. There are parts for the builder to make either the D.IV or the D.III. I purchased the Hawkeye resin aftermarket set and the PART photoetch sheet in an attempt to enhance this kit; neither is necessary to build a nice looking model but I liked some aspects of both these aftermarket products. The kit's decals are thin and in register but the kit's lozenge decals are way off; they are 4-colour (they should be 5-colour), the colours are somewhat dubious and they are the same for both upper and lower surfaces. The Toko (this kit has been re-released under the Eastern Express label following Toko's demise) kit contains two sprues of nicely molded grey plastic: a little flash but nothing problematic. There are parts for the builder to make either the D.IV or the D.III. I purchased the Hawkeye resin aftermarket set and the PART photoetch sheet in an attempt to enhance this kit; neither is necessary to build a nice looking model but I liked some aspects of both these aftermarket products. The kit's decals are thin and in register but the kit's lozenge decals are way off; they are 4-colour (they should be 5-colour), the colours are somewhat dubious and they are the same for both upper and lower surfaces. The Hawkeye resin set contains an engine, an upper wing with separate ailerons, a tail plane and elevator and a vented spinner. The spinner and engine were excellent and I used them both. The tail plane is fine and compares better with the line drawings in the Windsock Datafile, so it is probably more accurate. The resin top wing was warped. I'm sure Hawkeye would have replaced it or I could have tried to straighten it out using hot water but sometimes resin has a memory, so I just used the kit's upper wing. Although the resin wing is better detailed and, again, is a closer match to the Windsock Datafile plans, I reasoned that after slapping on a covering of lozenge decals and rib tapes, the surface detail would be obscured. 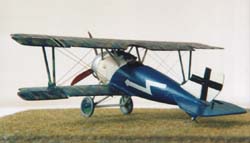 The PART photoetch sheet is excellent though I was unable to use all the pieces. Some of that was because I simply did not feel I would have the skill to cut away certain kit pieces and replace them with the photoetch part. One example is the vents on the underside of the fuselage: the kit part was not too bad, so I left it alone. However, the PART set made the task of building the cockpit interior a lot easier and the result was fairly good. The PART photoetch sheet is excellent though I was unable to use all the pieces. Some of that was because I simply did not feel I would have the skill to cut away certain kit pieces and replace them with the photoetch part. One example is the vents on the underside of the fuselage: the kit part was not too bad, so I left it alone. However, the PART set made the task of building the cockpit interior a lot easier and the result was fairly good. Engine and Cockpit Interior I started with the engine. The Hawkeye replacement is excellent and they provide you with a length of thin straight wire from which you are supposed to make the push rods - all 22 of them! The Part photoetch provides a hub with 22 spokes that you could easily fit right onto the front of the engine but unfortunately, the push rods on that part are straight, and the SSW D.III's pushrods are supposed to emanate outwards at an angle from the centre of the engine, forming a sort of ''V' on each cylinder. I tried a couple of things but the easiest and most successful was cutting lengths of .010-inch plastic rod, laying them in place and running a Touch 'n' Flow filled with Pro Weld to melt it to the engine part. That whole business took only an hour or so, including the trimming of each rod. I then painted the engine dark grey, and painted the pipes at the rear in Copper. Finally, I dry-brushed the whole thing with aluminium to bring out the details, including the pushrods. I keep a plastic film canister with the kit I am building for small finished sub-assemblies, so into it went the engine. 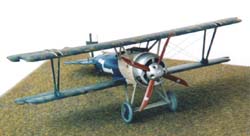 Next came the interior. The first task here was to remove the kit's rendition of the interior framework so it could be replaced with the photoetch pieces. I thinned the cockpit's sidewalls with a Dremel tool until I could hold the part up to the light and see that it was translucent. I used most of the interior pieces from the Part photoetch, most useful of which was the frame upon which the seat rests: a difficult component to reproduce by scratch building. Rather than using super glue, I used Elmer's White Glue to attach the sidewall framework: less mess and a lot stronger than you think. Will it last 40 years? Maybe not but neither will I. I also used the photoetch control stick, foot rudder and seat. All of these looked excellent when I painted them but when I closed the fuselage and glued on the sidewall 'shelves' on either side of the cockpit interior, it was difficult to see much of the detail. Rather than the use the Part 'shelves' I made them from strips of plastic. Finally, I added seatbelts made with foil from a champagne bottle. Next came the interior. The first task here was to remove the kit's rendition of the interior framework so it could be replaced with the photoetch pieces. I thinned the cockpit's sidewalls with a Dremel tool until I could hold the part up to the light and see that it was translucent. I used most of the interior pieces from the Part photoetch, most useful of which was the frame upon which the seat rests: a difficult component to reproduce by scratch building. Rather than using super glue, I used Elmer's White Glue to attach the sidewall framework: less mess and a lot stronger than you think. Will it last 40 years? Maybe not but neither will I. I also used the photoetch control stick, foot rudder and seat. All of these looked excellent when I painted them but when I closed the fuselage and glued on the sidewall 'shelves' on either side of the cockpit interior, it was difficult to see much of the detail. Rather than the use the Part 'shelves' I made them from strips of plastic. Finally, I added seatbelts made with foil from a champagne bottle. Flying Surfaces - the Lozenge I began by re-positioning the ailerons on the upper wing. Rather than cut them off, I made a cut on the fore-aft axis and then scored along the cross-wise aileron join. Then I carefully bent the aileron into position. I find this easier then cutting off and re-attaching the aileron because there is no gluing involved. The Windsock Datafile describes the upper wing's lozenge fabric as being applied diagonally, at a 45-degree angle to the leading edge. This is not too difficult. First, I brushed on a coat of Future to give the lozenge decals a nice surface to which to adhere. Then, using Eagle Strike 5-colour lozenge, I simply cut parallelograms with appropriately sloped sides and laid them on the wing's surfaces. I cut two opposed triangles of lozenge for the centre section. Once these were glued on, I did the same using on the wing's underside using the appropriate coloured lozenge, and applied another coat of Future. 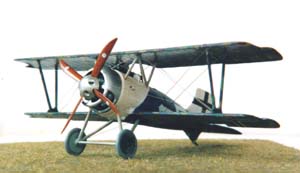 At this point, I had to decide upon rib tape colour. I had decided to build Greven's machine and pictures of his aeroplane are inconclusive with respect to the type of rib tapes that were used. I had loads of lozenge decals, so I decided to use that for rib tapes. Using a sharp Exacto knife and a steel ruler, I began the repetitive task. Once the decal rib tapes were on, I applied yet another coat of Future and proceed to add the leading and trailing edge rib tapes. At this point, I had to decide upon rib tape colour. I had decided to build Greven's machine and pictures of his aeroplane are inconclusive with respect to the type of rib tapes that were used. I had loads of lozenge decals, so I decided to use that for rib tapes. Using a sharp Exacto knife and a steel ruler, I began the repetitive task. Once the decal rib tapes were on, I applied yet another coat of Future and proceed to add the leading and trailing edge rib tapes. I think at this point, I would like to comment on the Eagle Strike lozenge decals. These are quite good: they release from their backing rapidly and their colours look excellent, at least to my eye. My main problem with them is that they are more fragile than the Americal/Gryphon brand that I am used to using, though they have the important advantage over Americal/Gryphon of being readily available in my local hobby shop. Another less favourable characteristic of Eagle Strike is they do not react to Solvaset and snuggle down as readily as Americal/Gryphon. This was not a significant issue until I had to adhere lozenge decals to the interplane struts. I solved this problem logically by using my little bit of left over Americal/Gryphon lozenge for this task. I simply cut three strips of lozenge, wrapped them around the struts and the strut base, slopped on the Solvaset and it was done. I also used Americal/Gryphon lozenge decals for the wheel hubs having first sprayed the wheels grey and brushed that with Future. Into the film canister went the interplane struts and the wheels. 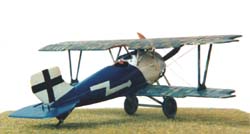 Fuselage and Painting Fuselage and Painting I glued the fuselage halves using Pro Weld and the trusty Touch 'n' Flow. I also glued on the tailpieces, which required some filler where they did not quite go all the way into the slot in the rear of the fuselage. After waiting a day, I began the task of sanding and filling the seams. The Greven scheme was for a late model so I had to sand away the headrest. Once this was complete, I pushed the seat and interior framework through the hole on the underside of the fuselage, and I then glued the lower wing onto the fuselage. More sanding and filling followed. Once this was complete, I sprayed the fuselage-lower wing assembly a light grey as a primer for the white and to make sure there were no small seams. Unfortunately, there were a few, so the task was repeated until they were gone. I then sprayed the entire subassembly white, masked off the tailfin and the front of the fuselage, and sprayed everything blue. Between coats, after the white dried, I applied a brushed coat of Future. This allows for easier clean up should the blue bleed under the mask. Once this was dry, I added another coat of Future and began the task of putting lozenge decals on the lower wing. This is slightly easier than the upper wing because it is applied chord wise; and aside from the direction of the lozenge, I applied it in the same way as I had to the upper wing. Guns, Top Wing and Undercarriage 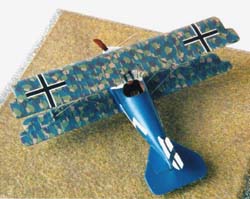 Before gluing on the upper wing I had to glue on the guns. The kit guns are fine but I cut off the barrels and replaced them with cooling jackets from the Part set, then I re-attached the plastic bits from the kit back onto the end of the barrels. I also added the photoetch disks that represent dials and such in front of the guns. Once this had dried, I glued on the top wing. Note that in my kit, the instructions reversed the numbers for the D.III versus the D.IV cabane struts: not difficult to notice but I thought it would be just as well to mention that. The single-piece interplane structure made gluing on the top wing somewhat easier and the cabane struts actually fit without too much of a problem. However, I should mention that I facilitated this by drilling attachment holes in the upper wing for the cabane struts after the upper wing was glued in place. At this point I added the Part photoetch aileron cranks that go from the fuselage to the upper wing's underside. Rather than use the entire photoetch piece I used .010-inch plastic rod for the aileron rods. Before gluing on the upper wing I had to glue on the guns. The kit guns are fine but I cut off the barrels and replaced them with cooling jackets from the Part set, then I re-attached the plastic bits from the kit back onto the end of the barrels. I also added the photoetch disks that represent dials and such in front of the guns. Once this had dried, I glued on the top wing. Note that in my kit, the instructions reversed the numbers for the D.III versus the D.IV cabane struts: not difficult to notice but I thought it would be just as well to mention that. The single-piece interplane structure made gluing on the top wing somewhat easier and the cabane struts actually fit without too much of a problem. However, I should mention that I facilitated this by drilling attachment holes in the upper wing for the cabane struts after the upper wing was glued in place. At this point I added the Part photoetch aileron cranks that go from the fuselage to the upper wing's underside. Rather than use the entire photoetch piece I used .010-inch plastic rod for the aileron rods. I found the undercarriage simple to assemble and attach. I painted it light grey and made sure I had drilled open the attachment points on the fuselage. I eschewed the Part photoetch detail provided for the tailskid and used the kit's, which I found to be easy to attach and paint. Decals, Rigging and Cowl Greven's machine had a large black cross on the tailfin, which I made from decal paper sprayed with black paint. Similarly, I sprayed some decal paper with white paint and cut out the little thunderbolts for each side of the fuselage. All the decals went on without any difficulty. Once all this had dried, I used 0.005-inch straight wire from Small Parts inc. to make the model's rigging, and I glued it with Elmer's White Glue. This was a fairly straightforward task. I made the tail's aileron horns by drilling a small hole through the tail and pushing a small piece of plastic rod through the hole and gluing it. I then trimmed the rod down to size and painted it dark grey. 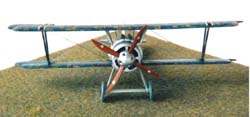 I gave the entire assembly an oil wash to bring out the louvers and panel lines as best I could. Once the rigging was completed, I sprayed the cowl and the spinner with Alclad II Lacquer Aluminium: I did not use any primer but simply sprayed on a light first coat from about 12 inches and when that was fairly set, I covered the surfaces, spraying from closer this time. Alclad goes on really well, looks great and dries in about 15 minutes. I painted the propeller a base of 'Wood' and used watercolour gouache to give it a grained appearance. In truth, the propellers of this aeroplane were made from laminated pieces of wood but I could not work out how to mask off the propeller blades to arrive at this effect. Finally, I glued on the cowl, propeller and spinner, added the final pieces of wing-to-cowl-rigging and a windshield. I gave the entire assembly an oil wash to bring out the louvers and panel lines as best I could. Once the rigging was completed, I sprayed the cowl and the spinner with Alclad II Lacquer Aluminium: I did not use any primer but simply sprayed on a light first coat from about 12 inches and when that was fairly set, I covered the surfaces, spraying from closer this time. Alclad goes on really well, looks great and dries in about 15 minutes. I painted the propeller a base of 'Wood' and used watercolour gouache to give it a grained appearance. In truth, the propellers of this aeroplane were made from laminated pieces of wood but I could not work out how to mask off the propeller blades to arrive at this effect. Finally, I glued on the cowl, propeller and spinner, added the final pieces of wing-to-cowl-rigging and a windshield. Conclusion This is an excellent kit. I used a couple of aftermarket products, and while these are not superfluous, their absence does not preclude one building a nice model. The kit is highly recommended. Acknowledgements I would like to thank Bob Pearson for information about the colour scheme. Brian Nicklas of the National Air And Space Museum provided helpful information about the Siemens-Halske engine. I received advice and recommendations from members of the World War One Modelling list, sponsored by the University of New Hampshire and hosted by Allan Wright. References Grosz, Peter M: SSW D.III-D.IV: Windsock Datafile 29. Albatros Publications Ltd., Berkhamsted, Hertfordshire, United Kingdom. | 


|

 The Toko (this kit has been re-released under the Eastern Express label following Toko's demise) kit contains two sprues of nicely molded grey plastic: a little flash but nothing problematic. There are parts for the builder to make either the D.IV or the D.III. I purchased the Hawkeye resin aftermarket set and the PART photoetch sheet in an attempt to enhance this kit; neither is necessary to build a nice looking model but I liked some aspects of both these aftermarket products. The kit's decals are thin and in register but the kit's lozenge decals are way off; they are 4-colour (they should be 5-colour), the colours are somewhat dubious and they are the same for both upper and lower surfaces.
 The PART photoetch sheet is excellent though I was unable to use all the pieces. Some of that was because I simply did not feel I would have the skill to cut away certain kit pieces and replace them with the photoetch part. One example is the vents on the underside of the fuselage: the kit part was not too bad, so I left it alone. However, the PART set made the task of building the cockpit interior a lot easier and the result was fairly good.
 Next came the interior. The first task here was to remove the kit's rendition of the interior framework so it could be replaced with the photoetch pieces. I thinned the cockpit's sidewalls with a Dremel tool until I could hold the part up to the light and see that it was translucent. I used most of the interior pieces from the Part photoetch, most useful of which was the frame upon which the seat rests: a difficult component to reproduce by scratch building. Rather than using super glue, I used Elmer's White Glue to attach the sidewall framework: less mess and a lot stronger than you think. Will it last 40 years? Maybe not but neither will I. I also used the photoetch control stick, foot rudder and seat. All of these looked excellent when I painted them but when I closed the fuselage and glued on the sidewall 'shelves' on either side of the cockpit interior, it was difficult to see much of the detail. Rather than the use the Part 'shelves' I made them from strips of plastic. Finally, I added seatbelts made with foil from a champagne bottle.
 At this point, I had to decide upon rib tape colour. I had decided to build Greven's machine and pictures of his aeroplane are inconclusive with respect to the type of rib tapes that were used. I had loads of lozenge decals, so I decided to use that for rib tapes. Using a sharp Exacto knife and a steel ruler, I began the repetitive task. Once the decal rib tapes were on, I applied yet another coat of Future and proceed to add the leading and trailing edge rib tapes.
  Fuselage and Painting
 Before gluing on the upper wing I had to glue on the guns. The kit guns are fine but I cut off the barrels and replaced them with cooling jackets from the Part set, then I re-attached the plastic bits from the kit back onto the end of the barrels. I also added the photoetch disks that represent dials and such in front of the guns. Once this had dried, I glued on the top wing. Note that in my kit, the instructions reversed the numbers for the D.III versus the D.IV cabane struts: not difficult to notice but I thought it would be just as well to mention that. The single-piece interplane structure made gluing on the top wing somewhat easier and the cabane struts actually fit without too much of a problem. However, I should mention that I facilitated this by drilling attachment holes in the upper wing for the cabane struts after the upper wing was glued in place. At this point I added the Part photoetch aileron cranks that go from the fuselage to the upper wing's underside. Rather than use the entire photoetch piece I used .010-inch plastic rod for the aileron rods.
 I gave the entire assembly an oil wash to bring out the louvers and panel lines as best I could. Once the rigging was completed, I sprayed the cowl and the spinner with Alclad II Lacquer Aluminium: I did not use any primer but simply sprayed on a light first coat from about 12 inches and when that was fairly set, I covered the surfaces, spraying from closer this time. Alclad goes on really well, looks great and dries in about 15 minutes. I painted the propeller a base of 'Wood' and used watercolour gouache to give it a grained appearance. In truth, the propellers of this aeroplane were made from laminated pieces of wood but I could not work out how to mask off the propeller blades to arrive at this effect. Finally, I glued on the cowl, propeller and spinner, added the final pieces of wing-to-cowl-rigging and a windshield.


