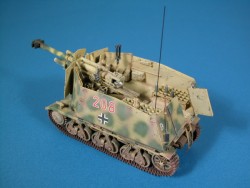
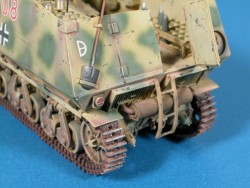
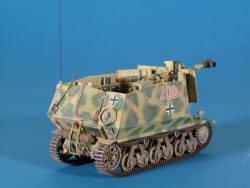
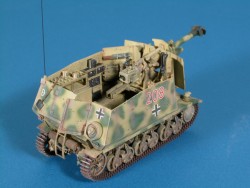
| Tiger Werke 10.5cm leFH18 (Sf) Auf Geschutzwagen HOTCHKISS 39H(f) 1:35th scale | 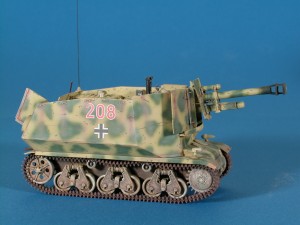
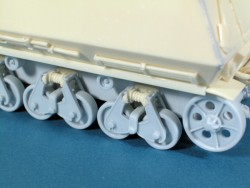
| History This is one of many self-propelled guns that the German army produced during World War 2. The need for mobile artillery guns to keep pace with the fast moving panzers forced the German High Command to mount artillery guns on any chassis that was reliable. Fortunately for the Germans, they had captured many French tanks during the 1940 campaign and were able to use these for many self-propelled gun chassis. While the French tanks proved to be no match for the onslaught of German panzers, they were however very reliable mechanically. The gun used on this particular conversion was the excellent 10.5cm leFH18 howitzer. Production started in 1935 and several manufacturers produced the gun. Weighing in at just less than 2 tons, the gun was nonetheless easy to manipulate by the gun crew. With a qualified crew, the gun could maintain a sustained rate of fire of 6 rounds per minute. It had a muzzle velocity of 540 meters per second and a maximum range of 12,325 meters. The gun used 3 basic forms of ammunition. The first was the FH Gr., which was a high explosive shell; the next was the 10cm Pzgr., which was a capped armor piercing round and the third was the 10cm Gr.39 rot H1. All of these rounds had separate charges and shells. In 1940 the standard 10.5cm leFH 18 field piece was modified to accept a more powerful, longer-range projectile. This necessitated changes to the recoil system and the addition of a muzzle brake. The gun was then designated 10.5cm leFH 18M, the M meaning Mudungbremse (muzzle brake). The Kit The kit is a multi media affair consisting of styrene, resin, photo-etch and copper wire. The kit is based on the Heller Hotchkiss 39 tank kit and all of the main components of the lower hull are from this kit. Now this is not a conversion kit, as all required pieces are included. There are 121 resin pieces for the upper hull and main gun. The track links are also supplied in resin and the kit requires 114 links per side. There are a few extras included. Also includes is a beautifully executed sheet of photo-etch. There are 77 pieces mainly for brackets, tie-downs, and the covers for the gun recuperators. Lastly, there is a short piece of copper wire included. This adds up to 470 parts total. Definitely not an afternoon project! The instruction sheet is one of the best that I have seen included in a mainly resin kit. The assembly is broken down into 9 very well laid out steps. Included on the instruction sheet are a parts layout (very necessary because none of the parts are numbered) and a side view photo of the completed kit. The resin components of this kit are simply exquisite. With the exception of 2 very minor pinholes, all parts are crisp and flawless. The detail is stunning and I found myself examining each part closely so as not to miss any thing! Construction 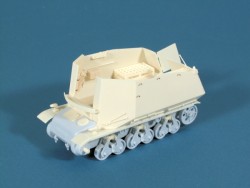 Step 1 is the assembly of the lower chassis. This consists of several flat plates glued together to form the lower hull. Careful alignment is necessary so as to keep the hull square. Fortunately the Heller components fit just fine. This is also where I noticed that the drawings in the instructions didn't match the parts exactly. Now don't get me wrong, as this does not cause any major problems. It does however mean you need to pay close attention and test fit everything. The instructions call for the solid rear idler wheels, parts P140, but most of my reference materials show a rear wheel with several holes in it. Also the box top shows this configuration. Both types of idler wheels are included in the kit, so you can decide for yourself. The construction of the bogie assemblies starts the use of the resin components and you can immediately see that this is going to be a super detailed kit. The resin parts fit the plastic pieces perfectly. I left off the front drive sprockets (parts R56) until it was time to install the track links. Step 1 is the assembly of the lower chassis. This consists of several flat plates glued together to form the lower hull. Careful alignment is necessary so as to keep the hull square. Fortunately the Heller components fit just fine. This is also where I noticed that the drawings in the instructions didn't match the parts exactly. Now don't get me wrong, as this does not cause any major problems. It does however mean you need to pay close attention and test fit everything. The instructions call for the solid rear idler wheels, parts P140, but most of my reference materials show a rear wheel with several holes in it. Also the box top shows this configuration. Both types of idler wheels are included in the kit, so you can decide for yourself. The construction of the bogie assemblies starts the use of the resin components and you can immediately see that this is going to be a super detailed kit. The resin parts fit the plastic pieces perfectly. I left off the front drive sprockets (parts R56) until it was time to install the track links. 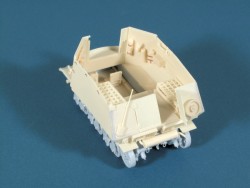 Step 2 is the assembly of the major interior components, and the fenders. There are a few alignment pins on the inside of the hull that will need to be removed before the main floor (part R3) can be installed. Also part R3 needs to be installed all of the way forward. Parts R4 and R5 are the main fenders and here was the only place in the whole kit that required any filling with putty. Where the resin fenders meet the plastic front glacis plate (part P186) a major gap resulted. This was easily filled with several coats of Gunze Mr. Surfacer 500. The nice thing with this filler is that it can be smoothed out with its own thinner and requires no sanding. Once this was done, the rest of the fenders and interior parts were added. Step 2 is the assembly of the major interior components, and the fenders. There are a few alignment pins on the inside of the hull that will need to be removed before the main floor (part R3) can be installed. Also part R3 needs to be installed all of the way forward. Parts R4 and R5 are the main fenders and here was the only place in the whole kit that required any filling with putty. Where the resin fenders meet the plastic front glacis plate (part P186) a major gap resulted. This was easily filled with several coats of Gunze Mr. Surfacer 500. The nice thing with this filler is that it can be smoothed out with its own thinner and requires no sanding. Once this was done, the rest of the fenders and interior parts were added.
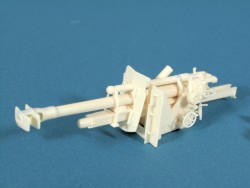 Step 3 is the assembly of the main combat compartment. This consisted of the largest resin parts in the kit. No problems were encountered, as the quality of the castings was perfect. Step 3 is the assembly of the main combat compartment. This consisted of the largest resin parts in the kit. No problems were encountered, as the quality of the castings was perfect.
Step 4 is the construction of the gun platform and the front shield assembly. I assembled the gun mount but did not mount it until the interior was painted. The front gun shield again fit perfectly. Also included in this step are several small detail parts for the front of the vehicle. Step 5 is the assembly of the rear detail parts. Again the parts are wonderful. The muffler (part R97) even has dents molded into it! 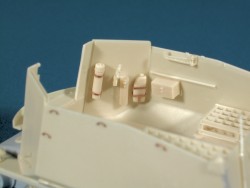 Steps 6 and 7 are the interior detailing and this is where this kit really shines. All of the internal equipment that is hung on the walls includes photo etch mounting brackets. This really adds super detail to each of the components. One nice option of the kit is that you can install the brackets only if you like. I went for the full load of equipment. The radio set (parts R64, R102, and R87) features some of the best detail that I have ever seen on parts before. There are even wing nuts molded into these parts! Part R54 is the most delicate part of the kit and requires very careful sanding. This is the storage grid for the shells. This is extremely fine when sanding is completed, so be careful and take your time. My kit featured a spare part in case you go too far! This completes the interior assembly. Steps 6 and 7 are the interior detailing and this is where this kit really shines. All of the internal equipment that is hung on the walls includes photo etch mounting brackets. This really adds super detail to each of the components. One nice option of the kit is that you can install the brackets only if you like. I went for the full load of equipment. The radio set (parts R64, R102, and R87) features some of the best detail that I have ever seen on parts before. There are even wing nuts molded into these parts! Part R54 is the most delicate part of the kit and requires very careful sanding. This is the storage grid for the shells. This is extremely fine when sanding is completed, so be careful and take your time. My kit featured a spare part in case you go too far! This completes the interior assembly.
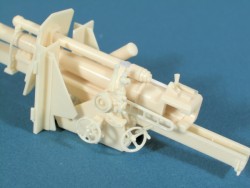 Step 8 is the gun assembly. The first thing that I noticed was that the resin barrel was straight! The detail here may even be better than the rest of the kit if that is possible. Parts R21 and R118 are braces for the gun and neither one matched the drawings. Again this was no problem as it was easy to figure out what parts were needed. Parts PE2 and PE4 are the gun recuperator covers. I did not install these on my kits based on my reference materials. The muzzle brake requires careful sanding and again my kit had a spare muzzle brake included. Step 8 is the gun assembly. The first thing that I noticed was that the resin barrel was straight! The detail here may even be better than the rest of the kit if that is possible. Parts R21 and R118 are braces for the gun and neither one matched the drawings. Again this was no problem as it was easy to figure out what parts were needed. Parts PE2 and PE4 are the gun recuperator covers. I did not install these on my kits based on my reference materials. The muzzle brake requires careful sanding and again my kit had a spare muzzle brake included.
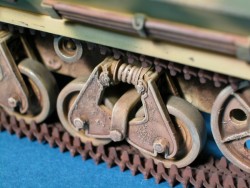
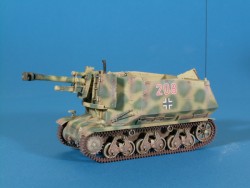
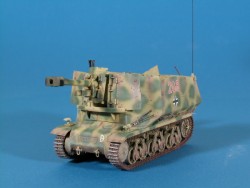
Step 9 is the assembly of the gun mount and the front shields. The gun cradle (part R29) did not fit my gun very well but a little minor surgery on parts R66 and R67 fixed this. I left the gun loose so as to make painting easier. Painting 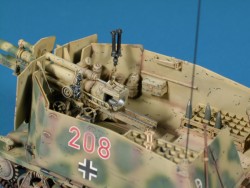 With assembly completed I base painted the kit with Tamiya Dark Yellow. I removed the gun and painted it as a separate item. Once the kit was base painted, I lightened up the base color about 30% with white and applied it to the centers of all the panels. The next step was to apply the camouflage pattern with Tamiya Flat Green. I then lightened it by 30% and applied it to the center of the camo pattern. Once this was dried I painter all of the detail parts, road wheels, and tools. I left this set over night and then proceeded to apply a very thin wash of Lamp Black oil paint to the entire vehicle. This wash accomplishes 2 things. It evens out the base and fade coats and it also tones down the "bright" colors. I applied a heavier wash mix to the interior, especially around the drive train. With assembly completed I base painted the kit with Tamiya Dark Yellow. I removed the gun and painted it as a separate item. Once the kit was base painted, I lightened up the base color about 30% with white and applied it to the centers of all the panels. The next step was to apply the camouflage pattern with Tamiya Flat Green. I then lightened it by 30% and applied it to the center of the camo pattern. Once this was dried I painter all of the detail parts, road wheels, and tools. I left this set over night and then proceeded to apply a very thin wash of Lamp Black oil paint to the entire vehicle. This wash accomplishes 2 things. It evens out the base and fade coats and it also tones down the "bright" colors. I applied a heavier wash mix to the interior, especially around the drive train. 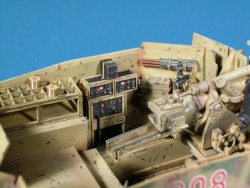 The next step was to add a very thin mix of Tamiya Flat Earth and Tamiya Desert Yellow (mixed 50/50) with the airbrush to all of the panel lines and recesses to add a dingy look to the tank. I also used this mix to add streaks to the main paint coat. This mix was also applied more heavily to the running gear and lower hull. The next step was to add a "pin wash" of Van Dyke Brown to the entire vehicle. This adds a dirty look to the kit. The next step was to add a very thin mix of Tamiya Flat Earth and Tamiya Desert Yellow (mixed 50/50) with the airbrush to all of the panel lines and recesses to add a dingy look to the tank. I also used this mix to add streaks to the main paint coat. This mix was also applied more heavily to the running gear and lower hull. The next step was to add a "pin wash" of Van Dyke Brown to the entire vehicle. This adds a dirty look to the kit.
A mix of Lamp Black and Van Dyke Brown was added heavily to the lower hull and running gear. The next paint step wash a dry brush coat mixed up of Pale Yellow Ochre, White, Van Dyke Brown and a touch of Sap Green. This accented all of the edges and raised details. The metal parts of the tools were covered with graphite for a metalized look. The final paint step was to apply "paint chips" with Vallejo Black Grey thinned 50/50 with water. This was applied in a very random pattern. Conclusion If you can pronounce the name of this kit then building it should present no problems! The resin is the best that I have seen on any armor subject and the fit is great. This is not a project for beginners, but if you have a little experince with resin then this kit should not be a problem. I am anxiously waiting to see what new subjects are coming from Tiger Werke as this one is outstanding! My thanks to Tiger Werke for the review samples.
| 


|
 Step 1 is the assembly of the lower chassis. This consists of several flat plates glued together to form the lower hull. Careful alignment is necessary so as to keep the hull square. Fortunately the Heller components fit just fine. This is also where I noticed that the drawings in the instructions didn't match the parts exactly. Now don't get me wrong, as this does not cause any major problems. It does however mean you need to pay close attention and test fit everything. The instructions call for the solid rear idler wheels, parts P140, but most of my reference materials show a rear wheel with several holes in it. Also the box top shows this configuration. Both types of idler wheels are included in the kit, so you can decide for yourself. The construction of the bogie assemblies starts the use of the resin components and you can immediately see that this is going to be a super detailed kit. The resin parts fit the plastic pieces perfectly. I left off the front drive sprockets (parts R56) until it was time to install the track links.
 Step 2 is the assembly of the major interior components, and the fenders. There are a few alignment pins on the inside of the hull that will need to be removed before the main floor (part R3) can be installed. Also part R3 needs to be installed all of the way forward. Parts R4 and R5 are the main fenders and here was the only place in the whole kit that required any filling with putty. Where the resin fenders meet the plastic front glacis plate (part P186) a major gap resulted. This was easily filled with several coats of Gunze Mr. Surfacer 500. The nice thing with this filler is that it can be smoothed out with its own thinner and requires no sanding. Once this was done, the rest of the fenders and interior parts were added.
 Step 3 is the assembly of the main combat compartment. This consisted of the largest resin parts in the kit. No problems were encountered, as the quality of the castings was perfect.
 Steps 6 and 7 are the interior detailing and this is where this kit really shines. All of the internal equipment that is hung on the walls includes photo etch mounting brackets. This really adds super detail to each of the components. One nice option of the kit is that you can install the brackets only if you like. I went for the full load of equipment. The radio set (parts R64, R102, and R87) features some of the best detail that I have ever seen on parts before. There are even wing nuts molded into these parts! Part R54 is the most delicate part of the kit and requires very careful sanding. This is the storage grid for the shells. This is extremely fine when sanding is completed, so be careful and take your time. My kit featured a spare part in case you go too far! This completes the interior assembly.
 Step 8 is the gun assembly. The first thing that I noticed was that the resin barrel was straight! The detail here may even be better than the rest of the kit if that is possible. Parts R21 and R118 are braces for the gun and neither one matched the drawings. Again this was no problem as it was easy to figure out what parts were needed. Parts PE2 and PE4 are the gun recuperator covers. I did not install these on my kits based on my reference materials. The muzzle brake requires careful sanding and again my kit had a spare muzzle brake included.
  With assembly completed I base painted the kit with Tamiya Dark Yellow. I removed the gun and painted it as a separate item. Once the kit was base painted, I lightened up the base color about 30% with white and applied it to the centers of all the panels. The next step was to apply the camouflage pattern with Tamiya Flat Green. I then lightened it by 30% and applied it to the center of the camo pattern. Once this was dried I painter all of the detail parts, road wheels, and tools. I left this set over night and then proceeded to apply a very thin wash of Lamp Black oil paint to the entire vehicle. This wash accomplishes 2 things. It evens out the base and fade coats and it also tones down the "bright" colors. I applied a heavier wash mix to the interior, especially around the drive train.
  The next step was to add a very thin mix of Tamiya Flat Earth and Tamiya Desert Yellow (mixed 50/50) with the airbrush to all of the panel lines and recesses to add a dingy look to the tank. I also used this mix to add streaks to the main paint coat. This mix was also applied more heavily to the running gear and lower hull. The next step was to add a "pin wash" of Van Dyke Brown to the entire vehicle. This adds a dirty look to the kit.