| Tamiya 1/48 Republic P-47D 'Razorback' Thunderbolt | 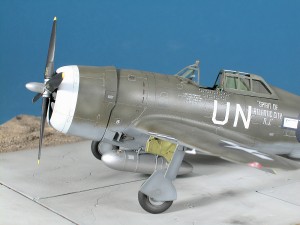 | History The P-47D first appeared in April 1943. It was equipped with R-2800-59 engine featuring a water injection system that could generate up to 2300hp in an emergency situation. Ducts on the sides and below the fuselage connected to the supercharger that was placed behind the pilots seat and this contributed to the aircrafts massive 4-ton form. The"Razorback" was so named because of the sharp edged dorsal fin running from the canopy to the upper fuselage. The P-47D equipped many units such as the 56th Fighter group and was used to escort the B-17 and B-24 bombers as far as western Germany. After the introduction of the longer range P-51 in the autumn of 1944, the P-47 was used for the ground attack role. The planes robust construction and its 1-ton payload capacity proved perfect for this role. The Kit 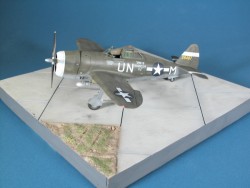 Let me start this review by saying: WOW! This kit is superb. The detail is unbelievable. Everything in this kit is nice, the instructions, the parts, the decals, everything. Lets get into construction. Let me start this review by saying: WOW! This kit is superb. The detail is unbelievable. Everything in this kit is nice, the instructions, the parts, the decals, everything. Lets get into construction.
Step 1 begins with the construction of the cockpit and the detail is exquisite. This rivals most of the resin aftermarket sets that I have seen. The only thing that I added was seatbelts from Eduard. The kit is supplied with a decal for the seatbelts. I laid the supplied decal over the instrument panel and with a couple of coats of Micro Sol it laid down wonderfully. Painting was carried out throughout construction. 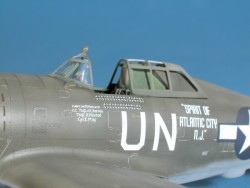 Step 2 is the installation of the wing spars and the supercharger into the fuselage. The wing spars also form the rear of the landing gear wells and the fit is nice and snug. Step 2 is the installation of the wing spars and the supercharger into the fuselage. The wing spars also form the rear of the landing gear wells and the fit is nice and snug.
Step 3 is the fuselage halves and the cockpit installation. The fit here is as perfect as I have seen. No filler was needed anywhere. 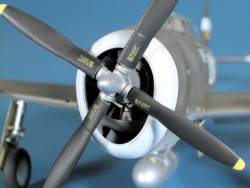 Step 4 is the construction of the engine and the detail is, again, simply superb. I spent a little extra time with the detail painting here but keep in mind that most of this cannot be seen on the finished model. I know it's there though. Step 4 is the construction of the engine and the detail is, again, simply superb. I spent a little extra time with the detail painting here but keep in mind that most of this cannot be seen on the finished model. I know it's there though.
Step 5 is the installation of the stabilizers and the rear supercharger doors. These can be built opened or closed. Step 6 is the construction of the wings and here again fit was perfect. 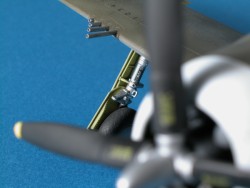 Step 7 is the installation of the wings and the engine cowling. The design of the wing spars makes the wing root joint nearly flawless. Also in this step, is the installation of the machine gun mounts. You P-47 experts out there will notice that the guns set level to the ground, not to the wing. Finally, they got it right! Lets pause for a round of applause here for Tamiya. Step 7 is the installation of the wings and the engine cowling. The design of the wing spars makes the wing root joint nearly flawless. Also in this step, is the installation of the machine gun mounts. You P-47 experts out there will notice that the guns set level to the ground, not to the wing. Finally, they got it right! Lets pause for a round of applause here for Tamiya.
Step 8 is the construction of the landing gear. One nice feature here is that the wheels have separate hubs and this makes painting very easy. 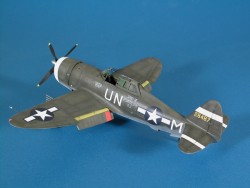 Steps 9 and 10 are the construction and installation of the flaps. These can be built up or down. Steps 9 and 10 are the construction and installation of the flaps. These can be built up or down.
Step 11 is the construction of the propeller and you have 3 options here. Step 12 is the final details parts, the canopy, machine gun barrels, Pitot tube and gun sight. Yet another detail with this kit is the machine gun barrels are opened on the end, no need to replace them with tube. Steps 13, 14 and 15 are the construction and installation of the under wing armaments and the drop tanks. You have lots of options here: bombs, rockets and 2 different style of drop tanks. Painting 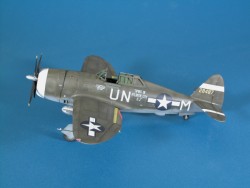 I began painting by putting a base coat of Tamiya Olive Drab on the top of the aircraft. I used Tamiya Neutral Grey for the bottom. Once the base coat was done I mixed a lighter coat of the Olive Drab and “faded” the upper surfaces. The cowl ring and the tail strips were masked off and painted Tamiya White. I began painting by putting a base coat of Tamiya Olive Drab on the top of the aircraft. I used Tamiya Neutral Grey for the bottom. Once the base coat was done I mixed a lighter coat of the Olive Drab and “faded” the upper surfaces. The cowl ring and the tail strips were masked off and painted Tamiya White.
Once the basic painting was finished, I applied 2 thin coats of Future Floor wax and set the aircraft aside to dry over night. I then did all of the detail painting. After drying over night I started to apply the kit decals and they laid down super nice. I had the entire aircraft decaled in about an hour and a half! Once the decals had dried, I put a light coat of Gunze Flat on to restore the flat finish. Weathering began with an overall wash of Lamp Black oil paint to even out the paint and to slightly tone down the decals. I applied a light pin wash with Van Dyke Brown oil paint to accent the panel lines. The last step was to apply a small amount of silver pencil to represent paint chips. 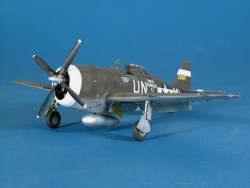 Conclusion Conclusion
This is the nicest aircraft kit that I have assembled. The fit and finish of the parts is second to none. The kit was built out of the box except for the Eduard seatbelts, including the decals. No filler was needed any where on this kit. I spent about 15 hours on mine. Highly recommended!
| 


|

 Let me start this review by saying: WOW! This kit is superb. The detail is unbelievable. Everything in this kit is nice, the instructions, the parts, the decals, everything. Lets get into construction.
 Step 2 is the installation of the wing spars and the supercharger into the fuselage. The wing spars also form the rear of the landing gear wells and the fit is nice and snug.
 Step 4 is the construction of the engine and the detail is, again, simply superb. I spent a little extra time with the detail painting here but keep in mind that most of this cannot be seen on the finished model. I know it's there though.
 Step 7 is the installation of the wings and the engine cowling. The design of the wing spars makes the wing root joint nearly flawless. Also in this step, is the installation of the machine gun mounts. You P-47 experts out there will notice that the guns set level to the ground, not to the wing. Finally, they got it right! Lets pause for a round of applause here for Tamiya.
 Steps 9 and 10 are the construction and installation of the flaps. These can be built up or down.
 I began painting by putting a base coat of Tamiya Olive Drab on the top of the aircraft. I used Tamiya Neutral Grey for the bottom. Once the base coat was done I mixed a lighter coat of the Olive Drab and “faded” the upper surfaces. The cowl ring and the tail strips were masked off and painted Tamiya White.
  Conclusion


