Heller's Fieseler 156 Storch/MS.500 Criquet in 1/72nd Scale | 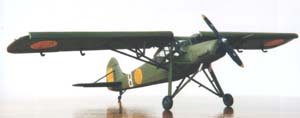 | Introduction A detailed discussion of this aircraft is unnecessary. There is a large literature in print and on the web about the Storch. Developed by the Germans in the mid-1930s, the Storch could fly at 32 mph under full control, land with a roll of less than 45 feet and take off in under 150 feet. These capabilities made it a popular aeroplane, even after 1945, the Storch was used by numerous countries, providing modellers with an almost endless range of schemes from which to choose. Also, the Storch was produced in France by Morane-Saulnier as the MS 500/502 Criquet. 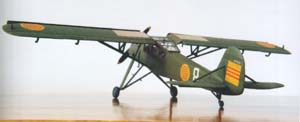 About three years ago I came across what I found to be an extremely unusual looking aeroplane model: this was the Airfix kit of the Fieseler Storch which I felt would be an interesting model to build. Time passed and I came upon the Smer kit, which is a re-release of the Heller kit, and I was intrigued, especially by the South Vietnamese Air Force decals in the kit, even though the kit was probably inaccurate for that particular version, manufactured after World War II in France - the MS.500 Criquet. About three years ago I came across what I found to be an extremely unusual looking aeroplane model: this was the Airfix kit of the Fieseler Storch which I felt would be an interesting model to build. Time passed and I came upon the Smer kit, which is a re-release of the Heller kit, and I was intrigued, especially by the South Vietnamese Air Force decals in the kit, even though the kit was probably inaccurate for that particular version, manufactured after World War II in France - the MS.500 Criquet. My attempt to make this somewhat odd-looking model failed. I had masked off the canopy and had sprayed the fuselage, only to realize afterwards that I had not smoothed down all the Elmers Glue I had used as filler for the fuselage-to-canopy join: into the bin it went. About three months ago I started the Academy Storch kit: an improvement on the Smer/Heller kit. I got as far as attempting to glue the multi-part canopy and messed it up: more bin material. In the interim, I had purchased a couple of the original Heller kits, one for a dollar, another for about four dollars. I pulled one of them out and started again. The Heller Storch is certainly not state of the art by some of today's kit's standards: it has a few raised panel lines, not too much interior detail but it is a decent kit. Cockpit and fuselage 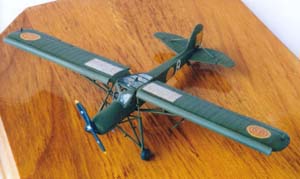 Construction began in the cockpit area. Given my prior failures with this model, I was interested only in a simple out-of-the-box project: no fancy aftermarket products for me on this one. To be honest, the large greenhouse canopy and the resultant ability to see inside the cockpit could easily use more detail but I had experienced sufficient problems building this model and wanted to concentrate on actually getting it finished. The cockpit is simple enough: only a couple of seats, a control column and an instrument panel. I added a couple of sets of simple-looking seatbelts using foil from a champagne bottle. I sprayed the interior a dark green and glued the fuselage halves. Once this was set, there was plenty of seams to take care of, while at the same time trying not to destroy too much of the detail, some of which is a little heavy. One or two of the small bits were knocked off during the seam filling process but I replaced them afterwards with bits of styrene. Construction began in the cockpit area. Given my prior failures with this model, I was interested only in a simple out-of-the-box project: no fancy aftermarket products for me on this one. To be honest, the large greenhouse canopy and the resultant ability to see inside the cockpit could easily use more detail but I had experienced sufficient problems building this model and wanted to concentrate on actually getting it finished. The cockpit is simple enough: only a couple of seats, a control column and an instrument panel. I added a couple of sets of simple-looking seatbelts using foil from a champagne bottle. I sprayed the interior a dark green and glued the fuselage halves. Once this was set, there was plenty of seams to take care of, while at the same time trying not to destroy too much of the detail, some of which is a little heavy. One or two of the small bits were knocked off during the seam filling process but I replaced them afterwards with bits of styrene. The canopy 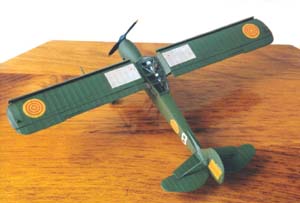 Usually, the canopy is the last piece I add before painting, mainly because it is can easily be ruined by a careless glue blob or scratched during construction. The big hurdle for me with the Criquet was that the clear part canopy had to be installed before the wings because it represents an integral part of the wing-to-fuselage structure and the fact that there are so many pieces to the canopy. Not only are there multiple pieces but also the parts must be aligned carefully to ensure the canopy as a whole fits together and fits properly with the fuselage. I had tried several methods of gluing this seven-piece canopy. First, I tried regular super glue, which was too quick to dry and made a mess. Then, I tried odourless super glue, which didn't set up very well and was therefore ineffective. Finally, I tried coating the clear parts in Future and then used simple Testors' glue from the orange tube: it worked, not flawlessly but good enough. Usually, the canopy is the last piece I add before painting, mainly because it is can easily be ruined by a careless glue blob or scratched during construction. The big hurdle for me with the Criquet was that the clear part canopy had to be installed before the wings because it represents an integral part of the wing-to-fuselage structure and the fact that there are so many pieces to the canopy. Not only are there multiple pieces but also the parts must be aligned carefully to ensure the canopy as a whole fits together and fits properly with the fuselage. I had tried several methods of gluing this seven-piece canopy. First, I tried regular super glue, which was too quick to dry and made a mess. Then, I tried odourless super glue, which didn't set up very well and was therefore ineffective. Finally, I tried coating the clear parts in Future and then used simple Testors' glue from the orange tube: it worked, not flawlessly but good enough.  Once this had set up, it was time to mask off the canopy. Again, this was a task where success for me had been elusive. My primary interest in modeling is building World War One biplanes where canopies are almost non-existent (one reason to build old biplanes by the way). I tried a number of different methods. First, I thought about using decal paper sprayed with the same colour as the model: no way this would work for me - too much framework. Next I tried wrapping the entire canopy in Parafilm and cutting out the frames, leaving the film over the windows. This proved equally impossible because the Exacto blade is never sharp enough to perform this task adequately. Then I tried wrapping the entire canopy in Tamiya masking tape and doing the same - again, no success. I decided that I'd have to mask each window separately, which is probably obvious to anyone who has done this sort of thing a few times. Yes, it's mildly tedious cutting out 21 bits of masking to go over each pane and it took me a couple of evenings but it was really quite simple. Once this had set up, it was time to mask off the canopy. Again, this was a task where success for me had been elusive. My primary interest in modeling is building World War One biplanes where canopies are almost non-existent (one reason to build old biplanes by the way). I tried a number of different methods. First, I thought about using decal paper sprayed with the same colour as the model: no way this would work for me - too much framework. Next I tried wrapping the entire canopy in Parafilm and cutting out the frames, leaving the film over the windows. This proved equally impossible because the Exacto blade is never sharp enough to perform this task adequately. Then I tried wrapping the entire canopy in Tamiya masking tape and doing the same - again, no success. I decided that I'd have to mask each window separately, which is probably obvious to anyone who has done this sort of thing a few times. Yes, it's mildly tedious cutting out 21 bits of masking to go over each pane and it took me a couple of evenings but it was really quite simple. Wings and main assembly 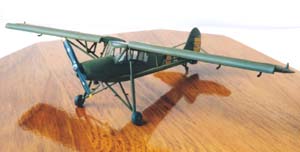 Once I had completed the canopy masking I proceeded to add the wings. First, I glued the wing halves and the control pieces on the leading edges. The major issue here is with alignment and to ensure the wings join up neatly with the fuselage. I did need to add some putty but for the most part, this was an uneventful and straightforward part of the process. Similarly, the tail parts and their associated struts went on without any difficulty. I added the nose to the fuselage, which needed some putty and had to be blended carefully into he rest of the fuselage. Once I had completed the canopy masking I proceeded to add the wings. First, I glued the wing halves and the control pieces on the leading edges. The major issue here is with alignment and to ensure the wings join up neatly with the fuselage. I did need to add some putty but for the most part, this was an uneventful and straightforward part of the process. Similarly, the tail parts and their associated struts went on without any difficulty. I added the nose to the fuselage, which needed some putty and had to be blended carefully into he rest of the fuselage. Painting 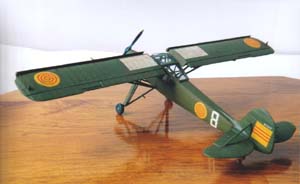 Now that I had completed the main assembly, it was time to paint. I chose the simplest possible scheme: an all-over olive drab for a Criquet used by the South Vietnamese Air Force in the early 1950s. I found a profile and some pictures of this aircraft in the Squadron-In-Action publication, though I am aware that there is evidence that the Heller kit does not portray this particular version of the Fi-156 accurately, primarily because the fabric covering of the wing was replaced by a metal skin. This means that if you really want to do the Vietnam version accurately, you need to sand off all the rib detail from the wing. I was concerned about this issue but not sufficiently so to do anything to correct it. I pushed ahead, spraying the assembly olive drab, which went on easily enough. Now that I had completed the main assembly, it was time to paint. I chose the simplest possible scheme: an all-over olive drab for a Criquet used by the South Vietnamese Air Force in the early 1950s. I found a profile and some pictures of this aircraft in the Squadron-In-Action publication, though I am aware that there is evidence that the Heller kit does not portray this particular version of the Fi-156 accurately, primarily because the fabric covering of the wing was replaced by a metal skin. This means that if you really want to do the Vietnam version accurately, you need to sand off all the rib detail from the wing. I was concerned about this issue but not sufficiently so to do anything to correct it. I pushed ahead, spraying the assembly olive drab, which went on easily enough. Landing gear 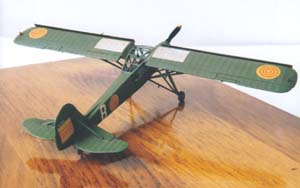 The landing gear and their struts were next. Once again, this is another area of the kit that provides some builders with problems. You need to line up and dry-fit the pieces carefully but the Heller kit fits quite well, so I had few problems. One problem is that some of these parts are too thick for the scale and could be replaced by scratchbuilding. Once again I eschewed any deviation that was going to steer me away from completing this kit, such had been my record of previous failures. The landing gear and their struts were next. Once again, this is another area of the kit that provides some builders with problems. You need to line up and dry-fit the pieces carefully but the Heller kit fits quite well, so I had few problems. One problem is that some of these parts are too thick for the scale and could be replaced by scratchbuilding. Once again I eschewed any deviation that was going to steer me away from completing this kit, such had been my record of previous failures. Decals 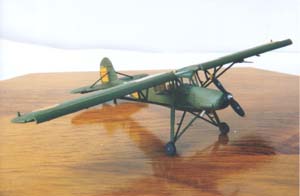 Once the landing gear and other small odds and ends were glued on, I gave the entire model a coat of Future in preparation for the decals. I used the decals that I had saved from the Smer release of this kit. These decals adhered well but they were too transparent, and the white rectangles on the top of the wing were somewhat blotchy. To try and cover this up somewhat, I sprayed the model with Testors Clear Flat and when that was dry, I gave the model a burnt umber oil wash. Not only did this reduce the blotchy effect on the decals but it also gave the model more depth of appearance. Further, I do not like to leave any part of a model perfectly white, so the oil wash certainly took care of that. I added some pastel chalk weathering and that was the finish. I noticed from the pictures that the Vietnam Criquet did not have the rod connecting the control cable to the tail rudder, so I filled in the canopy hole and left this piece off. Once the landing gear and other small odds and ends were glued on, I gave the entire model a coat of Future in preparation for the decals. I used the decals that I had saved from the Smer release of this kit. These decals adhered well but they were too transparent, and the white rectangles on the top of the wing were somewhat blotchy. To try and cover this up somewhat, I sprayed the model with Testors Clear Flat and when that was dry, I gave the model a burnt umber oil wash. Not only did this reduce the blotchy effect on the decals but it also gave the model more depth of appearance. Further, I do not like to leave any part of a model perfectly white, so the oil wash certainly took care of that. I added some pastel chalk weathering and that was the finish. I noticed from the pictures that the Vietnam Criquet did not have the rod connecting the control cable to the tail rudder, so I filled in the canopy hole and left this piece off. Conclusion This was one of my more satisfying builds though by no means will this win any major competitions. Nevertheless, the model is, in my opinion, an attractive one and worth having on my shelf: a most curious looking aeroplane to be sure. The kit is also inexpensive: I picked mine up in a sale for about $4, so I would recommend this model to those who have had some experience. References -
Frantisek Koran and Martin Velek. "Fieseler Fi 156 Storch in Detail." Wings & Wheels Publications, Prague, Czech Republic. 2000. -
Jim Meshko and Don Greer. "VNAF: South Vietnamese Air Force 1945-1975." Squadron/Signal Publications, Inc., Carrollton, Texas, U.S.A. 1987 | 


|

 About three years ago I came across what I found to be an extremely unusual looking aeroplane model: this was the Airfix kit of the Fieseler Storch which I felt would be an interesting model to build. Time passed and I came upon the Smer kit, which is a re-release of the Heller kit, and I was intrigued, especially by the South Vietnamese Air Force decals in the kit, even though the kit was probably inaccurate for that particular version, manufactured after World War II in France - the MS.500 Criquet.
  Construction began in the cockpit area. Given my prior failures with this model, I was interested only in a simple out-of-the-box project: no fancy aftermarket products for me on this one. To be honest, the large greenhouse canopy and the resultant ability to see inside the cockpit could easily use more detail but I had experienced sufficient problems building this model and wanted to concentrate on actually getting it finished. The cockpit is simple enough: only a couple of seats, a control column and an instrument panel. I added a couple of sets of simple-looking seatbelts using foil from a champagne bottle. I sprayed the interior a dark green and glued the fuselage halves. Once this was set, there was plenty of seams to take care of, while at the same time trying not to destroy too much of the detail, some of which is a little heavy. One or two of the small bits were knocked off during the seam filling process but I replaced them afterwards with bits of styrene.
  Usually, the canopy is the last piece I add before painting, mainly because it is can easily be ruined by a careless glue blob or scratched during construction. The big hurdle for me with the Criquet was that the clear part canopy had to be installed before the wings because it represents an integral part of the wing-to-fuselage structure and the fact that there are so many pieces to the canopy. Not only are there multiple pieces but also the parts must be aligned carefully to ensure the canopy as a whole fits together and fits properly with the fuselage. I had tried several methods of gluing this seven-piece canopy. First, I tried regular super glue, which was too quick to dry and made a mess. Then, I tried odourless super glue, which didn't set up very well and was therefore ineffective. Finally, I tried coating the clear parts in Future and then used simple Testors' glue from the orange tube: it worked, not flawlessly but good enough.
  Once this had set up, it was time to mask off the canopy. Again, this was a task where success for me had been elusive. My primary interest in modeling is building World War One biplanes where canopies are almost non-existent (one reason to build old biplanes by the way). I tried a number of different methods. First, I thought about using decal paper sprayed with the same colour as the model: no way this would work for me - too much framework. Next I tried wrapping the entire canopy in Parafilm and cutting out the frames, leaving the film over the windows. This proved equally impossible because the Exacto blade is never sharp enough to perform this task adequately. Then I tried wrapping the entire canopy in Tamiya masking tape and doing the same - again, no success. I decided that I'd have to mask each window separately, which is probably obvious to anyone who has done this sort of thing a few times. Yes, it's mildly tedious cutting out 21 bits of masking to go over each pane and it took me a couple of evenings but it was really quite simple.
  Once I had completed the canopy masking I proceeded to add the wings. First, I glued the wing halves and the control pieces on the leading edges. The major issue here is with alignment and to ensure the wings join up neatly with the fuselage. I did need to add some putty but for the most part, this was an uneventful and straightforward part of the process. Similarly, the tail parts and their associated struts went on without any difficulty. I added the nose to the fuselage, which needed some putty and had to be blended carefully into he rest of the fuselage.
 Now that I had completed the main assembly, it was time to paint. I chose the simplest possible scheme: an all-over olive drab for a Criquet used by the South Vietnamese Air Force in the early 1950s. I found a profile and some pictures of this aircraft in the Squadron-In-Action publication, though I am aware that there is evidence that the Heller kit does not portray this particular version of the Fi-156 accurately, primarily because the fabric covering of the wing was replaced by a metal skin. This means that if you really want to do the Vietnam version accurately, you need to sand off all the rib detail from the wing. I was concerned about this issue but not sufficiently so to do anything to correct it. I pushed ahead, spraying the assembly olive drab, which went on easily enough.
 The landing gear and their struts were next. Once again, this is another area of the kit that provides some builders with problems. You need to line up and dry-fit the pieces carefully but the Heller kit fits quite well, so I had few problems. One problem is that some of these parts are too thick for the scale and could be replaced by scratchbuilding. Once again I eschewed any deviation that was going to steer me away from completing this kit, such had been my record of previous failures.
  Once the landing gear and other small odds and ends were glued on, I gave the entire model a coat of Future in preparation for the decals. I used the decals that I had saved from the Smer release of this kit. These decals adhered well but they were too transparent, and the white rectangles on the top of the wing were somewhat blotchy. To try and cover this up somewhat, I sprayed the model with Testors Clear Flat and when that was dry, I gave the model a burnt umber oil wash. Not only did this reduce the blotchy effect on the decals but it also gave the model more depth of appearance. Further, I do not like to leave any part of a model perfectly white, so the oil wash certainly took care of that. I added some pastel chalk weathering and that was the finish. I noticed from the pictures that the Vietnam Criquet did not have the rod connecting the control cable to the tail rudder, so I filled in the canopy hole and left this piece off.


