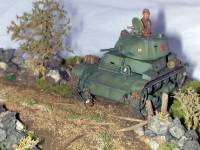
Skif's 1/72nd T-26-1 (1939)
|
 |
History
Like quite a few European and East European light tanks,
the T-26 began life as a variant of the Vickers "E" light tank.
This started in 1931 with the signing of a contract for the licensed production
of what the Russians designated the T-26. This was to be the start of
a production run that would produce over 12000 tanks up to 1941. Obviously
this will not be a complete history of this little tank and all its variants.
That would fill several books. I'll just concentrate on the T-26 M1939.
 First
a little information on the designation. I've seen various publications
calling out the T-26A,B & C. From my research, these were German designations,
not Russian. The Russian system designated them as T-26 M1931 (Model 1931)-
German T-26A, T-26 M1933 - German T-26B, T-26 M1939- German T-26C. Confused
? Don't feel alone. When one really starts digging into the various mods
and variants, it really gets confusing! First
a little information on the designation. I've seen various publications
calling out the T-26A,B & C. From my research, these were German designations,
not Russian. The Russian system designated them as T-26 M1931 (Model 1931)-
German T-26A, T-26 M1933 - German T-26B, T-26 M1939- German T-26C. Confused
? Don't feel alone. When one really starts digging into the various mods
and variants, it really gets confusing!
The T-26 M1939 was produced from 1939-41. The main modifications
were sloped armor with improved engine ventilators. It was equipped with
a 45mm main gun, but remember, at that time the Russian military actually
classified it as an "Infantry", or close support tank. In August
of 1939 there were over 8,500 T-26's in service, by far the most common
tank in Russian service.
 From
my research, it seems the T-26 could handle itself against the Panzer
I and II fairly well. But once she went up against the Panzer III it was
a different thing. But one also has to remember that Russian doctrine
at the time tied the tankers to the infantry, not as a fast moving hard
hitting separate arm. Obviously this was to change. From
my research, it seems the T-26 could handle itself against the Panzer
I and II fairly well. But once she went up against the Panzer III it was
a different thing. But one also has to remember that Russian doctrine
at the time tied the tankers to the infantry, not as a fast moving hard
hitting separate arm. Obviously this was to change.
The T-26 was in action in the Spanish Civil War, the Russian-Finnish
War, and the conflict between Russia and Japan starting in 1938 at Hasan
Lake.
The T-26 had a crew of three, Driver, Gunner, and Commander.
Top speed was roughly 35 KM/h with a combat range of approximately 160
km.
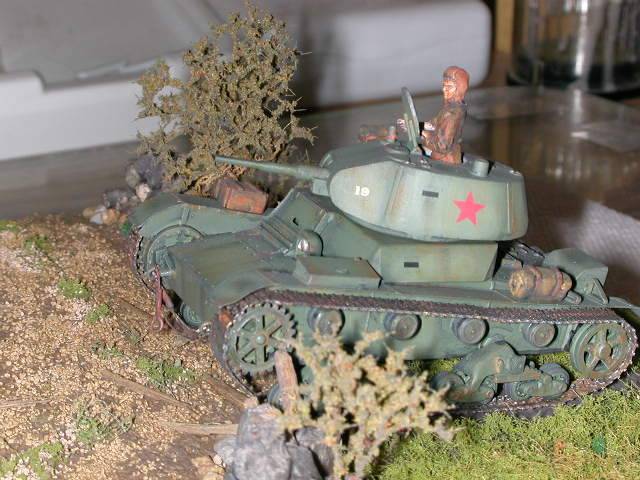
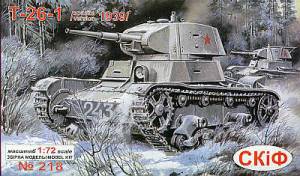
The Kit
 Several
years ago a small Ukranian model company under the name of Skif produced
several T-26 variants in 1/72nd scale. What really interested me was the
inclusion of a photo etch sheet including fenders. The kit is Skif # 218,
T-26 M1939. Unfortunately it also included rubber tracks. I personally
have never liked these in 1/72nd scale. But along came Part with a PE
sheet of T-26 tracks, now we had a winner, so I thought. Several
years ago a small Ukranian model company under the name of Skif produced
several T-26 variants in 1/72nd scale. What really interested me was the
inclusion of a photo etch sheet including fenders. The kit is Skif # 218,
T-26 M1939. Unfortunately it also included rubber tracks. I personally
have never liked these in 1/72nd scale. But along came Part with a PE
sheet of T-26 tracks, now we had a winner, so I thought.
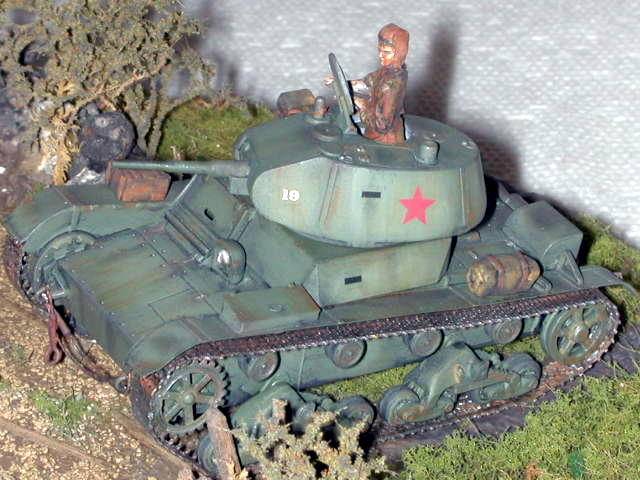
The kit is approximately 140 pieces. I would not recommend
this as a beginner kit. Only due to the amount of small parts and the
PE fenders can be a pain in mounting. The kit itself was a decent build.
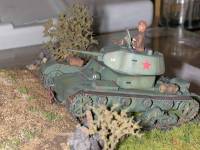
No major fit problems were encountered. I opened the Commander's hatch
just as a personal thing.
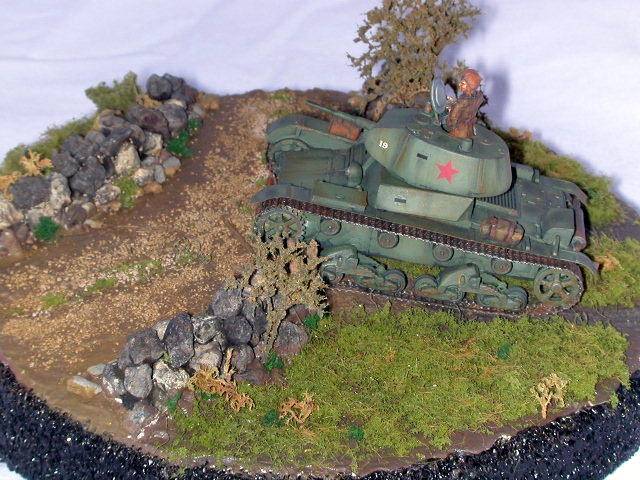
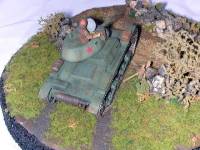
One note here, this is not a diorama. I just like to show
armor with a figure for scale, and in its "Natural Habitat".
Whenever my armor models go to a show, I leave it to the Judges as to
what class they prefer it placed in. All my armor is built this way just
for my enjoyment at home.
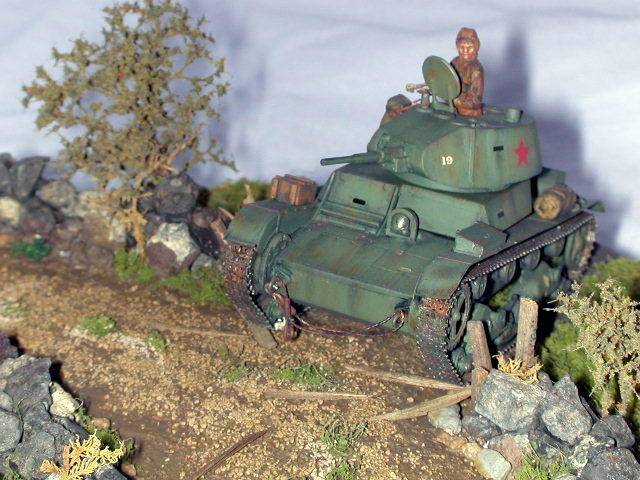
 The
PE fenders are a real boon to the model. They are thin enough for scale,
plus you can bend them up to show the damage always taken in normal
usage. The reinforcing straps on the fenders are raised, and when highlighted
with paint really help the appearance. The spotlight was replaced with
an MV lense from a RR shop. The forward tow cable was made from stranded
electrical wire, and the tow chain on the rear from the RR shop. The
rolled blanket, Commander's "pouch", and utility box came
from Verlinden's 1/72nd armor accessory kit. The
PE fenders are a real boon to the model. They are thin enough for scale,
plus you can bend them up to show the damage always taken in normal
usage. The reinforcing straps on the fenders are raised, and when highlighted
with paint really help the appearance. The spotlight was replaced with
an MV lense from a RR shop. The forward tow cable was made from stranded
electrical wire, and the tow chain on the rear from the RR shop. The
rolled blanket, Commander's "pouch", and utility box came
from Verlinden's 1/72nd armor accessory kit.
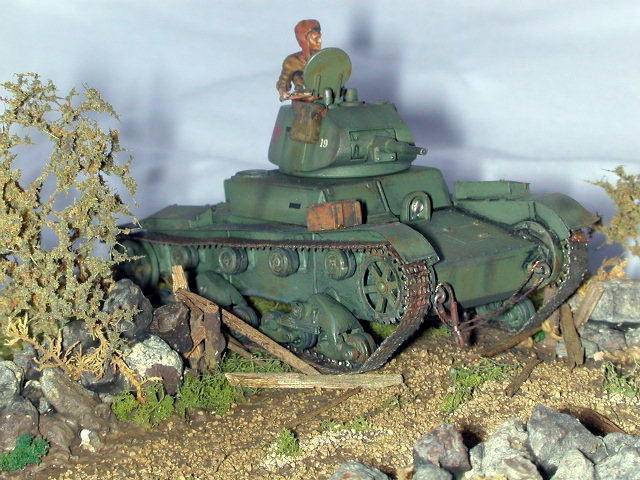
Now for the Part Tracks. Are they worth it? In my estimation...you
bet! They are a pain, be there no doubt, but the end product is worth
it. The part tracks come in various length segments. You will have a
4 way fold to accomplish to get a straight length. Then I used medical
tweezers to place and form them around the wheels and sprockets. I painted
them dark metal first, then washed them with several tints of brown,
with minor rust highlights.
Colors
 I
know....Colors ? Looks more like single color to me. Actually this is
what drew me to this project. I've read several articles over the last
few years about painting single color models and the ability to "Bring
them to life" utilizing highlights, shadows, and mild weathering.
In my opinion, the armor modelers do this much better than us wing modelers.
This is actually my first true experiment with this. I have a long way
to go. I
know....Colors ? Looks more like single color to me. Actually this is
what drew me to this project. I've read several articles over the last
few years about painting single color models and the ability to "Bring
them to life" utilizing highlights, shadows, and mild weathering.
In my opinion, the armor modelers do this much better than us wing modelers.
This is actually my first true experiment with this. I have a long way
to go.
The model was pre-shaded with black first. Next came the
basic color of Russian Armor Green. Next came a lightened spray in certain
areas of the basic color. At this point is where the designers gouache
washes come in. If you haven't heard of these, treat yourself to some.
These tubes are acrylic pastes available in most art supply stores. A
little goes a long way, so just try some smaller tubes. Essentially you
just put a dab of the color you want on a palette, water it down to taste,
then wash the area you wish to highlight. This is extremely effective
where molded details such as grills, panel lines, or handles are. Let
the gouache dry, usually about 5-10 minutes. Now starts the fun part.
Dampen a Q-tip, and start streaking or removing the color. Depending how
hard you rub, this 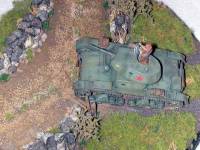 will
remove more or less of the highlight color. This technique leaves extremely
effective streaks, runs, and stains in my opinion. Note this works best
on flat paint to provide bite. But if you are not satisfied with the results,
wet a clean Q-Tip and remove the highlight color and start over. These
gouaches come in all colors, I favor black, dark gray, burnt sienna, and
raw umber. Aircraft modeler's note: this also works great for wheel well
interiors, engine cowl flaps, panel lines, and flight controls. Ship modeler's
note: a terrific way to highlight and bring out the deck gratings, limber
holes, etc. At any rate, give it a try. will
remove more or less of the highlight color. This technique leaves extremely
effective streaks, runs, and stains in my opinion. Note this works best
on flat paint to provide bite. But if you are not satisfied with the results,
wet a clean Q-Tip and remove the highlight color and start over. These
gouaches come in all colors, I favor black, dark gray, burnt sienna, and
raw umber. Aircraft modeler's note: this also works great for wheel well
interiors, engine cowl flaps, panel lines, and flight controls. Ship modeler's
note: a terrific way to highlight and bring out the deck gratings, limber
holes, etc. At any rate, give it a try.
The Base
The base is nothing more than a 6" X 1" styrofoam disc
picked up at a local department store's craft section. They are cheap,
light, and can be carved and shaped to various landscapes. Most of the
foliage comes from model railroad supplies. Be inventive, that's half
the fun.
Conclusion
 This
was a fun build. The most important feature was learning about the painting
and coloring techniques of real armor builders. One note here, I've recently
read on other digests apparently Skif has ceased production and was taken
over by UM (Unimodel)? But this is unconfirmed, so if you want some examples
of Skif’s kits, start hunting. T-26 models in 1/72nd are now coming
at us hot and heavy. Mirage is releasing examples of most of the T-26
family, plus there is talk of RPM jumping on the bandwagon. If this is
so, there will be plenty to choose from. This
was a fun build. The most important feature was learning about the painting
and coloring techniques of real armor builders. One note here, I've recently
read on other digests apparently Skif has ceased production and was taken
over by UM (Unimodel)? But this is unconfirmed, so if you want some examples
of Skif’s kits, start hunting. T-26 models in 1/72nd are now coming
at us hot and heavy. Mirage is releasing examples of most of the T-26
family, plus there is talk of RPM jumping on the bandwagon. If this is
so, there will be plenty to choose from.
(Editors note: Actually what has happened was that Skif is now only
doing 1/35th, while some of the original people from Skif started Unimodel
(UM) to concentrate on 1/72nd scale and has the T-26 molds. MEB)
One final note. If you want to see better models, photos, and articles,
get off your butts and do them. We can't expect the IM staff to do it
all. Figure it this way, folks, if you're reading this, these poor guys
were so desperate, they printed my stuff!
Enjoy.......and keep building.
|


|