Czech Master Resin 1/72 Westland Welkin By Tom Gloeckle | 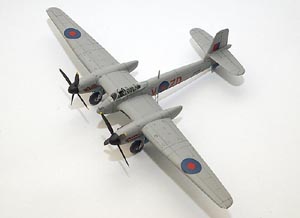 | Overview I want to start this article with a correction from the First look of this kit. I did a little research on the Internet and discovered that there were around 75 Welkin built, still not a significant number, particularly because the Luftwaffe ceased high altitude bomber missions, so the need for the Welkin no longer existed. I started this kit by washing all the parts in warm soapy water. This initial step is very important as there is mold release on the parts, and paint will not adhere properly if not washed. The second important step in building resin is priming the parts. I used Gunze Sangyo Resin Primer from a jar for the small parts, and Tamiya Plastic and Metal spray primer for the overall construction. Priming needs to be done as the paint, regardless of type, will not stick to the raw resin. I use Poly Scale and Testors Acryl exclusively as I don’t like the toxic odor of enamels. Construction 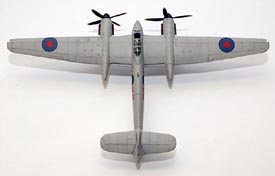 Construction started with the cockpit, as usual. The instrument panel, floor, stick, and behind seat bulkhead with what I believe are ammo boxes are molded in one piece! How the mold makers do this and have beautiful detail is amazing! The sidewall detail is finely molded on the inside of the fuselage. The seat and a structural support of some kind are separate. I added an Eduard photo etched harness to finish off the detail. The cockpit was painted RAF interior gray-green with the instrument panel, stick grip, and various electrical boxes interior black. I then added a dark wash and lightened base color dry brushed to bring out the detail. The cockpit was completed with a little weathering with Prismacolor silver pencil. There was a minor amount of filing and sanding, particularly around the instrument panel to get the fuselage together. Construction started with the cockpit, as usual. The instrument panel, floor, stick, and behind seat bulkhead with what I believe are ammo boxes are molded in one piece! How the mold makers do this and have beautiful detail is amazing! The sidewall detail is finely molded on the inside of the fuselage. The seat and a structural support of some kind are separate. I added an Eduard photo etched harness to finish off the detail. The cockpit was painted RAF interior gray-green with the instrument panel, stick grip, and various electrical boxes interior black. I then added a dark wash and lightened base color dry brushed to bring out the detail. The cockpit was completed with a little weathering with Prismacolor silver pencil. There was a minor amount of filing and sanding, particularly around the instrument panel to get the fuselage together.
The fuselage halves go together reasonably well, particularly for a resin kit. Don’t forget to insert the small detail part at the very back of the fuselage before the halves are put together. This would be a good time to bring up putty. I used a two part automotive type glazing putty, this was chosen for its ability to adhere well to the resin. I prefer this versus toluene-based putties for the same reasons toluene based glues will not work with resin. The two parts takes some practice to work with, but is quite easy to sand and will not crack or shrink over time. 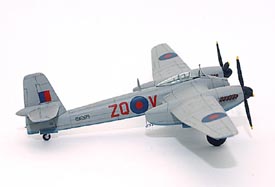 The flying surfaces have pins molded on to go into corresponding holes in the fuselage to ensure a strong positive joint. However, I chose to replace the pins with 1/16th inch aluminum tubing. I also used 5-minute epoxy to make the solid wing/nacelle combination as secure as possible. Epoxy also allows the time needed to set the wing dihedral correctly according to the instructions. The stabilizers were simply set at zero dihedral. The only problem area was the separate cowling that goes over the wing-mounted radiators. One of the cowls fit was fair, but the other was quite undersized, and ended up using Miliput to blend in with the fuselage. I glued the gear doors in place after the flying surfaces were cleaned up as I thought this would be less troublesome than trying to mount them after the model was painted. The wheel wells were quite basic, being part of a one-piece mold. I didn’t see this as too big a problem as information was very sketchy about this plane. Besides figuring out how to detail these would be very complicated. The oil cooler screens are very small and delicate. I snapped off one of the mounting brackets and had to replace it with a small scrap of plastic. The flying surfaces have pins molded on to go into corresponding holes in the fuselage to ensure a strong positive joint. However, I chose to replace the pins with 1/16th inch aluminum tubing. I also used 5-minute epoxy to make the solid wing/nacelle combination as secure as possible. Epoxy also allows the time needed to set the wing dihedral correctly according to the instructions. The stabilizers were simply set at zero dihedral. The only problem area was the separate cowling that goes over the wing-mounted radiators. One of the cowls fit was fair, but the other was quite undersized, and ended up using Miliput to blend in with the fuselage. I glued the gear doors in place after the flying surfaces were cleaned up as I thought this would be less troublesome than trying to mount them after the model was painted. The wheel wells were quite basic, being part of a one-piece mold. I didn’t see this as too big a problem as information was very sketchy about this plane. Besides figuring out how to detail these would be very complicated. The oil cooler screens are very small and delicate. I snapped off one of the mounting brackets and had to replace it with a small scrap of plastic.
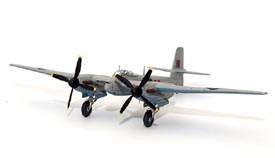 The landing gear was constructed as a typical subassembly and painted flat aluminum. I do have a question about the landing gear. I believe at some point this manufacturer would be best served to mold their under carriage in white metal. Resin kits can be rather heavy, and landing gear may ultimately be weakened to the point of collapse over time. Anyway, the detail on the under carriage is quite delicate, particularly the trailing actuating struts. The locating pins for the wheels is not very large, and the holes in the wheels they mount to are small, another possible weak place. One of the more frustrating bits of the kit is the propellers. There is no direction in the instructions on how to properly mount the individual blades to the spinner. I ended up using some logic based on how the props spin on the Westland Whirlwind and the Mosquito. So I drilled out the holes a little in the spinner and set the pitch on the blades to spin counter clockwise. I painted the blades flat black with yellow tips, and the spinner satin black. The finished props were butt joined to the nacelles after painting was completed. The landing gear was constructed as a typical subassembly and painted flat aluminum. I do have a question about the landing gear. I believe at some point this manufacturer would be best served to mold their under carriage in white metal. Resin kits can be rather heavy, and landing gear may ultimately be weakened to the point of collapse over time. Anyway, the detail on the under carriage is quite delicate, particularly the trailing actuating struts. The locating pins for the wheels is not very large, and the holes in the wheels they mount to are small, another possible weak place. One of the more frustrating bits of the kit is the propellers. There is no direction in the instructions on how to properly mount the individual blades to the spinner. I ended up using some logic based on how the props spin on the Westland Whirlwind and the Mosquito. So I drilled out the holes a little in the spinner and set the pitch on the blades to spin counter clockwise. I painted the blades flat black with yellow tips, and the spinner satin black. The finished props were butt joined to the nacelles after painting was completed.
Painting 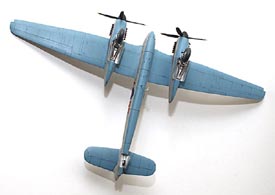 As I stated earlier, the model was primed using Tamiya primer, and preshaded with thinned flat black. This was necessary as the scribing is very fine and could have been lost in painting. I finished the model in the high altitude scheme of sea gray medium and PRU blue undersides of the Flight Interception Unit in 1944. After the paint had dried, I sealed the model with Future in preparation for the decals. The decals are thin, glossy, and went down well using Microscale Sol and Set with no silvering evident. I finished with Polyscale clear flat and went over the panel lines with thinned black paint. As I stated earlier, the model was primed using Tamiya primer, and preshaded with thinned flat black. This was necessary as the scribing is very fine and could have been lost in painting. I finished the model in the high altitude scheme of sea gray medium and PRU blue undersides of the Flight Interception Unit in 1944. After the paint had dried, I sealed the model with Future in preparation for the decals. The decals are thin, glossy, and went down well using Microscale Sol and Set with no silvering evident. I finished with Polyscale clear flat and went over the panel lines with thinned black paint.
Final Assembly The smaller detail parts and under carriage were added at this point. The most difficult part to work with in the entire kit was the boarding ladder. It is unbelievably delicate as it is quite scale, very difficult to remove from its pouring stud without breaking, and no better once mounted. I broke it once while handling the model. The wing tip lights are molded in clear resin, which is nice, if you don’t undercut one like I did, and the other one I cut a little too big and needed a little sanding. There was a fair amount of flash around the exhaust stubs, so I cleaned them up, painted them a mix of rust and black, and mounted to the engine nacelle. Two aerials were mounted on the fuselage along with that boarding ladder. 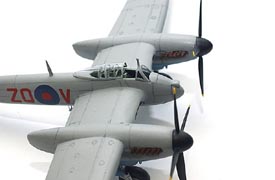 The canopy is vacformed, and two are included in the kit. I concluded after some fit testing, that the canopy was best cut apart and placed in the open position. I dipped the canopy in Future to increase clarity and prevent fogging from super glue. Before adding the canopy, that small behind seat structure of unknown use was mounted. It is important to sand as much of the bottom of this part as carefully as possible. If you don’t do enough sanding then the canopy will not sit properly. The canopy was added with tiny drops of super glue. The windscreen was faired in with the fuselage using thinned white glue, and the final delicate part added was the mirror on the windscreen. The canopy is vacformed, and two are included in the kit. I concluded after some fit testing, that the canopy was best cut apart and placed in the open position. I dipped the canopy in Future to increase clarity and prevent fogging from super glue. Before adding the canopy, that small behind seat structure of unknown use was mounted. It is important to sand as much of the bottom of this part as carefully as possible. If you don’t do enough sanding then the canopy will not sit properly. The canopy was added with tiny drops of super glue. The windscreen was faired in with the fuselage using thinned white glue, and the final delicate part added was the mirror on the windscreen.
Conclusion Overall, a very enjoyable and reasonably pain free model, with only the most minor of trouble areas. The Welkin is a really big model, the wingspan is about the same as a 1/48th scale Hornet, de Havilland that is. This is not a “shake and make” model, but certainly less traumatic than some injection molded kits I’ve worked with. I think Czech Master Resin makes some the nicest resin kits around. They also have done quite a few British subjects, and that makes this Anglophile Yank very happy indeed! I thank Chris and Czech Model for allowing me to build this kit
| 


|
