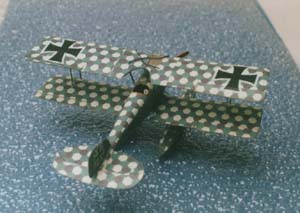
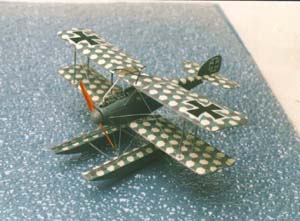
Roden 1/72 Albatros W.4 by Joel Christy |  | Introduction  The Albatros W.4 was that company's answer to the 1916 request from the German Navy for a single seat floatplane fighter. Although the proposed fighter appeared to look like an Albatros scout on floats, it was really much heavier and larger. This in turn meant that the sea-borne product had none of the manoeuvrability of the smaller aircraft. In the end none of the single seater floatplanes were as suitable to Naval requirements as were the larger two seat Hansa Brandenberg and Friedrichschafen airplanes subsequently supplied to the German Navy. For a more detailed history of the Albatros W.4 see the Windsock Mini-Datafile published by Albatros Publications Ltd. The Albatros W.4 was that company's answer to the 1916 request from the German Navy for a single seat floatplane fighter. Although the proposed fighter appeared to look like an Albatros scout on floats, it was really much heavier and larger. This in turn meant that the sea-borne product had none of the manoeuvrability of the smaller aircraft. In the end none of the single seater floatplanes were as suitable to Naval requirements as were the larger two seat Hansa Brandenberg and Friedrichschafen airplanes subsequently supplied to the German Navy. For a more detailed history of the Albatros W.4 see the Windsock Mini-Datafile published by Albatros Publications Ltd. The Kit Roden has again produced a fine kit of an interesting World War One subject. We are now used to the beautifully illustrated box and the logical layout of the sprues. As the W.4 was a Naval aircraft the kit includes a comprehensive hexagonal camouflage decal sheet. On examination of my issue of the kit I found a bit of flash and a blemish on one wing panel but nothing that couldn't be corrected with a bit of wet'n'dry sandpaper. I started construction by slicing off the vents on the fuselage sides as shown in the plan. This was easily done as the plastic is quite soft and after a little cleaning up with wet'n'dry there was no sign of the vents. Next I simply gave the inside of the fuselage sides a coat of Tamiya Clear Orange to indicate a varnished wood interior. Then the basic but adequate rudder bar, seat and control column were installed. Roden's engines are always a joy to make and the one in the W.4 is no exception, it's just a shame that they are always buried in the finished model! After gluing it all together I gave the engine a coat of Humbrol number 106 gray and a wash of Tamiya Smoke to bring out the detail. I also dry fitted this item several times before closing up the fuselage. I used clamps to make sure the seams were very tight as this is important when it comes to cleaning them up. After the fuselage was thoroughly dry I scraped it down with a sharp scalpel blade to get rid of any sign of the seams. Next I turned to the flying surfaces. As always I separated the control surfaces. With Roden kits this is easy as one only has to cut the slot at the trailing edge, score the hinge and bend the control surface to the desired amount. Typical of Roden's attention to detail they have even included a bit of washout to the ailerons, nice one. The top wing is made up of three parts and it is therefore necessary to make good tight joints. I did this by taping the centre section to the work mat and gluing the wing panels to either side after making sure all the gluing surfaces were completely square. With the top wing prepared I turned to the lower wing. This is in two parts and again careful preparation is needed to make sure that after the panels are glued to the fuselage they do not fall off during construction; a most annoying occurrence as I'm sure some modelers know! Also at this point I put just a tiny amount of dihedral in the lower wing. I do this because there is nothing that spoils the look of a completed model like anhedril. This often happens with subjects like the Albatros aircraft that appear dead flat. Just a tiny amount of dihedral will alleviate this problem. I treated the tail surfaces the same as the wings. When ready I attached them to the fuselage. The floats are in three pieces but one has to be careful when cleaning the tops, as the connecting struts are very fragile. With all the parts prepared I started putting them all together. As the fuselage has two separate parts to cover the engine the fit is not all that it should be and it is necessary to do quite a bit of cleaning up, especially around the nose. I found I had to glue the top cockpit/engine cowling a bit at a time and once the nose ring was in place some judicious sanding of all the seams resulted in a nicely shaped fuselage. I do like Roden's feature of supplying a separate Albatros nose-ring as it is the way the actual aircraft was made and looks more realistic than the earlier Airfix, Pegasus and Eduard models. When I had the basic construction completed I painted the panel areas with Humbrol 164 satin Dark Sea Gray and the under surfaces number 74 Oak as I find the latter color more suitable to a natural fabric tone than the Linen. I also used the Dark Gray on all the flying surfaces edges so that when the lozenge decals were applied there would be no noticeable gap showing the light gray plastic. Next I gave the top surfaces a coat of clear polyurethane for good decal adhesion but I here came upon a big problem. I don't know if it was just my issue of the kit or if it is a defect common to all of Roden's W.4s; the decals were all splintered. Fortunately I started to apply the decals to the top wing's centre-section and I was able to save that bit. Once I discovered the problem I tried to coat the decal sheet with Johnson's Kleer [NOTE: "Future" to those in North America - RNP] but that didn't work. Then I decided to paint the whole sheet with clear polyurethane. This worked after a fashion but once applied the splintering still continued especially around the leading edges. Any handling of the parts resulted in a bit of decal lifting. Well, as there was no alternative to the decals I had to persevere but I would advise anyone building the model to first test the decals before proceeding. If splintering occurs one can do as I did or look for after market decals [NOTE: Americal/Gryphon have very nice naval lozenge - RNP]. Once on, the lozenge settled down on the plastic with the help of Microset but it needed several coats of Kleer and I was always apprehensive during the final construction lest I lift the decals. When decaling the floats I diverged slightly from the plans and only covered the top edges of them as I felt the fuel filler caps and the slats would have been painted dark gray. For the final stage of construction care must be taken with the very thin struts for the wings and floats. I chose to attach the cabane struts first and let them dry in position thoroughly. Then I glued on the top wing and finally when all was lined up and ready put on the interplane struts. This worked fine but I felt I needed to replace the float struts with brass wire as the kit parts simply would not have enough strength. The kit provides the rest of the details such as radiator piping, exhaust pipe, aileron connectors and machine gun. I made the lifting cables for the center section out of thin cord stained with a magic marker and attached them with white PVA glue. Lastly I rigged the model with hot stretched sprue and that completed the model. Conclusion I probably had more trouble building this model than other Roden products but I feel the overall quality of the kit out weighs its defects. It was the poor quality of the decals that was most disturbing as they are integral to the completion of a well-made model. All I can again say is, check that the decals do not splinter before trying to apply them or even before commencing construction. However once completed the Roden Albatros W.4 looked great and will replace my old Merlin model I made a few years ago. | 


|
