Omega's Moska Bystritski MB bis in 1/72nd Scale | 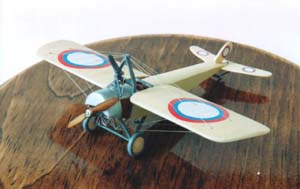 | Background I thought initially that the derivation of this aeroplane's name, Moska, came from the Russian name for Moscow (Moskva) but this is not the case. The Moska Bystritski (MB) bis was a joint product of Francesco Evgistovich Moska, an Italian who came to Russia in 1912, and his Russian assistant, Bystritski. According to Durkota et al. Moska started his own factory after the First World War began. The MB bis, of which about 50 were built, was an up-engined single seat version of its two-seat predecessor, the MB: with an 80hp Le Rhöne replacing the 50hp Gnome. These monoplanes had wings and a tail that could be folded down, as shown on the box art and I had considered briefly the idea of building it as such. However, sanity took hold and I decided upon a more straightforward path. 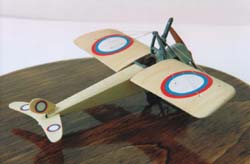 I should preface this review by stating that I found this model a little heavy going for my taste. As is usually the case, some of this was due to my preferences and inadequacies as a modeler, and some due to the kit's contents. For my part, I suppose I am not as keen as I thought I'd be on building World War One monoplanes. Also, I am not too fond of dealing with resin kits. I find the use of super glue and resin epoxy glue to be more difficult than the usual glues I use for plastic kits. The kit itself had some problems, not the least of which was the scant instructions comprising one sheet of unclear indications of which parts should go where. It was difficult to see what the components should look like when they were in place. That, plus the dearth of reference materials, made for some problems and forced me into the realm of fantasy as far as certain parts of the build were concerned. I should preface this review by stating that I found this model a little heavy going for my taste. As is usually the case, some of this was due to my preferences and inadequacies as a modeler, and some due to the kit's contents. For my part, I suppose I am not as keen as I thought I'd be on building World War One monoplanes. Also, I am not too fond of dealing with resin kits. I find the use of super glue and resin epoxy glue to be more difficult than the usual glues I use for plastic kits. The kit itself had some problems, not the least of which was the scant instructions comprising one sheet of unclear indications of which parts should go where. It was difficult to see what the components should look like when they were in place. That, plus the dearth of reference materials, made for some problems and forced me into the realm of fantasy as far as certain parts of the build were concerned. A review of this kit was featured in an earlier edition of Internet Modeler so I will not go into detail here about the box contents. Fuselage 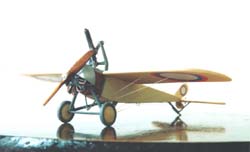 The fuselage comprises two pieces: one large piece with a slot for the cockpit components and another smaller piece that covers the cockpit and upper-forward part of the fuselage. The large piece had a hole underneath the cockpit and I could not tell initially whether this was meant to be there or not. I decided it was the remains of a huge air bubble and filled it with super glue: not a difficult task. The fuselage comprises two pieces: one large piece with a slot for the cockpit components and another smaller piece that covers the cockpit and upper-forward part of the fuselage. The large piece had a hole underneath the cockpit and I could not tell initially whether this was meant to be there or not. I decided it was the remains of a huge air bubble and filled it with super glue: not a difficult task. The next job was to "fill in" the fuselage pieces. The kit supplies you with a decent control stick, foot rudder control and seat, which are fine. I added a fantasy-based instrument panel for good measure. The problem is getting the inside of the cockpit to look decent. The walls are thick and it is difficult to sand them down, given the single piece configuration. Had the fuselage had the usual split into port and starboard halves, this would have been more straightforward. I suppose I might have split the fuselage myself but that would be a tricky process, especially with resin. I sanded it down the best I could using the trusty Dremel MiniMite. I also had to sand out the area aft of the seat so I could put in a bulkhead; it looked terrible left as it was. When I did this, I filled the cockpit with a little water to reduce the dust and basically Dremeled this thing underwater.  Once I had made the walls as smooth as possible, I added the rear bulkhead and used strips of brown painted decal paper strips to represent the interior framework. As with several part of this model, the framework pattern was a complete guess. I added some seatbelts formed from pieces of champagne bottle foil and closed the fuselage lid Once I had made the walls as smooth as possible, I added the rear bulkhead and used strips of brown painted decal paper strips to represent the interior framework. As with several part of this model, the framework pattern was a complete guess. I added some seatbelts formed from pieces of champagne bottle foil and closed the fuselage lid The engine The kit provides you with a fairly attractive 9-cylinder Le Rhone engine with separate cylinders and pipes that you are to attach to a central component, and a length of thin wire from which to form push rods. My first problem was that one of the cylinders was missing: I probably lost it myself, so I cannot blame the manufacturer. A second problem was that one of the cylinders had broken off: again, it is difficult to know when this occurred and it too could have been my fault. It turned out to be less of a problem than I had anticipated because at least three cylinders were hidden inside the cowl. Once assembled, I painted the engine dark grey and dry-brushed it with aluminium. I had to drill out a fair amount of the cowl to make room for the engine but eventually it fit well enough and I attached the cowl to the fuselage. Wings 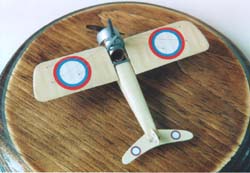 The first thing I noticed about the wings was that the detail was fairly nice and subdued. The second thing I noticed was they were as thick as the cheddar cheese sandwiches my mother used to make me for school lunches. I did not really consider sanding these down and replacing the detail: it would have been quicker and easier to replace them with plastic card, and the amount of resin dust generated would have been considerable. I left the wings as they were and continued as best I could. There are no holes in the fuselage attachments or the wings so you are presumably supposed to butt-join these things. I drilled two small holes in the wing root and corresponding holes at the fuselage attachment points. Then I inserted small lengths of 28 gauge copper wire and glued them with super glue. I followed this up by fixing on the tail parts. The first thing I noticed about the wings was that the detail was fairly nice and subdued. The second thing I noticed was they were as thick as the cheddar cheese sandwiches my mother used to make me for school lunches. I did not really consider sanding these down and replacing the detail: it would have been quicker and easier to replace them with plastic card, and the amount of resin dust generated would have been considerable. I left the wings as they were and continued as best I could. There are no holes in the fuselage attachments or the wings so you are presumably supposed to butt-join these things. I drilled two small holes in the wing root and corresponding holes at the fuselage attachment points. Then I inserted small lengths of 28 gauge copper wire and glued them with super glue. I followed this up by fixing on the tail parts. Painting Given that the flying surfaces and fuselage were now attached, I decided it was time to paint. First, I sprayed the front fuselage and cowl with aluminium. Next, I stuffed wet tissue paper into the cockpit and masked off the front fuselage, then I used Model Master "Aged White" acrylic paint to spray the entire assembly. Following that, I brush painted Model Master "Wood" onto the side and underside panels of the front fuselage. To obtain the wood grain effect, I applied gouache watercolour paints - burnt umber, black, burnt sienna and yellow ochre - with a wet Q-tip and then covered that with Tamiya Clear Yellow paint and Future floor polish. Once this was dry, I covered the entire assembly with Model Master Clear Flat and applied a burnt umber oil wash to all the Clear Doped Linen surfaces. There was a little sidewall detail on the fuselage and I used watercolour pencils to highlight it further. Undercarriage and other struts 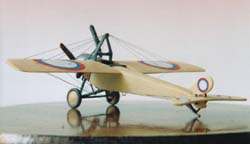 With most monoplanes, you get away without struts and such: not so here. I drilled out holes in the fuselage's underside for the landing gear legs and I cut some plastic rod for the spreader. After some playing and filling, they went together fairly well. In doing this, I used 5-minute epoxy glue because super glue, even the gel, does not give me sufficient time to play around with the alignment. With most monoplanes, you get away without struts and such: not so here. I drilled out holes in the fuselage's underside for the landing gear legs and I cut some plastic rod for the spreader. After some playing and filling, they went together fairly well. In doing this, I used 5-minute epoxy glue because super glue, even the gel, does not give me sufficient time to play around with the alignment. The next task was the underside struts that support the rigging. There are two components to this: one is between the undercarriage legs and the other is a bit aft of that. For the life of me, I could not fathom which of the kit's components were supposed to be used for this and what it was supposed to look like at the finish. I found a total of four pictures of the Moska MB bis and none gave me a really clear view of these components. I decided that that Mr. Moska must have copied, to some extent anyway, machines using the state of technology at that time, so I went to the Flying Machines Press tome on French World War One aeroplanes and looked at the structure of the Moraine Saulnier Type-G. I tried to follow that as much as I could, using plastic rod and bits of piano wire to make the components. In contrast to this confusion, the topside rigging support was fairly straightforward and I attached that without any problem. I fashioned a tailskid from plastic and attached the wheels without too much difficulty. The propeller too was dealt with in my standard way: namely, Model Master "Wood" as a base, followed by the water gouache paints applied with a wet Q-tip, Tamiya Clear Yellow and Future. Rigging and decals I had left the decals in the box loose with all the parts, and a few nicks had appeared in a couple of the roundels. This immediately indicated that they might be a bit fragile so I sprayed them with Microscale Liquid Decal. I had no further problems with them. I gave the fuselage and flying surface a couple of coats of Future, and applied the decals, trimming them carefully. They were a little thick but went on fairly well. I touched-up the tiny nicks in the decals with the appropriate colour paint and it was onto the rigging! 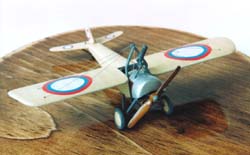 The rigging was straightforward. The diagram in the box is somewhat helpful and I found some stuff on the web that helped too. I used 0.005-inch straight wire from Small Parts Inc. I measured the length to be cut using dividers, trimmed off the necessary wire using wire cutters, and glued it on with Elmers white glue. Another coat of Testors Clear Flat followed by a brush painting of the "wooden" panels on the fuselage sides and the propeller, and I was done. The rigging was straightforward. The diagram in the box is somewhat helpful and I found some stuff on the web that helped too. I used 0.005-inch straight wire from Small Parts Inc. I measured the length to be cut using dividers, trimmed off the necessary wire using wire cutters, and glued it on with Elmers white glue. Another coat of Testors Clear Flat followed by a brush painting of the "wooden" panels on the fuselage sides and the propeller, and I was done. Conclusion As I mentioned above, this kit has some shortcomings but that is to be expected from a fairly inexpensive resin kit. I believe the kit's components are acceptable for this type of kit at this price. Certainly, thinning the wings and providing thin split fuselage halves would be nice but that would raise the cost considerably, I would guess. One improvement that should be made is a clearer set of detailed instructions rather than the sort of exploded and imprecise diagrams provided. Is it a perfect kit? No, but then I am not a perfect modeler. Bottom line: this kit builds into what I would call an acceptable model. The subject matter is fairly esoteric and references are thin on the ground so at least the manufacturer has made a fair attempt to provide you with a decent option. References -
Dr. James J. Davilla and Arthur M. Soltan. "French Aircraft of the First World War." Flying Machines Press, Stratford, CT, USA. 1997. -
Alan Durkota, Thomas Darcey and Victor Kulikov. "The Imperial Russian Air Service: Famous Pilots and Aircraft of World War One." Flying Machines Press, Stratford, CT, USA. 1995. -
-
| 


|

 I should preface this review by stating that I found this model a little heavy going for my taste. As is usually the case, some of this was due to my preferences and inadequacies as a modeler, and some due to the kit's contents. For my part, I suppose I am not as keen as I thought I'd be on building World War One monoplanes. Also, I am not too fond of dealing with resin kits. I find the use of super glue and resin epoxy glue to be more difficult than the usual glues I use for plastic kits. The kit itself had some problems, not the least of which was the scant instructions comprising one sheet of unclear indications of which parts should go where. It was difficult to see what the components should look like when they were in place. That, plus the dearth of reference materials, made for some problems and forced me into the realm of fantasy as far as certain parts of the build were concerned.
  The fuselage comprises two pieces: one large piece with a slot for the cockpit components and another smaller piece that covers the cockpit and upper-forward part of the fuselage. The large piece had a hole underneath the cockpit and I could not tell initially whether this was meant to be there or not. I decided it was the remains of a huge air bubble and filled it with super glue: not a difficult task.
  Once I had made the walls as smooth as possible, I added the rear bulkhead and used strips of brown painted decal paper strips to represent the interior framework. As with several part of this model, the framework pattern was a complete guess. I added some seatbelts formed from pieces of champagne bottle foil and closed the fuselage lid
 The first thing I noticed about the wings was that the detail was fairly nice and subdued. The second thing I noticed was they were as thick as the cheddar cheese sandwiches my mother used to make me for school lunches. I did not really consider sanding these down and replacing the detail: it would have been quicker and easier to replace them with plastic card, and the amount of resin dust generated would have been considerable. I left the wings as they were and continued as best I could. There are no holes in the fuselage attachments or the wings so you are presumably supposed to butt-join these things. I drilled two small holes in the wing root and corresponding holes at the fuselage attachment points. Then I inserted small lengths of 28 gauge copper wire and glued them with super glue. I followed this up by fixing on the tail parts.
  With most monoplanes, you get away without struts and such: not so here. I drilled out holes in the fuselage's underside for the landing gear legs and I cut some plastic rod for the spreader. After some playing and filling, they went together fairly well. In doing this, I used 5-minute epoxy glue because super glue, even the gel, does not give me sufficient time to play around with the alignment.
  The rigging was straightforward. The diagram in the box is somewhat helpful and I found some stuff on the web that helped too. I used 0.005-inch straight wire from Small Parts Inc. I measured the length to be cut using dividers, trimmed off the necessary wire using wire cutters, and glued it on with Elmers white glue. Another coat of Testors Clear Flat followed by a brush painting of the "wooden" panels on the fuselage sides and the propeller, and I was done.


