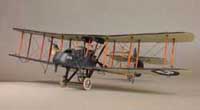
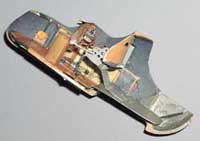
Aeroclub 1:48 scale RAF FE2bBy Sanjeev Hirve |  |
Introduction
Ever since I took up Great War subjects, I have been fascinated by the open structure of the pushers, but their flimsiness and the jungle of rigging wire had always deterred me from building one. Finally, I screwed up my courage (or bravado) and decided to build the FE2b.
The FE2b began production life towards the end of 1915 as a front-line fighter. Its design owes a lot to Geoffrey deHavilland, then an employee of the Royal Aircraft Factory (RAF). FE stands 'Farman Experimental', the RAF's designation for pusher configurations.
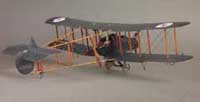
The FE2b ranks among the second generation of fighters, that, along with the DH2 and the Nieuports, helped overcome the 'Fokker scourge' [hallion]. The FE2b was among the first aircrafts designed as an armed fighter from the ground up. Despite its appearance, it was a dangerous opponent – especially in formations – and took the offensive over to the enemy airspace in accordance with Hugh Trenchard's doctrines.

Advances in fighter design and tactics eventually rendered the FE2b obsolete as a fighter. Because of its capacity and stability, however, it continued on until the end of the war in the night bombing role.
The Kit
The Aeroclub multi-media kit contains injection-moulded parts, white metal parts, brass wires and a plastic jig for the outrigger, decals, and instructions.
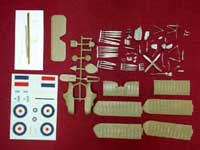
Plastic parts are provided for the wings, the nacelle, the wheels, and tail parts. The engine bearers and the two bulkheads within the nacelle are also plastic. All other parts are cast in white metal. These include all the struts and braces, the air scoops, the engine, a 4-bladed propellor, and sundry detail. Also included are two Lewis machine-guns, one with and one without a cooling sleeve. The wings are made in three sections, effectively eliminating problems of warp and incorrect dihedral.
The decal sheet has markings for two crafts, both of which are covered well in the Datafile [df].
The instructions are limited to an exploded parts diagram, 3-view drawings, some high-level guidelines for sequence of assembly, and also some useful construction tips. The instructions do not extend to explicit identification of each part, though if you have a Datafile this is not an insurmountable problem. One also needs the Datafile to get a clear idea of the rigging and control cabling.
As for variations, the kit parts will let you build a 120-HP Beardmore engine and the early tricycle-style undercarriage. Later styles of undercarriage, as well as 2-bladed props are not supplied.
The Subject
For my project, I wanted a less commonly modelled subject. Thus, I automatically ruled out the ones covered in the decal sheet, serial 6341 (Zanzibar) and A5548, and those covered extensively in the Datafile.
Of the total time and effort spent on building a FE2b, more than half was spent on research. In the course of this project, I acquired several books, discussed several topics on internet forums, and even obtained materials from the RAF museum.

A quick scan of Bob Pearson's Profiles CD uncovered 'Jess' (serial number A5650), a night-bomber with No. 100 squadron. Bob Pearson gave me photocopies of two period photographs of Jess. 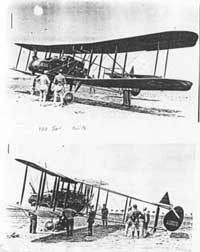 As period photos go, these are quite poor of quality, but several features can be distinguished. A5650 receives brief mention in an article in [otf]. The origin of the name "Jess" is not known. According to [hare1], A5650 was a rebuilt plane.
Jess's 4-blade propellor is obvious from the photo, as are the twin gravity fuel tanks. The engine type cannot be distinguished, but it is safe to assume that it was the 160HP rather than the 120HP version of the Beardmore – it was a relatively late model serving in the night bomber role. When I realized this, I had already built the engine in the 120HP version. I decided against re-doing the engine -- its copper cylinder jackets look more cheerful! I also reasoned that the exhaust has a baffle for suppressing the glow of the exhaust that could give away the aircraft's position during a night raid. The undercarriage is of the Vee type, confirming that the aircraft was from later production.

The pilot's cockpit rear bulkhead seems to have two or three vents (I assumed three). The craft is shown outfitted with a Lewis MG in the front, mounted on what I take to be a No. 4 Mk IV swivelling pillar. I see some evidence of an Anderson arch support at the rear of the observer's cockpit, but there is no sign of the telescoping tube itself. Probably the rear MG was permanently removed in favour of extra fuel or bombs.

As far as bombing payload, the photos indicate two bomb carriers under the wings, each probably carrying four 20lb Cooper bombs. Under the nacelle at the rear end, I can see what appears to be a twin (possibly 112lb) bomb carrier, but it seems to be suspended so high up that the bombs might not clear the propellor blades. I decided to ignore this and model a low-slung single 112Lb Mk.II bomb carrier, similar to the one shown on p. 25 of the Datafile. After all, the FE2b had a maximum bomb capacity of 350 Lbs. Bomb release Bowden cables are evident to the side of the nacelle.

After much searching and pestering experts with questions, I identified an RL tube under the nacelle chin, Holts flare holders under both wings, and night lights on the lower wings near the tips. The Holts flares were used for night landings. The RL tube, it turns out, has nothing to do with 'relief', but is so named because it was designed by the Royal Laboratories at Woolwich. The tube is 3" in diameter and has an electric apparatus for igniting flares as they exit the tube.
I saw evidence of neither a windshield for the pilot, nor any padding on his cockpit rim. I had some trouble determining the size of the tyres. Palmer Cord Aero Tyre Co. produced them in specific sizes, and the dimensions were printed on the sidewalls of the tyres. Using the Datafile GA drawings as a rough guide as well as other various references, I found that both the FE2b and the Airco DH4 used the same tyres, namely 750 x 125, this being the outer diameter and width of the tyre respectively, expressed in millimeters.
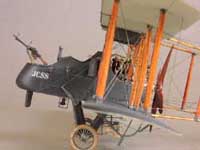
The pilot's cockpit was relatively easy speculation. The Datafile contains an excellent overview photo of the cockpit as well as several technical drawings. I managed to identify the map holder, compass, and a possible slip indicator. Generic dial instruments filled the rest of the instrument panel.
The observer's cockpit was more of a challenge. After much agonizing, I cooked up my own interpretation of the RL tube breech. A twin magazine carrier, a pivot for the MG mount, and clasps placed around the rim made up the rest of the detail in an otherwise bare and exposed cockpit.

Since the starboard side of Jess is not visible, I was free to attach a CFS bombsight on the nacelle. What's a bomber without a bombsight?
The wheels of the FE2b are of an offset spoke design. Though the spokes are usually covered, I decided to leave them exposed. The offset wheel design, patented by Palmer, was better suited to withstand crosswind landings. It was a distinctive feature of British-built aircrafts. The wheels employ four sets of spokes instead of the typical two sets, attached to the rim off its centre-line. This creates a marked conical appearance. Though frustrating, trying to model this with standard Fotocut P/E for the spokes was still interesting.
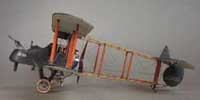
I relied on Bob's colour profile for the craft's colours and markings. By Bob's interpretation, A5650 was painted black all over. I chose however to leave the undersides of the wings and the tail plane in Clear Doped Linen (CDL). I made this decision because the wing bottom sports the standard 3-colour roundels. The photographs suggest that the underside could be CDL as well as black. Furthermore, if the craft had been repainted to fully conform with the official directive for night-bombers, the roundel should have been a single white circle on a black field. Therefore it is not a stretch to assume that Jess was one of those crafts that had been painted over in an ad-hoc manner to provide some degree of night camouflage. My final reason, and most important, is that a black-on-CDL model looks better than an all-black one!
The Build
If there is a leitmotif to this build, it is the extensive use of brass to scratch-build various details. 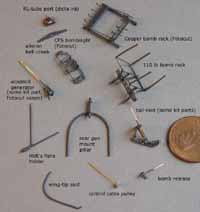 Compared to styrene, brass sheet has the advantages of being stronger, easier to work, simulating metal better, and available as thin as .001". Furthermore, solder joints are strong. I made most of my brass details using wire, shim stock, tubing, and rods, all available in various sizes in modelling hobby store. I spray-painted a piece of .001" brass sheet in grey. Using a Waldron punch set and metal scissors, I cut out pieces to simulate various panels and attachment hardware.
The typical construction sequence has to be somewhat different for a pusher aircraft like the FE2b.  I made a jig for positioning the upper wing over the nacelle and lower wing. This is essential because of the high aspect ratio of the wings, and also crucial for proper fit of the tail booms.
Build sequence is as follows:
- Complete the cockpit interior, assemble the nacelle, out-rigger (tail-boom frame), upper wing, etc.
- Paint, decal and finish the components
- Attach the upper wing and the tail-booms
- Attach the empennage, undercarriage, and other details
- Rig the plane
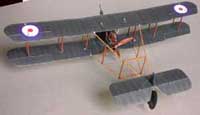
I will delve into some of the interesting aspects of the build. Additional description of the build and in-progress shots can be found at my booth at the wwi-modeling Web site.
The Nacelle
The kit part for the nacelle matches the GA drawing in overall shape and dimensions. The fit of the lower wing is excellent and the exterior has good detail, but the walls are thick and bare on the inside. For the most part, the bottom does not need to be thinned since the cockpit floor is raised above the lower longerons of the frame. I thinned the walls down as much as possible using an Exacto #10 blade, scraping to shave the plastic down. I alternated this with a riffling file for the tighter corners.
I constructed the floor from styrene rods, brass rods, and veneer sheet. I also lined both sides of the nacelle with styrene rods and .004" wire to simulate the frame and the rigging. Both bulkheads were made from sheet styrene, though I did use part of the kit's part for the curvy compartment in the front. I opened out the intake scoop ports in the fuselage and replaced the white metal scoops with ones made of .010" styrene (the thickness is much more to scale).
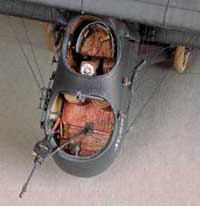
A wire mesh glued to a styrene bulkhead represents the radiator. I thinned out the floor and walls of the engine bay, and constructed the rear frame from styrene and brass rods for the engine bearers. This framework looks much better than the closed one-piece engine bearers supplied with the kit.
All the trimming and shaving left a visible ditch at the seam, so after gluing the two halves together, I filled the ditch with thick CA glue on the inside. I simulated the cockpit rim with .015" brass wire sanded to have a semi-circle cross section. I glued this carefully along the rim of each cockpit. This lip conveniently hid the seam line. After joining the halves, I bent a .022" brass wire into the shape of the front bow and glued it to the inside of the observers cockpit.
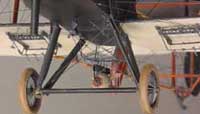
The Datafile contains technical drawings and a couple of photos that are a good source for detailing the interior of the nacelle. I made the instruments for the cockpit from the WWI Instrument Photo-etch set (Eduard kit 48291). I built a few control levers and switches and scattered them around the pilot's cockpit. The kit's seat is cast in white metal and is too thick. Rather than try to thin it and open out the holes in the backrest, I replaced it with one made from styrene sheet with a milliput clay seat cushion.
To finish the nacelle, I added the following details:
- Mounting clasps made from brass wire for the machine gun pillar (I attached these to the upper longeron).
- Bomb-release handles on the outside
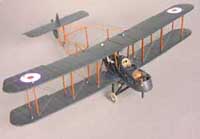
- A CFS bombsight constructed from the Fotocut Photo-etch set (Fotocut WH-1003)
- Step bracket, RL tube, and windmill generator under the nacelle. I used the original white metal part for the generator, but replaced its vanes.
- A Lewis gun mounted on a swivel pillar. Though Aeroclub supplies an excellent Lewis MG cast in white metal, I replaced it with a shoulder-stock variant with an exposed radiator. It is assembled from a PART pre-production Photo-etch kit. I reviewed this kit in the June 2002 issue of the Internet Modeler.
- An Anderson arch for the rear gun mount, made from soldered brass pipe and wires
- A 112Lb bomb carrier made from .003" brass sheet stock
Engine
The kit supplies a 160HP Beardmore engine made of cast white metal parts for the engine, intakes, exhaust manifold, and the cooling header bus piping.
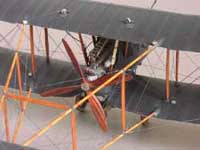
After unsuccessfully attempting to widen the gaps between cylinders, I cut off the top half of the engine and replaced it with individual cylinders made from styrene pipe stock. I added the push rods and rocker arms, and made new intake manifolds from soldered brass wire. The 120HP engine has two separate carburettors and intakes that each feed three cylinders.
I retained the kit parts for the exhaust baffle and the coolant header pipe, and made distributors from 3-ply styrene sheet. To each I attached six spark plug wires (.004" copper). I cut off the crankshaft axle, drilled a hole, and inserted a .030" brass wire to take the propellor.
Struts
The Fee has a total of 26 wood-clad struts. The kit supplies them in cast white metal and plastic strut stock. I substituted them all with wire-cored wood-clad ones. These struts are constructed as follows. Cut two strips of cherry veneer of the appropriate width and length. Each wing strut is cut to the precise length by placing the model in the jig and test-fitting each struts in its designated station. The jig is crucial for getting the length correct on the cabane struts

Use a ballpoint pen to scribe a groove down the centre of the veneer strips. Place a length of 0.015" steel wire in the groove and glue the two pieces of veneer together with CA. While setting, use a flat pliers to squeeze the veneer pieces together (be careful! too much pressure can split the wood). Next, using the GA drawing as a guide, file and sand the wood to shape. If the CA did not take care of the fuzz from the backing paper, use a fine grit paper to sand it away. To finish, I stained the veneer and coated them with tinted Future.
To attach the wing struts, I snipped the ends of the steel wire to the right size, about 1/16", and inserted them for a snug fit into shallows holes drilled in the wing surface. The joint is strengthened with a dab of epoxy glue.
Tail Booms
I decided to make the tail-booms a framework of steel wire soldered together. I did this for a good reason -- the kit recommends epoxy glue to attach the white metal struts, but is not suitable for .015" steel wire struts. I wanted a strong and rigid tail boom frame that would lend strength to the wing struts.
Using .039" and .015" steel wire for the booms and struts respectively, I proceeded to construct each frame half. Using the GA top and side views, I cut the strut wires to exact length. Before actually soldering the wires, I rigged the frame together with adhesive tape, placed the plane in its jig, and test-fitted the frame into the wing attachment points.

Next, I soldered the strut wires to the bottom boom, taking care to hold them normal to each other. Following that, I soldered on the top boom. I then positioned the two halves in the jig and soldered them together in a "V" at the rear. Finally I attached the horizontal span-wise struts.
Soldering steel wire was easier than expected, even when I had to solder two joints next to each other. Though proper soldering for joints takes practice, I will briefly cover a few tips from my experience:
- File the surfaces to maximize the mating area. For the tail boom I squared the ends of the strut wires and tried to cut a notch in the boom wires. This also cleans the surfaces.
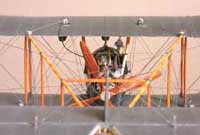
- Clamp the work pieces together in a jig. It is crucial that the joint not move before the solder has solidified. A frosted look means that the work moved before the solder cooled, and indicates a weak joint.
- Use the proper equipment: non-core 60/40 solder, good quality flux of syrup thickness (available at Glass staining hobby stores), a 15+ Watt iron with a clean sharp tip (clean the tip frequently by wiping it on a soaking-wet sponge).
- Use as little solder as possible; more solder does not a stronger joint make! It simply means more work to file away the excess. I admit this is easier said than done, but my joints have been becoming more svelte over time!
- The iron's tip should be clean and at its highest temperature. Pick up a small blob of solder with the tip and touch the tip briefly at the joint of the work. Do not dwell on the joint! The heat and the flux should cause the solder to flow quickly into it.
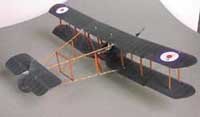
Once the frame was structurally complete, I added the veneer around the struts and filed and sanded them down to shape. This has to be done carefully since the sanding and filing tends to weaken solder joints.
In the real craft, the tail booms were made from bamboo. In my model, I simply applied small globs of thick CA glue to simulate the bamboo knuckles.
To finish, I masked off the struts and primed the boom wires with Gunze Sangyo Mr. Surfacer 1000. I then sprayed them with yellow tinged with brown and green. I dry brushed areas around the knuckles with a darker shade of brown. Finally, I sealed it with a coat of tinted Future.
Rigging
 I had to make an important decision for rigging the FE2b -- functional rigging or non. Functional rigging employs filament attached under tension to lend rigidity to the structure. The filament is anchored in holes drilled into the structure. On the other hand, non-functional rigging involves lengths of rigid wire glued lightly in place. Besides the fact that non-functional rigging does not strengthen the model, if the model is not rigid enough, flexing of the parts will cause the rigging to buckle and spring.
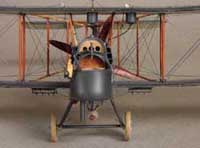
Encouraged by the rigidity of the tail-boom and the wire-core struts, I decided on the non-functional rigging approach. This approach has its advantages: it saves on the effort of drilling precisely angled holes, and there is no need to hide unsightly holes on the opposite face of the wings, no need to hide the wrap-around the tail boom wires.
In retrospect, I should have done functional rigging on the wing's span-wise braces, and non-functional for the rest. The wing, being thin, flexes easily, while the nacelle is weighed down by a white metal engine. This is certainly something to bear in mind for future projects.
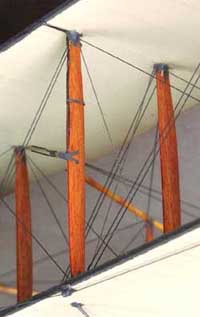
I used 0.006" ceramic wire throughout for rigging and control cables. My model has a total of about 150 individual pieces of wire! For each piece, I first determined its length by test-fitting a length of steel guitar string (it is a lot cheaper than ceramic wire). To cut the ceramic wire, I place it on my cutting mat, and press down on it with a sharp razor blade. The wire is then glued in place with white glue. This glue cures soft, and allows the wire to slide a bit if the model flexes.
Even though ceramic wire is dull, I brushed it lightly with Modelmaster Clear flat acryl to take off the sheen. I applied steel paint in dabs to hint at turnbuckles. Once rigged, I could not turn the model upside-down, pick it up by its wing tips, or work on the outboard section of the wings.
Wheels
The offset-spoke design of the Fee's wheels posed a challenge. To construct each wheel, I used a pair of Photo-etch spoke sets from Fotocut accessories set (WH-2002) for each wheel. One set is flat, while the other is pressed gently into a cone shape. I cut out one spoke and a bit of the rim to compensate for the reduced circumference.
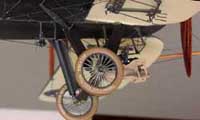
Using a compass fitted with a scalpel blade, I cut out two rings from 0.020" styrene sheet. I sanded the rings to the circular cross-section of the tyres. The spoke rims were then sandwiched between the two halves of the tyre. A styrene tube for the hub also served as a spacer between the spoke sets.
To simulate the wheel rim, I attached thin 1/32" strips of plastic tape along the inner circumference of the tyre on either sides of the spokes.
Miscellaneous Details
Certain other features of the model are worth mentioning.
- The pitot tube, the 20lb bomb-racks, are all assembled from Photo Etch accessory kit from Fotocut (WH-1003).
- The control cable pulleys are made from three styrene discs.
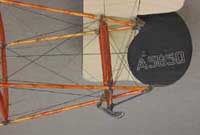
- The tail-skid is constructed from the kit part and brass strip stock. Copper wire is used to simulate the elastic cord.
- The undercarriage is made from brass wire wrapped in 0.010" styrene sheet. Twine is used to simulate the bungee cords.
- The Holts Flare holders are made from solder-joined brass wire and piping
- The propellor is made from 8-ply veneer.
- The 112lb HE RL bomb is assembled from a white metal kit (Aeroclub V207).
Painting and Finishing
The main colours of the craft according to the Datafile are probably "Lamp black" and CDL for which I used Aircraft Interior Black (Modelmaster 2040) and British CDL (Misterkit MKBC-005) respectively. This is the darkest grey I have seen this side of black. An absolute lamp black would not be realistic especially in scale. Most metal fittings were painted Engine Grey (Modelmaster 2034). The wooden components were either varnish-coated veneer, or plastic painted Wood (Modelmaster 1735). The propellor is coated with red-mahogany stain. Tyres of the period were typically grey, but I decided to paint them beige instead.
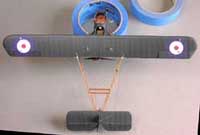
To paint the craft, sub-assemblies are painted and finished as far as possible before final assembly. In the case of the FE2b, the separate components are the upper wing, the nacelle attached to the lower wing, the tail post, rudder, the horizontal stabilizer, and the undercarriage. The parts are first sprayed with Gunze-Sangyo grey Surfacer 1000 primer. Seams and flaws are fixed and primer is re-applied. Next, I painted the parts CDL, and then black.
Next, I highlighted the wing frame and nacelle details. First I sprayed a slightly lighter shade of black along the raised ribs, and then I applied rib tapes made from decal paper sprayed the same colour. Then I dry-brushed a lighter shade to highlight the raised details. Finally, I put a very mild over-coat of the base shade.
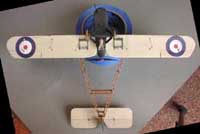
The underside of the wings and stabilizer were treated somewhat differently. Over the CDL coat, I masked and sprayed a darker tint (brown) of CDL to simulate the spars. Then I applied rib tapes made from decal paper of the same colour. The surface was then re-sprayed with a very light coat of the base CDL colour. The purpose of this treatment is to suggest translucence of the fabric.
I applied Gloss Clear Acryl (Modelmaster FM02017) to the areas that took decals. After the decals were applied, the parts were finally sprayed generously with Flat Clear Acryl (Modelmaster FM02015). Overall, the model is dull-coated to a matte finish, except for the struts and the propellor.
Errors and Inconsistencies
I compared the Aeroclub kit to the GA drawings in the Datafile, and found very few discrepancies. Where these did exist, I tried to confirm them against photographs.
- The span of the wings is higher. I had to trim off about 1/8" to conform to the GA.
- The plan-form shape of the wing tips does not match the GA. This can be corrected by sanding.
- Both cockpit openings are the wrong shape. The rear corners are too 'square'. I built up the corners with milliput for a gentler curve.
- The kit part for the bulkhead between the observer and the pilot is sited too far forward. Unless modified, the bulkhead fits flush with the rear of the observer's cockpit opening.
- The kit contains a template or jig for assembling the tail booms. The gap between the second and third strut is incorrect, short by 1/8". Consequently, the distance between the third and last strut is too great.
- The horizontal stabilizer is wider in span by 1/8".
- The kit's wheels are slightly short in diameter.
- The kit's gravity tank is wrong in plan-form. It should be shorter in length and should have a more rounded bow.
I also noted a discrepancy between the side and top views of the Datafile GA. The dimensions around the rear of the craft do not match.
In Conclusion
 Overall I spent about about nine months working on this project. I estimate about 500 hours on the build. Though the result is quite satsifactory, if I were to do it again, I would probably be more careful with the painting and would do some functional rigging. Aeroclub provided a very nice kit, and I look forward to building their other offerings in the RAF line.
 Nine months is a long time for a project, and I hope that between my memory and my notes I did not omit some important points. Nine months also makes for a long and plodding article, but if you, the reader, made it so far, I hope you gained some tidbits from my experiences.
Acknowledgements
I wish to take this opportunity to thank the many members of the wwi-modeling list and the Aerodrome forum who patiently answered my many questions.
My special thanks to Guy Revell of the RAF museum at Hendon, and Alberto Casirati for supplying me with reference material. Bob Pearson provided Alps decals for all the markings. Lance Krieg gave me his copious build notes on his Fee, and prodded me whenever I wavered from the true path to AMS nirvana. Ken Schmitt tried valiantly and with limited success to improve my painting skills, but as they say, a silk purse from a sow's ear...
References
- [df]
- RAF FE2b: by J M Bruce, Windsock Datafile 18, Albatros Productions, ISBN 0-948414-22-7. My primary reference on the FE2b.
- [ws]
- Windsock International, Albatros publications. Volume 11-3 reviews the Aeroclub kit, Volume 10/6 provides many detail photos and drawings of the RAF FE2d, Volume 9/3 has a photo of the RL electric launching tube mounted on a BE2c.
- [li]
- Horses don't fly: Frederick Libby, Arcade Publishing, Inc. ISBN 1-55970-526-4, recounts the author's experiences as a FE2b observer.
- [hare1]
- Aeroplanes of the Royal Aircraft factory: by Paul Hare, Crowood Press, ISBN 1-86126-209-4. Extensive coverage of the FE2 series, with 6 pages dedicated to the FE2b.
- [hare2]
- Royal Aircraft factory: by Paul Hare, Putnam, ISBN 0-85177-843-7. History of the RAF and the FE2b.
- [otf]
- Over the Front, Volume 12/2. Brief mention and line art of FE2b serial A5650.
- [hallion]
- Rise of the fighter aircraft 1914-1918, by Richard Hallion, Nautical & Aviation Publishing, ISBN 0-933852-42-8. An analysis of the evolution of fighter aircraft and doctrine, including references to the FE2b.
- [bombs]
- Details of Aerial Bombs. A collection of RFC pamphlets, reprinted by WW1-Aero. This contains notes and diagrams for the various Bombs, bomb carriers, fuzes, release mechanisms, and bomb-sights. Provides details and dimensions of the FE2b's 110lb bomb carrier.
- [tech]
- British Military Aircraft of World War One, Volume 4, the Official Technical and Rigging Notes of the RFC and RNAS Ö, Arms and Armour Press, ISBN 0-88254-408-X. Contains rigging instructions for the FE2b. Sadly, one of the few subjects not accompanied by rigging diagrams.
