The French word for ladybug is coccinelle, but Heller has chosen the more academic genus name for this simple and charming model. The complete name is Coccinella septempunctata, more commonly known as the “Sevenspotted Lady Beetle”. “Ladybug” and “Ladybird” are also commonly used to describe this nemesis of the aphids.
The Kit
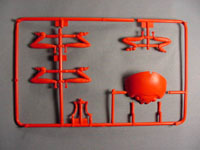
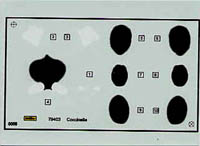
Heller doesn’t state a scale for their model; it measures out to about 102 mm (antennae not included). The real bug tops out at 7-8 mm, so the model is around 13.5/1 scale. The kit has 11 orangy red parts, and a water-slide decal sheet for the black and white spots that adorn the head and carapace of the real bug. The instruction sheet has large simple drawings to guide the assembly, but the written instructions are in a dozen languages; the overall impression is visually confusing, and might be daunting to very young modelers. Molding is clean, detail a bit soft; this won’t matter a whit to the kit’s intended audience. There are noticeable mold lines around the parts, and three injection pin marks on each leg.
The Build
Before presenting this model as a present to my six-year-old daughter, I spent some time with some on-the-tree parts cleanup. The plastic was a bit on the soft side - carving and scraping with an X-Acto knife worked better than sanding.
Testor’s Guards Red is ideal for the carapace, and gloss black for the rest of the parts. Airbrushing was a challenge for six-year-old fingers, and I ended up spraying most of the red. The black was easier for my daughter, since she could easily see where the paint was going.
My daughter successfully assembled the three main head/body parts, though the fit was vague. Decals followed - these turned out to be a chore for Dad. Even though they were going on over glossy surfaces with no seams, the decals had trouble settling down over the bug's compound curves. There were ten individual decals - too many for my daughter’s patience. While Dad struggled with Microset and an old T-shirt, my daughter launched into a fantasy monologue about Captain Poopdeck and some sea turtles. Despite the patience and Microset, some decals silvered.
The legs were another challenge. They’re supposed to snap-fit into sockets on theunderside, but the pins on the legs were flimsy and the holes on the body were too small. After the holes were enlarged, the legs snapped in, but they flopped around randomly.
The instructions recommend a “natural support” for a base. A piece of old firewood, sawed down the middle, worked fine. Heller suggests attaching the bug to the base with a “15 mm thick piece of modeling clay”, and then gluing down the legs. The clay idea sounded too visible and too ugly, so I just glued the legs, aided by masking tape. Superglue didn’t work, but five-minute epoxy did - after an hour of taping, relocating, regluing and cussing. Because the angles of the legs are fixed, some of the feet don’t sit flat on the base, and the whole ladybug stands higher than natural. Surprisingly, errant epoxy smears scraped off the base’s bark with little visible residue.
Conclusion
This is just a marvelous subject to inspire a very young modeler, and the final result is dramatic and cute. Unfortunately, the model’s engineering leaves a lot to be desired. The attachment of the legs seems doomed to failure in young hands, and the decals require too much time (though stickers would probably fare worse on those compound curves). The lack of a base that easily mates with the bug is also a drawback. Inspired subject - indifferent, frustrating execution.