Here I am flying high over France in my Sopwith "Camel" searching for the infamous Red Baron! Suddenly antiaircraft fire begins to burst below my plane. "Archie" we call it. Good grief! What's that? It's the Red Baron! He's on my tail! A stream of tracer bullets cuts across my lower right wing ..... As my plane strikes the ground I leap from the cockpit! Right in my supper dish. How embarrassing. "Curse you Red Baron!"
Snoopy and the Red Baron. The epic story of Snoopy's struggles is familiar to many and has even been turned into a song. It's not exaggerating things to say that some people wouldn't be building WW1 models today if not for Snoopy. His adventures were many, but throughout them all his determination and faith that "someday I'll get you, Red Baron!", never wavered.
One of the odd things of life is that you never hear of something then suddenly everyone is talking/writing about it. Such was the case for me with Sculpey. Everyone was raving about it so when I managed to find some, I picked it up not quite knowing what I was going to do with it but wanting to try it out sometime. Not too much later the urge to experiment got the better of me and casting around in my mind in the for the "someday I'm going to build .....section", I came across the subject of the Daisy Hill Puppy Farm's most famous flying ace.
I had the book. I had the clay. I had no idea what I was getting into but thought it could be fun. Contact!
A few notes on Sculpey...
As far as I can determine all the rave reports over Sculpey are justified. It's really pliable without being sticky which allows you to sculpt as a fine a detail as you require. As long as you keep your project wrapped up well in a plastic bag or something similar it remains soft and workable as long as you need it. You can smooth it using denatured alcohol before hardening. The clay itself hardens in the oven and can be added to after hardening and rebaked as many times as you like. Sculpey is non toxic but you should still take certain precautions. You should have good ventilation, so turn on the exhaust fan and leave the oven door open when you've finished to allow any residual fumes to escape. When sanding it definitely wear a mask and take the same precautions as you would with resin as the dust is amazingly fine. Not only is it useful for whole figures but better heads and hands are available if you're willing to have a go and sculpt them.
The Body
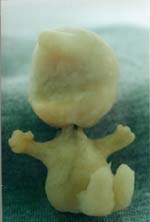
Starting with a bit of wire, I twisted a basic frame (you couldn't really call it an armature), for my pilot and gave it some bulk where needed with aluminium foil. Then I broke out the Sculpey, building up the body, arms and legs as one unit and the head as a separate piece. The ability of Sculpey to be baked and rebaked really came in handy here and also when adding the helmet to the head. It really was just a matter of sculpt, bake, sculpt some more, bake etc. As long as you think about how you are going to build something you can build the piece up in layers giving you more control over the piece. The head was then joined to the body, a neck created, as much smoothing done as it was possible to do and then the whole piece baked for a final time.
While I was doing all this I was wondering how to keep him sitting on the roofline. In the end, I drilled a hole in the base and glued in a length of brass rod which was to sit just level with the roof itself. While sculpting the body, I left a small hole into which I could later glue some brass tubing which would fit tightly over the rod and support the figure on the capped roof.
After baking the piece was then left to cool (for about 7 months!). Note that this is not the usual cooling time for Sculpey :-). It really only takes a few hours to cool right down, but I usually like to leave it overnight. When I was ready to pick it up again, I sanded it smooth then gave it a coat of Mr Surfacer to prime it. It was at about this point that Irealised I had forgotten his tail. Ooops. As I had already primed it there was no going back into the oven so a tail was created from Milliput. The body and face are successive coats of Tamiya Flat White while the flying helmet received a base of Humbrol Leather. An aged worn look to the helmet was then created using artists oils (predominantly Burnt Umber) and applying it then rubbing it off lightly.The goggles were blacked in just as in the book.
The black patches of his coat and the open mouth were all done along the way but the eyes and nose were left to the very last. I'm glad I did it this way as the moment when Snoopy came "alive" was just great.
The "Sopwith Camel"
Once I had the figure sized up it was just question of making the "plane" to match. Scrounging around I found some thick plastic card in the scrap box (that's the one between the spares box and the useable sprue bits box next to the decal drawer :-) ). A basic frame was built and the doghouse constructed around it by lapping the pieces of styrene over one another. Study of the book shows that the planks of Snoopy's doghouse is not perfectly straight so when I cut the card I moved the knife blade as I cut. It seems to be like any kennel I've ever seen, however I added reinforcing to the roof as I wanted the roof to be strong. The roof capping itself was just another piece of styrene cut to size and bent to shape under hot water with a hole in the middle for the brass rod to come through.
The painting of the "plane" raised some interesting questions and in the end I decided that an amalgam of doghouse reality, WW1 reality and comic fantasy would have to be it. To that end the inside of the doghouse is painted Black but the outside was painted Tamiya Olive Drab and streaked fairly thoroughly with Burnt Umber to give a finish that is somewhere between PC10 and generic green yard paint over rough plywood. The front and back being not as exposed to the weather were probably left unpainted so a general plywood effect was needed. An undercoat of a creamy yellow went on and then I just mixed up streaks in varying shades using artists oils till it looked, well, not like plywood but like "larger than life" plywood.
You never see whether Snoopy's name is over the doorway of his doghouse or not. I choose to believe it is ..... afterall it is his personal marking scheme. Searching through other books showed no one way to do it. Shaky letters were painted on to make it look as though Charlie Brown would have done it and I couldn't resist going through the decal box till I came up with a pair of decals that were about the right size and applying them.
Finally for those cold nights in western France, I added a blanket. This is just tissue painted light blue and the folds created while still damp. It looks remarkably similar to Linus's actually. Spoils of war perhaps?
Putting it all together
Grabbing some grass flock that had been bought for some project or other I covered the base with white glue, applied the flock and let it dry. I then attached Snoopy to his "aircraft" and gave him a scarf to wear. You can still find lead foil on some champagne bottles, so grabbing some of it, I cut a strip, painted it and with a X-acto blade cut fine fringing on both ends. This was then wrapped around his neck and the scarf positioned to fly out behind him in the wind. The fringes were splayed out and once I had printed up his most famous phrase on some card stock and placed it on the base I was done.
What started out to be just a way to try out a new product turned out to be a really rewarding project. When I did work on it I enjoyed myself immensely. It's really not that difficult a project, but as a start to sculpting and scratch building it was great. Now that I've used it, I too, have to join the ranks of Sculpey enthusiasts. With an idea in mind, patience and some Sculpey any figure is achievable but wouldn't you know it? The "someday I'm going to build .....section" in my mind just got bigger.