 Hand-Carved Props - the easy way. Hand-Carved Props - the easy way.
Introduction Recently, I have been delving into the arcane world of WWI aircraft modeling. The subject is fascinating – you have beautifully streamlined aircraft along with things that look like they could hardly stay airborne without a 200 knot tailwind. The variety of aircraft is quite large, and many have colorful paint schemes. The history that goes with them is also fascinating. The era was romantic, but also quite grisly. For instance, a pilot's sidearm was not usually issued to assist him in escaping to friendly forces in case of being shot down – rather it was there for him to end his life in the 'honorable' fashion should his aircraft catch fire in the air! The period saw the chivalry of the 'Knights of the Air', and great advances in aviation. 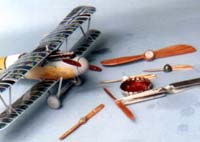 I tried painting plastic model propellers to look like wood on several occasions. I even tried the decal route. Finally I figured out that I could easily carve my own propellers out of finely-grained wood veneer. The idea was fairly straightforward and simple. I would need wood veneers thin enough to laminate together and be several layers thick so as to represent the laminating process used in creating actual propeller blades. I tried painting plastic model propellers to look like wood on several occasions. I even tried the decal route. Finally I figured out that I could easily carve my own propellers out of finely-grained wood veneer. The idea was fairly straightforward and simple. I would need wood veneers thin enough to laminate together and be several layers thick so as to represent the laminating process used in creating actual propeller blades.
I went to a local lumberyard – in and of itself a fun time, as they had the laminates on a shelf in a big room full of different exotic woods. Man, I LOVE that smell! The laminates are very thin - about 1/64 of an inch thick. They had several kinds, and I bought a selection of light and dark woods to experiment with. Be sure that you get the kind of veneer that does not have any adhesive on it. You usually find laminates in concert with furniture repair too. Be assured that now I have PLENTY of laminate to last me a while!  An alternative here is to buy or obtain some lumber scrap and pull out your trusty block plane. For 1/72 and smaller props, wood shavings can be layered as your veneers for that 'scale' appearance. Also, keep in mind that different types of woods have different sizes of grains; from big stripy grain with big pores to grain that is so small as to be nearly invisible. It's fun just looking at the different kinds of wood. An alternative here is to buy or obtain some lumber scrap and pull out your trusty block plane. For 1/72 and smaller props, wood shavings can be layered as your veneers for that 'scale' appearance. Also, keep in mind that different types of woods have different sizes of grains; from big stripy grain with big pores to grain that is so small as to be nearly invisible. It's fun just looking at the different kinds of wood. 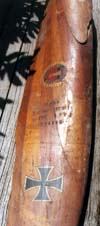  First of all, I cut rectangular 'blanks' from the larger sheets of veneer, making sure that I cut the blanks at the same direction of the grain of the wood. I use two different shades appropriate to the propeller type that I am doing. For instance, many British propellers are made from layers that are fairly similar in shade. So I use two similar shades of wood for mine. With German and Austrian propellers, the different layers usually have contrasting shades of wood. I can use different colors of veneer, or even pieces from the same First of all, I cut rectangular 'blanks' from the larger sheets of veneer, making sure that I cut the blanks at the same direction of the grain of the wood. I use two different shades appropriate to the propeller type that I am doing. For instance, many British propellers are made from layers that are fairly similar in shade. So I use two similar shades of wood for mine. With German and Austrian propellers, the different layers usually have contrasting shades of wood. I can use different colors of veneer, or even pieces from the same 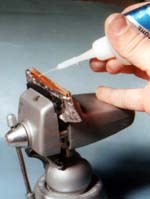 sheet that look different because the natural grain has run through them. The colors are alternate just like on the real thing. sheet that look different because the natural grain has run through them. The colors are alternate just like on the real thing. I add medium thickness super glue (CA) between each layer. This is because it takes a little longer to cure, and gives me more time to stack the veneer blanks. Then I wrap the stack of blanks in aluminum foil prior to placing them in a vise (so I don't accidentally glue my vise shut!). I tighten down just about as hard as I can and leave it there for about 15 minutes or so. I also add the 'thin' CA to soak into the grain of the wood. This adds a plastic quality to the wood, making it more breakage and split resistant, harder to sand (or over-sand), and easier to work along the grain. If the glue is runny, hit it with accelerator. With this method, there's really no reason to wait for glue to cure. What I have now is a 'slug' of laminate.  After I unwrap the aluminum from the slug once it's pressed, I put it in a miter box and use a razor-saw to cut it to a very rough shape. I then usually glue the kit propeller, or a paper template to the face of the slug. This gives me my basic top-down shape for the propeller. After I unwrap the aluminum from the slug once it's pressed, I put it in a miter box and use a razor-saw to cut it to a very rough shape. I then usually glue the kit propeller, or a paper template to the face of the slug. This gives me my basic top-down shape for the propeller. 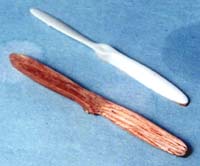 It is the only difficult part, really, and it takes some patience. You can easily do it with an X-acto knife and sanding sticks. It's not that hard – just follow the outline of the template. Now you have a rough propeller shape. It is the only difficult part, really, and it takes some patience. You can easily do it with an X-acto knife and sanding sticks. It's not that hard – just follow the outline of the template. Now you have a rough propeller shape. 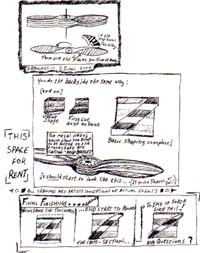 Propellers are in reality very long, thin wings. Therefore, in cross-section, props have an airfoil shape. Once carved, your props made of alternating laminates really begin to look cool as you carve into the slug; they start to show the alternating bands of color in the wood. My advice is to first draw with pencil, the circle at the center of the prop that will represent the area of the prop where the boss will go (the metal plate at the center of the prop where it bolts onto the crankshaft). You don't want to carve on this yet! And you need to figure out which way the prop rotates. Propellers are in reality very long, thin wings. Therefore, in cross-section, props have an airfoil shape. Once carved, your props made of alternating laminates really begin to look cool as you carve into the slug; they start to show the alternating bands of color in the wood. My advice is to first draw with pencil, the circle at the center of the prop that will represent the area of the prop where the boss will go (the metal plate at the center of the prop where it bolts onto the crankshaft). You don't want to carve on this yet! And you need to figure out which way the prop rotates. 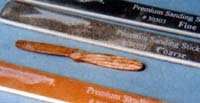 Your first cuts are very important! If your prop will turn counter-clockwise (from the front), you will want to do a nice cut at the trailing edge of both blades. (Notice that, working from the front of the slug, the cuts will be at opposite sides from each other - if you do them on the same side, you have made a wing, not a prop!). I do this at the beginning of carving after I have shaped the slug. If I don't, I forget what I am doing and foul it all up. In essence, you leave alone the leading edge of the blades, and cut by the trailing edge. Now you have done these initial cuts, you know for sure which way the prop turns and also now you can see that those two cuts start to make the slug look like a prop (a little bit). Don't try to do it all with the knife, though. You will find that the Coarse Sanding Stick that you either buy, or make yourself, is your best friend here. You may need to thin the shaped slug (let's call it a 'shape'). Your first cuts are very important! If your prop will turn counter-clockwise (from the front), you will want to do a nice cut at the trailing edge of both blades. (Notice that, working from the front of the slug, the cuts will be at opposite sides from each other - if you do them on the same side, you have made a wing, not a prop!). I do this at the beginning of carving after I have shaped the slug. If I don't, I forget what I am doing and foul it all up. In essence, you leave alone the leading edge of the blades, and cut by the trailing edge. Now you have done these initial cuts, you know for sure which way the prop turns and also now you can see that those two cuts start to make the slug look like a prop (a little bit). Don't try to do it all with the knife, though. You will find that the Coarse Sanding Stick that you either buy, or make yourself, is your best friend here. You may need to thin the shaped slug (let's call it a 'shape'). I usually get a nice face on the prop first. Then I worry about the back of the prop. With patience, you get more and more propeller-like results. As you notice that you have sanded into areas where the thin CA hasn't penetrated, add amounts of the thin CA. Allow it a few minutes to cure, or use kicker. You want to keep the wood 'plasticized'. I usually get a nice face on the prop first. Then I worry about the back of the prop. With patience, you get more and more propeller-like results. As you notice that you have sanded into areas where the thin CA hasn't penetrated, add amounts of the thin CA. Allow it a few minutes to cure, or use kicker. You want to keep the wood 'plasticized'.
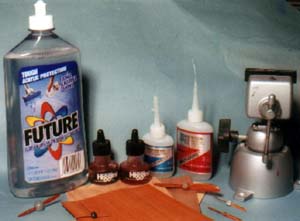
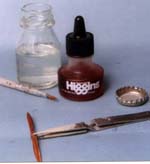 Finally, you will have your propeller fairly-well shaped. Notice that wooden props have a thick, rich varnish on them. The varnish was a protectant, but also had the effect of making the prop's wood grain and laminates stand out. For this, I Finally, you will have your propeller fairly-well shaped. Notice that wooden props have a thick, rich varnish on them. The varnish was a protectant, but also had the effect of making the prop's wood grain and laminates stand out. For this, I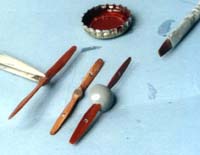 sand the propeller with increasingly fine grades of sandpaper. Then I make a 'varnish' out of Future floor wax and Drafter's inks. The most useful ink colors I have are all translucent reds, oranges, browns and grays. Black is usually too overpowering, as is white. I mix the varnish to where it's not too dark, but not too light either. You can always add more coats. I brush it on, following the wood grain. Decals, photo-etched prop bosses, and – if I am doing a British aircraft – possibly fabric-wrapping or brass sheaths, are added. A coat of regular Future over it all and the prop is done. sand the propeller with increasingly fine grades of sandpaper. Then I make a 'varnish' out of Future floor wax and Drafter's inks. The most useful ink colors I have are all translucent reds, oranges, browns and grays. Black is usually too overpowering, as is white. I mix the varnish to where it's not too dark, but not too light either. You can always add more coats. I brush it on, following the wood grain. Decals, photo-etched prop bosses, and – if I am doing a British aircraft – possibly fabric-wrapping or brass sheaths, are added. A coat of regular Future over it all and the prop is done. This all takes practice, but it is really easier than it sounds. You may find that you enjoy carving props more than the other jobs involved with making your model. Just remember to cut away from yourself whenever possible, and always use brand new blades when necessary. A sharp knife is a safer knife. Fingers don't grow back! And always, whenever there is the possibility of inhaling sawdust, wear a mask. I like to wear my respirator as it scares the bejeezus out of my cats! Have fun making wood chips!  | 


    |