


 ICM/Encore
1/72 nd Polikarpov I-15 bis (I-152)
ICM/Encore
1/72 nd Polikarpov I-15 bis (I-152)

By Matt Bittner
Photography by David Van Wagoner
History
The TsKB-3bis prototype was a development of the successful Polikarpov I-15 fighter of the mid 1930s, and entered service in 1937. The new I-152 (occasionally referred to as the I-15 bis ) was powered by the more powerful M-25V engine, and initially retained the I-15's armament of four PV-1 machineguns. A major re-stressing of the airframe was undertaken, resulting in improved strength and rigidity. The controversial 'gull' wing center-section of the I-15 was replaced by a traditional span carried on 'N' type cabane struts, though the total wing span remained unchanged at 10.0 meters.
Despite a significant increase in power, performance in the I-152 was disappointing, this in part due to the increased drag imparted by the cabane-strut wing arrangement. The I-152 saw limited combat in Spain (as the 'Super Chato'), and an entire Regiment piloted by Soviet aviators flew in Chinese service during the winter of 1937-38 while resisting the Japanese invasion. Though production of the I-152 came to halt during 1938, the type soldiered on in the light attack role well into the first year of the Patriotic War.
The Kit
 Encore's
I-152 is the same exact kit that ICM released a few years ago. The only
differences between the kits are the price – the Encore being less
expensive and lately on sale – and the decal schemes provided with
the kits. While ICM provides all options and all decals for both the wheel
and ski version, Encore broke these up into two kits, with different decals
for the wheel version versus the ski version. ICM contains seven schemes
that neither Encore kit contains. The Encore version with wheels provides
one different scheme, and their ski version also contains one different
scheme than the ICM kit.
Encore's
I-152 is the same exact kit that ICM released a few years ago. The only
differences between the kits are the price – the Encore being less
expensive and lately on sale – and the decal schemes provided with
the kits. While ICM provides all options and all decals for both the wheel
and ski version, Encore broke these up into two kits, with different decals
for the wheel version versus the ski version. ICM contains seven schemes
that neither Encore kit contains. The Encore version with wheels provides
one different scheme, and their ski version also contains one different
scheme than the ICM kit.

Both the wheel and ski versions of the Encore kit contain 47 injected molded pieces and one injected clear windscreen. The version with wheels contains three decal schemes: an I-152 of the Chinese Air Force; an example in Spanish markings (which is the decal option not covered by ICM); and one VVS example. The ski version contains three decal options: a Soviet I-152 captured by the Finns but left in VVS markings (which is the decal option not covered by ICM); a machine marked in Finnish markings; and a VVS bird in Soviet markings.
The exterior finish to this kit is very nice. To-scale panel lines, with an okay fabric effect. Unfortunately, ICM's mold makers were a little heavy handed with the 'fabric weave effect', and this effect must be removed before finishing the model. Otherwise all of this bogus weave will stick out like a sore thumb.
Construction
Before I started on the construction, I naturally dry fit the fuselage halves together. I noticed the gap in the rudder – since it was a single rudder attached to one fuselage half – was significant enough to worry about. To eliminate this gap, I decided to cut the rudder off, and take care of this whole area before adding the rudder back on.
 Naturally
construction starts in the cockpit. ICM provides a most comprehensive
cockpit, especially considering that when the fuselage halves are glued
together little will be seen due to the small cockpit opening. Be very
careful when you cut the tubular structure from the sprue - these are
very delicate and are easily broken. In all the kits I have - both the
ICM and Encore version, since Encore didn't change any of the molds -
most of the holes in the cockpit floor to accept the tubular structure
are not drilled out. I had to place the structure on the floor where I
thought it would go, mark where the structure touched the floor, and then
drill the holes for the structure.
Naturally
construction starts in the cockpit. ICM provides a most comprehensive
cockpit, especially considering that when the fuselage halves are glued
together little will be seen due to the small cockpit opening. Be very
careful when you cut the tubular structure from the sprue - these are
very delicate and are easily broken. In all the kits I have - both the
ICM and Encore version, since Encore didn't change any of the molds -
most of the holes in the cockpit floor to accept the tubular structure
are not drilled out. I had to place the structure on the floor where I
thought it would go, mark where the structure touched the floor, and then
drill the holes for the structure.

When gluing the instrument panel (part B25) to the cockpit structure, be aware that the instructions would have you mount it upside down. The two 'square pieces' on the instrument panel within the "cut out" are actually supposed to represent the gun butts. If you mount it according to the instructions, it makes it look like the kit has two sets of rudder pedals. If you're really pedantic, the instrument panel should also have a slight bend at the outer edges. However, it's hardly noticeable when the cockpit is glued in and fuselage halves joined.
The only items I added to this excellent cockpit were True Details British photoetch seat belts.
 As
I was painting and working on the cockpit, I simultaneously worked on
the forward fuselage/engine/cowl assembly. Since this whole area is separate
from the rest of the fuselage, you can build it as a separate sub-assembly.
After painting the engine, then line up each piece of the cowl and glue.
There were some gaps in this area, again dealt with using putty.
As
I was painting and working on the cockpit, I simultaneously worked on
the forward fuselage/engine/cowl assembly. Since this whole area is separate
from the rest of the fuselage, you can build it as a separate sub-assembly.
After painting the engine, then line up each piece of the cowl and glue.
There were some gaps in this area, again dealt with using putty.

Once the cockpit was in, the fuselage halves were joined. Whatever you do, don't sand the fuselage halves like they were vacuformed fuselages. Even the slightest bit of sanding will throw the fit off the rest of the kit. Trust me on this. Whatever gaps there are - which weren't many except on the underside rear fuselage – are best dealt with putty and/or CA. After the fuselage halves were dry, I then worried about the rear tail/rudder area. The hinges on this area were significant, so these were added using plastic strip. The center portion that looks like a hinge was actually a place where a control rod connecting each stabilizer passed. This too was built up using strip stock, then drilled out to accept a plastic rod to connect the stabs.
 Assembly
now turned to the bottom wing. Unfortunately the worst fit of the entire
model is in this area. I had to use plenty of putty to blend in the rear
fuselage/rear wing area. Some gap filling did need to be done on the roots,
but not as much as the rear-most area.
Assembly
now turned to the bottom wing. Unfortunately the worst fit of the entire
model is in this area. I had to use plenty of putty to blend in the rear
fuselage/rear wing area. Some gap filling did need to be done on the roots,
but not as much as the rear-most area.

As I mentioned above, be sure to sand off all the bogus 'fabric weave' on all parts. Some of the parts on my kit were also nicked and scratched in some areas, and some of these areas actually needed to be filled. Not a big deal, but something to be aware of.
After the lower wing was all set to go, the horizontal tailpieces were added. Once these were puttied and sanded then the tail struts were added. Before painting I decided to check out the interplane struts to see how fit was here. Not good and there is a gap to fill. Normally I fit the interplane struts after painting, but needed to glue them on - and eliminate the gaps - before painting. Actually this wasn't a big deal, since the struts are so big, and since I used liquid cement on them they were very strong and held up to the normal painting "abuse".
Final Assembly and Painting
 Painting
now commenced. I wanted a white over blue scheme; unfortunately, there
aren't a lot of them for I-152s. I was only made aware of one for sure,
and can't seem to find any references for the white/blue scheme for the
ICM/Encore example. So, being the type that likes to model known planes,
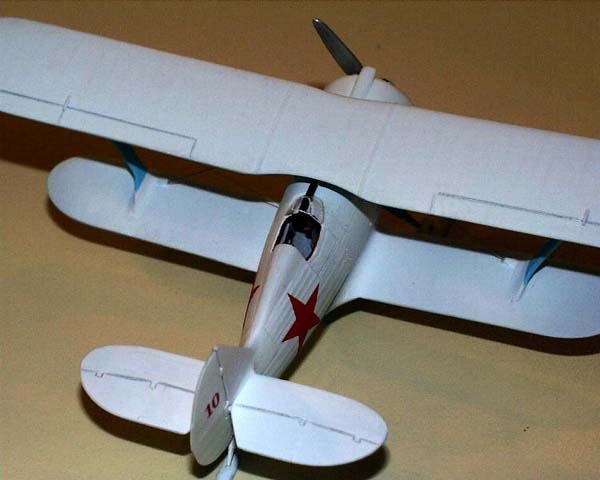
I settled for the scheme with a reference. The stars were the decals supplied
with the Encore kit, while the red '10s' were ALPS printer generated.
Painting
now commenced. I wanted a white over blue scheme; unfortunately, there
aren't a lot of them for I-152s. I was only made aware of one for sure,
and can't seem to find any references for the white/blue scheme for the
ICM/Encore example. So, being the type that likes to model known planes,
I settled for the scheme with a reference. The stars were the decals supplied
with the Encore kit, while the red '10s' were ALPS printer generated.

Paint was all Polly Scale, and since the reference stated this was a very clean machine, very little weathering was done.
Once the painting was done, I then attached the upper wing to the interplane struts. As I suspected, there was also a gap on the interplane strut-to-upper wing join. Luckily and unlike the lower wing, the gap was on the outside, so filling and sanding was a bit easier. Unfortunately this meant more masking to re-spray this area with blue.
Since the kit supplied windscreen wasn't too clear and too thick for the scale, a new one was made by heating and 'squashing' clear plastic sheet over the original.
 The
kit supplied center struts would not line up correctly on the model. I
cut off the forward 'leg' of the strut, and after thinning the remaining
'V' glued that to the assembly, then followed with Contrail struts for
the forward 'leg'. After the final dullcoat was sprayed the windscreen,
sight, propeller and spinner were attached. Rigging was accomplished using
.005 stainless steel 'surgical' wire. The 'springs' on the skis were built
up using the same material. A longer piece was used for the middle, while
two smaller pieces were used for the outside 'springs'. Holes were drilled
into the skis to accept the 'springs' The forward 'springs' need to look
like they're being stretched, while the rear-most need to look like they're
'sagging'. These springs were used to keep the skis level in flight.
The
kit supplied center struts would not line up correctly on the model. I
cut off the forward 'leg' of the strut, and after thinning the remaining
'V' glued that to the assembly, then followed with Contrail struts for
the forward 'leg'. After the final dullcoat was sprayed the windscreen,
sight, propeller and spinner were attached. Rigging was accomplished using
.005 stainless steel 'surgical' wire. The 'springs' on the skis were built
up using the same material. A longer piece was used for the middle, while
two smaller pieces were used for the outside 'springs'. Holes were drilled
into the skis to accept the 'springs' The forward 'springs' need to look
like they're being stretched, while the rear-most need to look like they're
'sagging'. These springs were used to keep the skis level in flight.
Conclusion
Although there was a little work involved, I think this is a great kit and is worth building a couple more. Personally I feel the gull winged aircraft (I-15, I-153, Curtiss F9C-2 Sparrowhawk, etc. as well as the WW1 Rolands) are the easiest biplanes to build. However, the ICM/Encore I-152 is probably the easiest non-gull wing biplane due to the large interplane struts and positive attachment points.
I would like to thank Erik Pilawskii of the Modeling the Aircraft of the Soviet VVS web site for all the help.
References
-
Squadron/Signal, Polikparpov Fighters in action, Pt. 1 (for the photographs only )
-
Polygon Warbird No.1, I-5, I-15, I-15 bis


Previous: Contents

